> ## Documentation Index
> Fetch the complete documentation index at: https://docs.encord.com/llms.txt
> Use this file to discover all available pages before exploring further.
# Hosting with Modal
[Modal](https://modal.com/docs) provides a serverless cloud for engineers and researchers who want to build compute-intensive applications without thinking about infrastructure.
The cloud service is well suited for building and hosting Encord Custom Agents.
This example places a bitmask "ball" in the center of an image in the Label Editor.
See the Custom Agent [examples](/agents-documentation/Custom-Agents/Examples) for more sophisticated use cases.
Everything in the *FastAPI examples* can also be done using Modal, as Modal acts as a wrapper around FastAPI.
This page is not intended to explain everything that [Modal](https://modal.com/docs) can do -- as it does a lot --, but it does provide a working example.
For a complete code example, go [here](https://github.com/encord-team/encord-agents/blob/main/docs/code_examples/modal/editor_add_bitmask.py).
## STEP 1: Authentication
You need to [authenticate](/agents-documentation/Basics/Authentication) with Encord first.
Once you have a private access key (preferably corresponding to a service account), you must also ensure that you have [signed up for Modal](https://modal.com/signup).
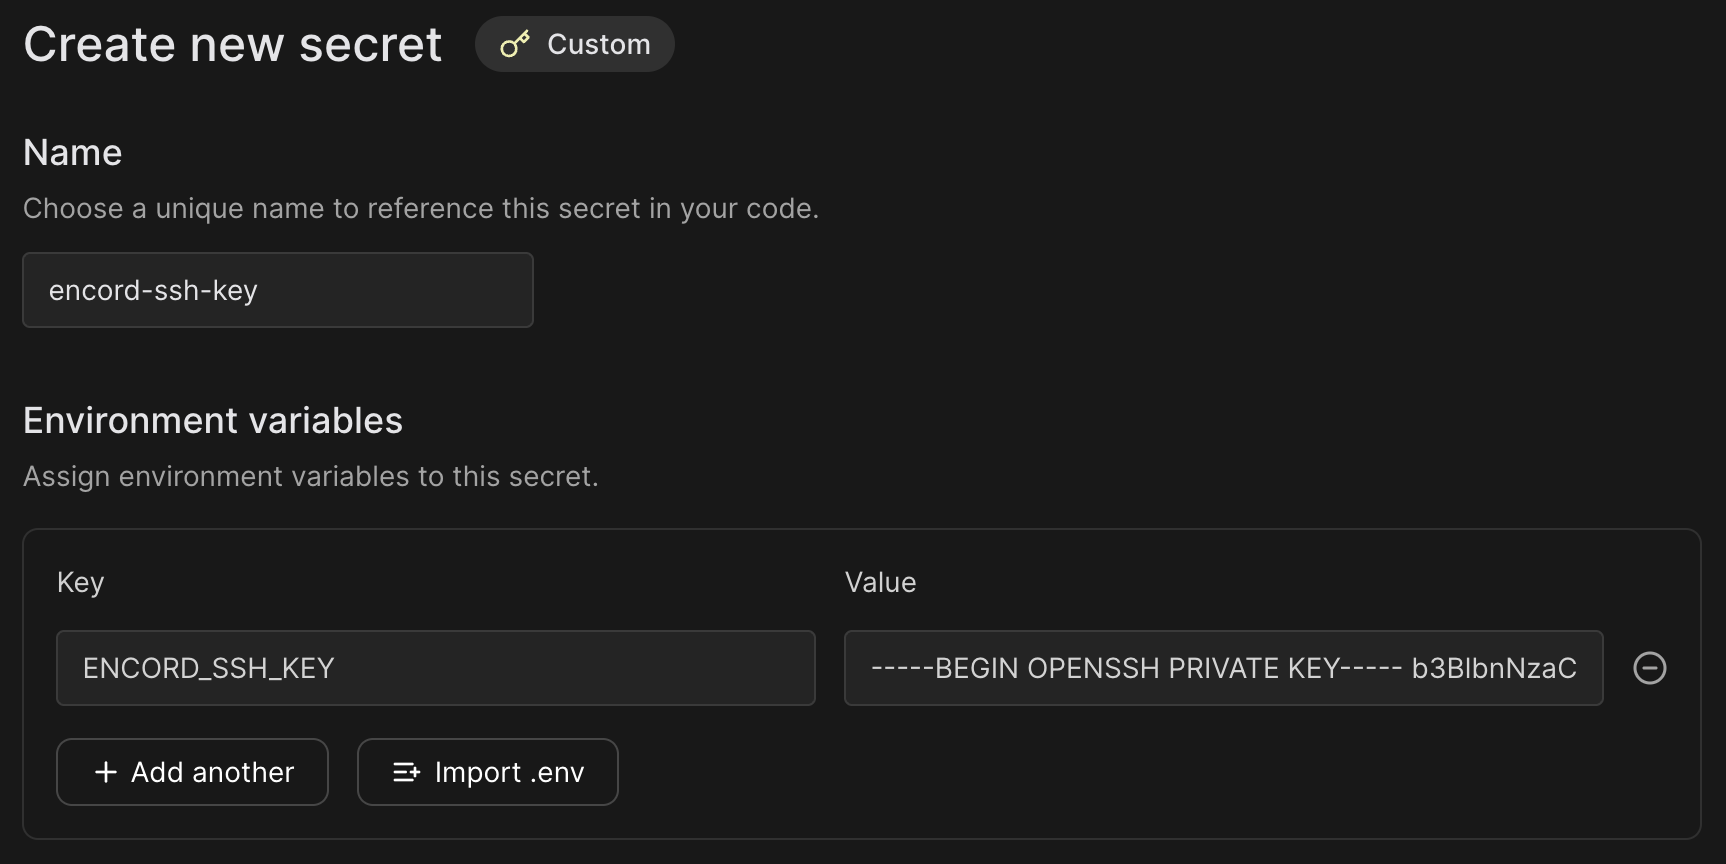
Now you can configure the secret:
1. Go to `https://modal.com/secrets`.
2. Click "Create new secret".
3. Choose the "Custom" option.
4. Name it `encord-ssh-key` (you can choose the name but it needs to match the name in the code below).
5. Add an environment variable names `ENCORD_SSH_KEY` with the content of your private access key file. Similar to the figure below.
This setup allows `encord-agents` to authenticate with Encord using the provided key.
## STEP 2: Installation
Ensure that you have installed `encord-agents` and `modal`:
```shell theme={"dark"}
python -m venv venv
source venv/bin/activate
python -m pip install encord-agents modal
```
## STEP 3: Inspecting the Modal Template
Now you need a template for creating an endpoint that can be used for defining a Custom Agent.
The following example:
1. **Creates a Docker Image** – We define a container that includes all necessary dependencies:
* `encord-agents`: The library for building agents
* `modal`: For hosting the agent
* `libgl`: Required by `opencv`
Modal automatically handles setting up this container for you.
2. **Defines an App** – We create a FastAPI application to manage the agent's endpoints.
3. **Sets Up Authentication** – We add an endpoint that uses an access key for authentication.
* The access key should be stored as `ENCORD_SSH_KEY`.
* `encord-agents` automatically detects this key and use it to authenticate with the Encord SDK.
4. **Implements the Agent Logic** – defines what the agent should do when triggered.
* Check out [these examples](/agents-documentation/Custom-Agents/Examples#fastapi-examples) to see different ways to customize your agent.
Since this is a FastAPI route, you can also take advantage of built-in dependencies from [`encord_agents.fastapi.dependencies`](/agents-documentation/Reference/Custom-Agents/Agents-Reference-Custom-Agents#dependencies-3) to simplify your setup.
```python theme={"dark"}
from typing_extensions import Annotated
from fastapi import Depends
from encord_agents.fastapi.dependencies import LabelRowV2, dep_label_row
from encord_agents import FrameData
import modal
# 1. Define the docker image to run the code.
image = (
modal.Image.debian_slim(python_version="3.12")
.apt_install(
"libgl1",
"libglib2.0-0",
).pip_install(
"fastapi[standard]",
"encord-agents",
)
)
# 2. Define the app to hold the endpoint
app = modal.App(name="encord-agents-add-ball", image=image)
# 3. Define the endpoint with access to the secret that we set up.
@app.function(secrets=[modal.Secret.from_name("encord-ssh-key")])
@modal.web_endpoint(method="POST")
def put_ball_on_image(
frame_data: FrameData,
label_row: Annotated[LabelRowV2, Depends(dep_label_row)],
):
# 4. The agent logic goes here
# This is really a FastAPI endpoint ✨
...
```
Next, you must define some logic to go into the agent.
## STEP 4: Defining the Agent
The following example adds a circular bitmask in the middle of the current frame.
However, it could easily be running your own model ([even on the GPU](https://modal.com/docs/guide/gpu)).
In the function definition of your route, add the following code to:
1. Ensure that the Project's Ontology has a bitmask object. If it does not, there's nothing to do here.
2. Ensure that the task is a visual data unit (an image, image group, image sequence, or video).
3. Places a bitmask with the appropriate shape and fills in a sphere.
4. Adds the bitmask to the label row.
5. Saves the labels.
```python theme={"dark"}
@app.function(secrets=[modal.Secret.from_name("encord-ssh-key")])
@modal.web_endpoint(method="POST")
def put_ball_on_image(
frame_data: FrameData,
label_row: Annotated[LabelRowV2, Depends(dep_label_row)],
):
# 1. Find the first bitmask ontology object
# Exit if no one is found
bitmask_object = next(
(o for o in label_row.ontology_structure.objects if o.shape == Shape.BITMASK),
None,
)
bitmask_object = next((o for o in label_row.ontology_structure.objects if o.shape == Shape.BITMASK), None)
if not bitmask_object:
return
# 2. Ensure we can read image width/height
# Otherwise, it's probably not a vision asset
w, h = label_row.width, label_row.height
if w is None or h is None:
return
# 3. Construct bitmask with ball in the center
cw, ch = w//2, h//2
radius = min(cw, ch) // 2
mask = np.zeros((h, w), dtype=np.uint8)
cv2.circle(mask, (cw, ch), radius, 255, -1) # type: ignore
# 4. Add it as a label
ins = bitmask_object.create_instance()
ins.set_for_frames(
frames=frame_data.frame,
confidence=0.8,
coordinates=BitmaskCoordinates(mask > 0)
)
label_row.add_object_instance(ins)
# 5. Save update
label_row.save()
```
Upon completion, the `encord_agents` library sends a 200 response to the Label Editor, causing the editor to refresh its state. The result is a sphere in the middle of the image.
## STEP 5: Testing the Agent
To test the agent, there is a dedicated CLI tool.
You must first run the agent locally (with your Python environment sourced).
Assuming that the python file you created is named `example.py`, you can run:
```shell theme={"dark"}
modal serve example.py
```
The command should print a url similar to this
```
└── 🔨 Created web function put_ball_on_image =>
https://-put-ball-on-image-dev.modal.run
```
Let's call it ``.
Now, go to the Encord Label Editor in your browser, viewing an asset for which you would like to test your agent.
Copy the url; let's call it ``.
It should follow this pattern:
```
https://app.encord.com/label_editor///
```
With the endpoint running, you can from another terminal window run:
```
encord_agents test custom '' ''
```
Where you replace the `` and the `` with the relevant urls.
You should see a green box detaining the request and the response.
If the status code is 200, refresh your browser to see the new bitmask in the Label Editor.
## STEP 6: Deployment
When you are done developing your agent, run the following to deploy your agent.
```shell theme={"dark"}
modal deploy example.py
```
Copy the displayed url and configure it in the Encord platform by following [the documentation](/platform-documentation/Annotate/automated-labeling/annotate-agents-overview).
Once that is done, you can right-click the frame in the Label Editor to trigger the agent.