> ## Documentation Index
> Fetch the complete documentation index at: https://docs.encord.com/llms.txt
> Use this file to discover all available pages before exploring further.
# Project Settings
The Project Settings are accessed using the *Settings* tab of your Project. The *Settings* tab is only visible to Project Admins and Team Managers.
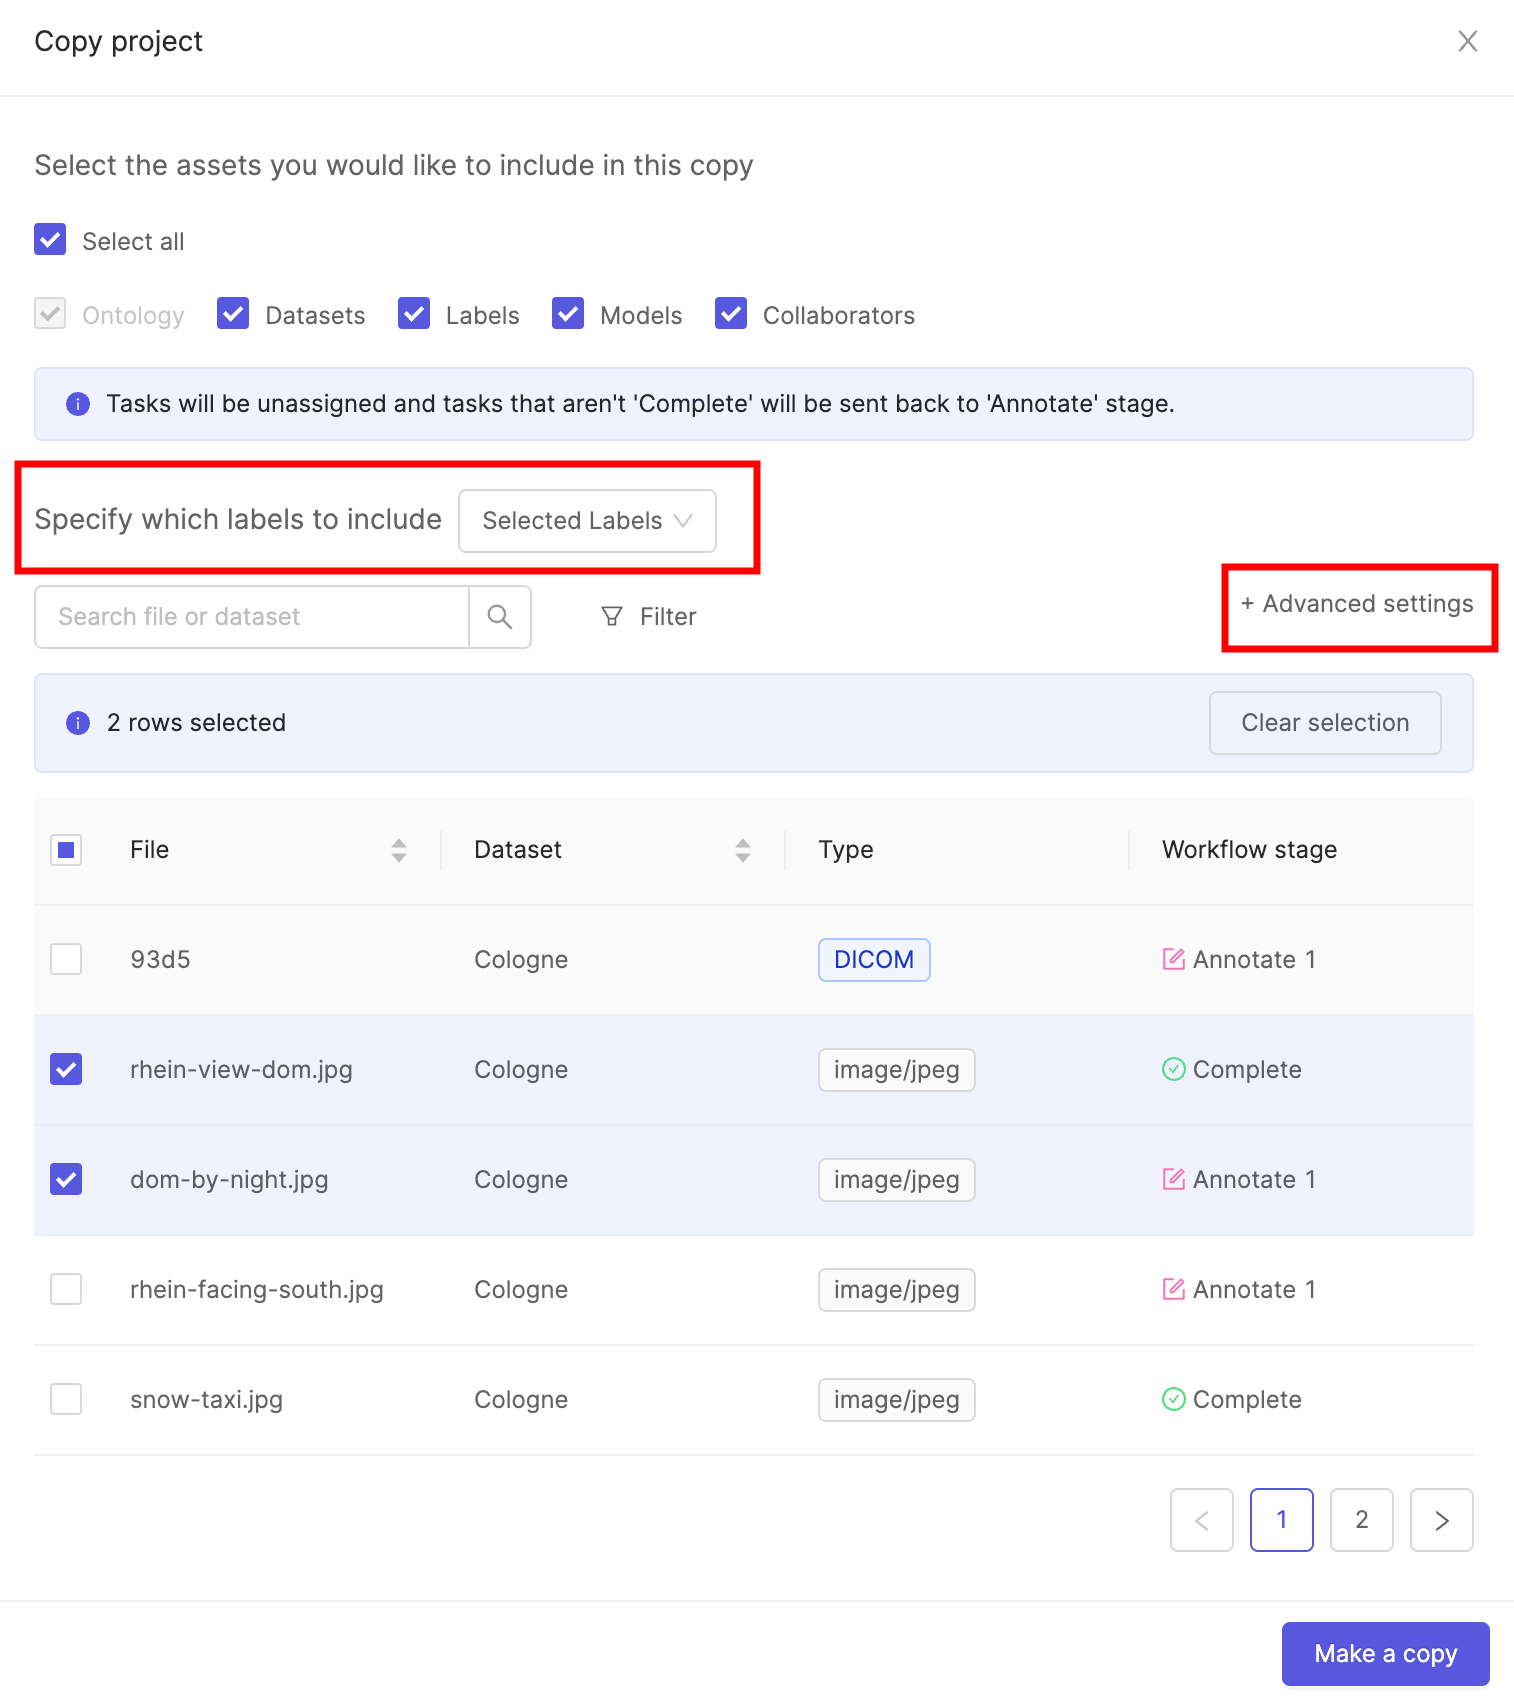
## Copy Project
To copy a Project:
1. Click the **Copy project** button in the *Options* section of the Project's *Settings*.
2. Select the components of the Project you want to copy into the new Project. The Ontology must be copied and is therefore always selected. All components of the current Project are selected by default.
You can copy any combination of the following assets:
* **Datasets** – All Datasets are copied.
* **Labels** – Copies labels in specified data units. By default, all labels are included. To copy only specific labels, select *Selected Labels* from the dropdown. Click **+Advanced settings** to filter labels by status.
* **Models** – Copies all models in the Project, including their training logs.
* **Collaborators** – Copies all Project users along with their roles. Project admins are always included.
3. Click the **Make a copy** button to copy the Project with the specified components.
***
## Upload Annotation Instructions
1. Navigate to the *Settings* tab of your Project.
2. Click the **Upload file** button to upload instructions for your annotators. Both PDF and video files are supported (`.mp4`, `.webm`, `.mov`, `.avi`, `.mkv`).
To ensure the best possible results, provide as much detail as possible about what you would like annotated and how precise bounding boxes should be drawn. For example, instead of saying 'person', consider defining what should constitute a person for your annotators - only a full person? A torso? Or should any part of a person in a frame be labeled as a 'person'? The more specific your annotator instructions, the higher the chances that your annotators perform well.
Once uploaded, annotation instructions are accessible within the Label Editor, and the Workflow tab of your Project. PDF instructions are displayed as an embedded document, while video instructions play automatically in the Label Editor.
***
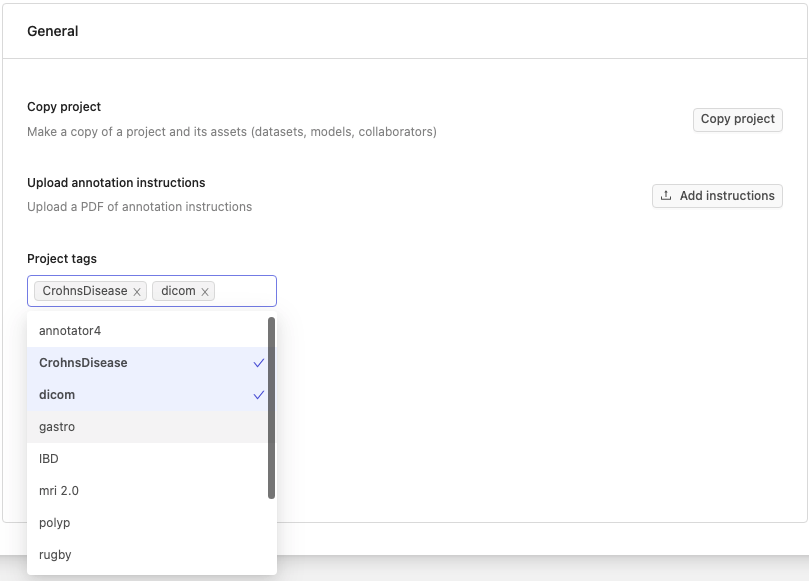
## Project Tags
Project tags are created and managed on the [Workspace level](/platform-documentation/General/general-workspace-settings#project-tags-tab). Once created for the Workspace they can be added to individual Projects.
Project tags allow you to:
* Flexibly categorize and group your Projects.
* Filter your list of Projects by tag.
**To add or remove Project tags**:
1. Navigate to the Settings tab in a Project and click the *Project tags* drop-down.
All available tags in your Workspace are shown.
2. Click on a tag to add it to a Project.
Remove a tag from your Project by clicking the same tag again, or clicking the **x** button next to its name.
***
## Issue Tags
Issue tags can be created and managed on the [Workspace level](/platform-documentation/General/general-workspace-settings#issue-tags-tab) by Workspace admins, or on the Project level by Project admins.
A complete walkthrough of all things Issues and Comments related can be found [here](/end-to-end/Features/issues-e2e).
Issue tags allow you to:
* Flexibly categorize and group your [issues](/platform-documentation/Annotate/annotate-label-editor/annotate-label-editor-review#comments-and-issues) within Projects.
* Get [insights on issues](/platform-documentation/Annotate/annotate-projects/annotate-project-analytics#issues) being created by collaborators.
**To add or remove Issue tags from Projects**:
1. Navigate to the Settings tab for a Project and click the *Issue tags* drop-down.
All available tags in your Workspace are shown.
2. Click on a tag to add it to the Project.
3. (Optionally) Create a new tag by typing the name of the tag and hitting ENTER.
Remove an issue tag from your Project by clicking the same tag again, or clicking the **x** button next to its name.
***
## Ontology Settings
You can view or switch the Ontology attached to your Project.
Changing the Ontology can render existing labels invalid and lead to data inconsistency.
* Click the **Switch ontology** button to switch the Ontology linked to your Project. The resulting pop-up allows you to choose an existing Ontology from a list, or [create a new Ontology](/platform-documentation/Annotate/annotate-ontologies/annotate-create-ontologies) for this Project.
* Click the **View ontology** button to view the details of the Ontology that is attached to the current Project.
***
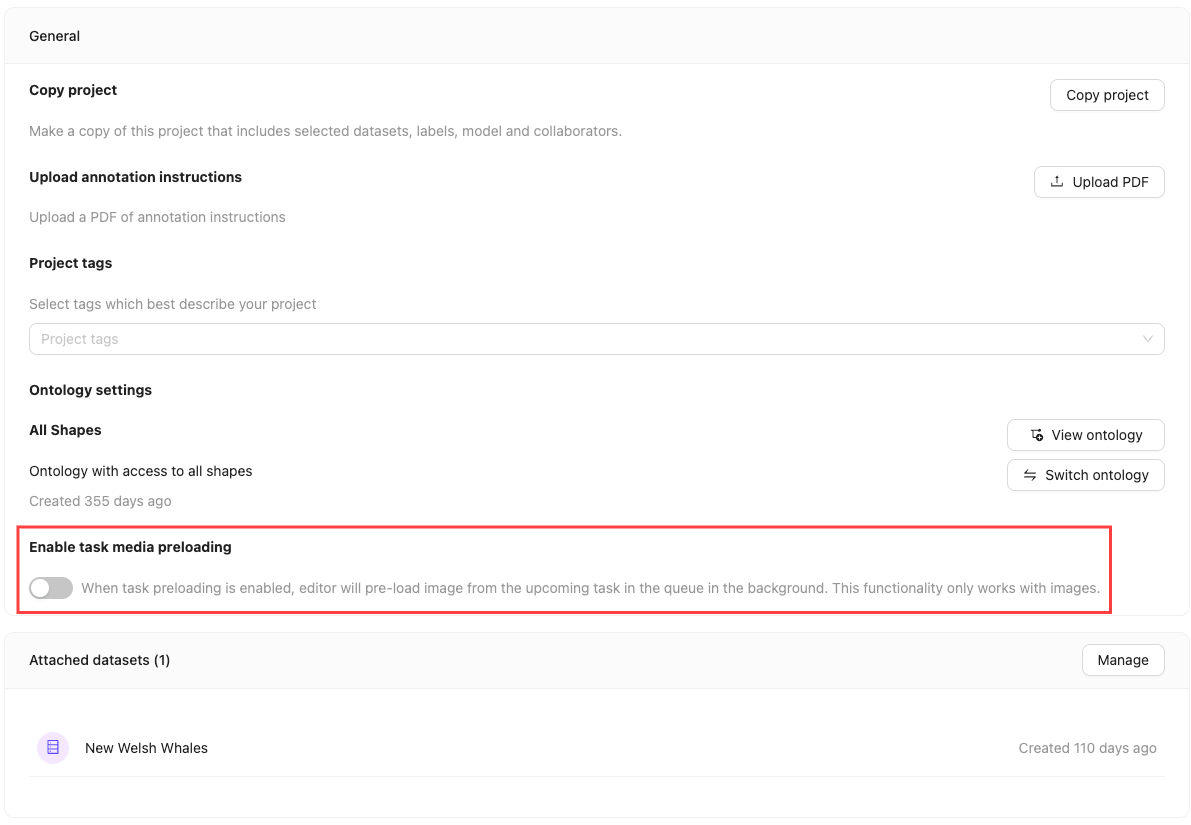
## Preload Next Task
Turning on the `Enable task media preloading` feature preloads the next task in the background while the user is working in the Label Editor. This reduces wait times for the next task after submitting a task. This setting is disabled by default.
When enabled, the preloaded task is automatically assigned to the user, preventing others from initiating it.
* This feature is supported for single images and videos.
* Only the media file is preloaded. Labels are not preloaded.
***
## Hide Annotator Usernames
Enable this setting to hide annotator usernames and emails during consensus review. When enabled, annotator identities are replaced with "Hidden user" labels and anonymous avatars throughout the Label Editor.
**To enable or disable this setting**:
1. Navigate to the *Settings* tab of your Project.
2. In the **General** section, toggle the **Hide annotator usernames** switch.
This setting only affects the display of annotator identities in consensus review mode. It does not impact task assignment, project permissions, or other functionality.
When this setting is enabled, all annotator-specific visual elements (usernames, emails, avatar colors) are anonymized to maintain reviewer objectivity during consensus evaluation.
***
## Change Datasets Attached to a Project
The *Datasets* section of the *Options* pane shows all the Datasets attached to a Project.
**To add Datasets**:
1. Click **Manage**.
2. Navigate to *All datasets*.
3. Click **Attach** next to the Dataset(s) you want to add to the Project.
**To remove Datasets**:
1. Click **Manage**.
2. Ensure the *Attached* section is displayed.
3. Click **Detach** next to the name of the Dataset you want to remove from the Project.
***
## Required Segmentation Coverage
Specify the minimum percentage of cloud points that must be covered by segmentations, in a 3D scene frame, before a task can be submitted. Depending on your use case, this can help ensure annotation quality for point cloud segmentation tasks.
Specify **0** to disable this requirement.
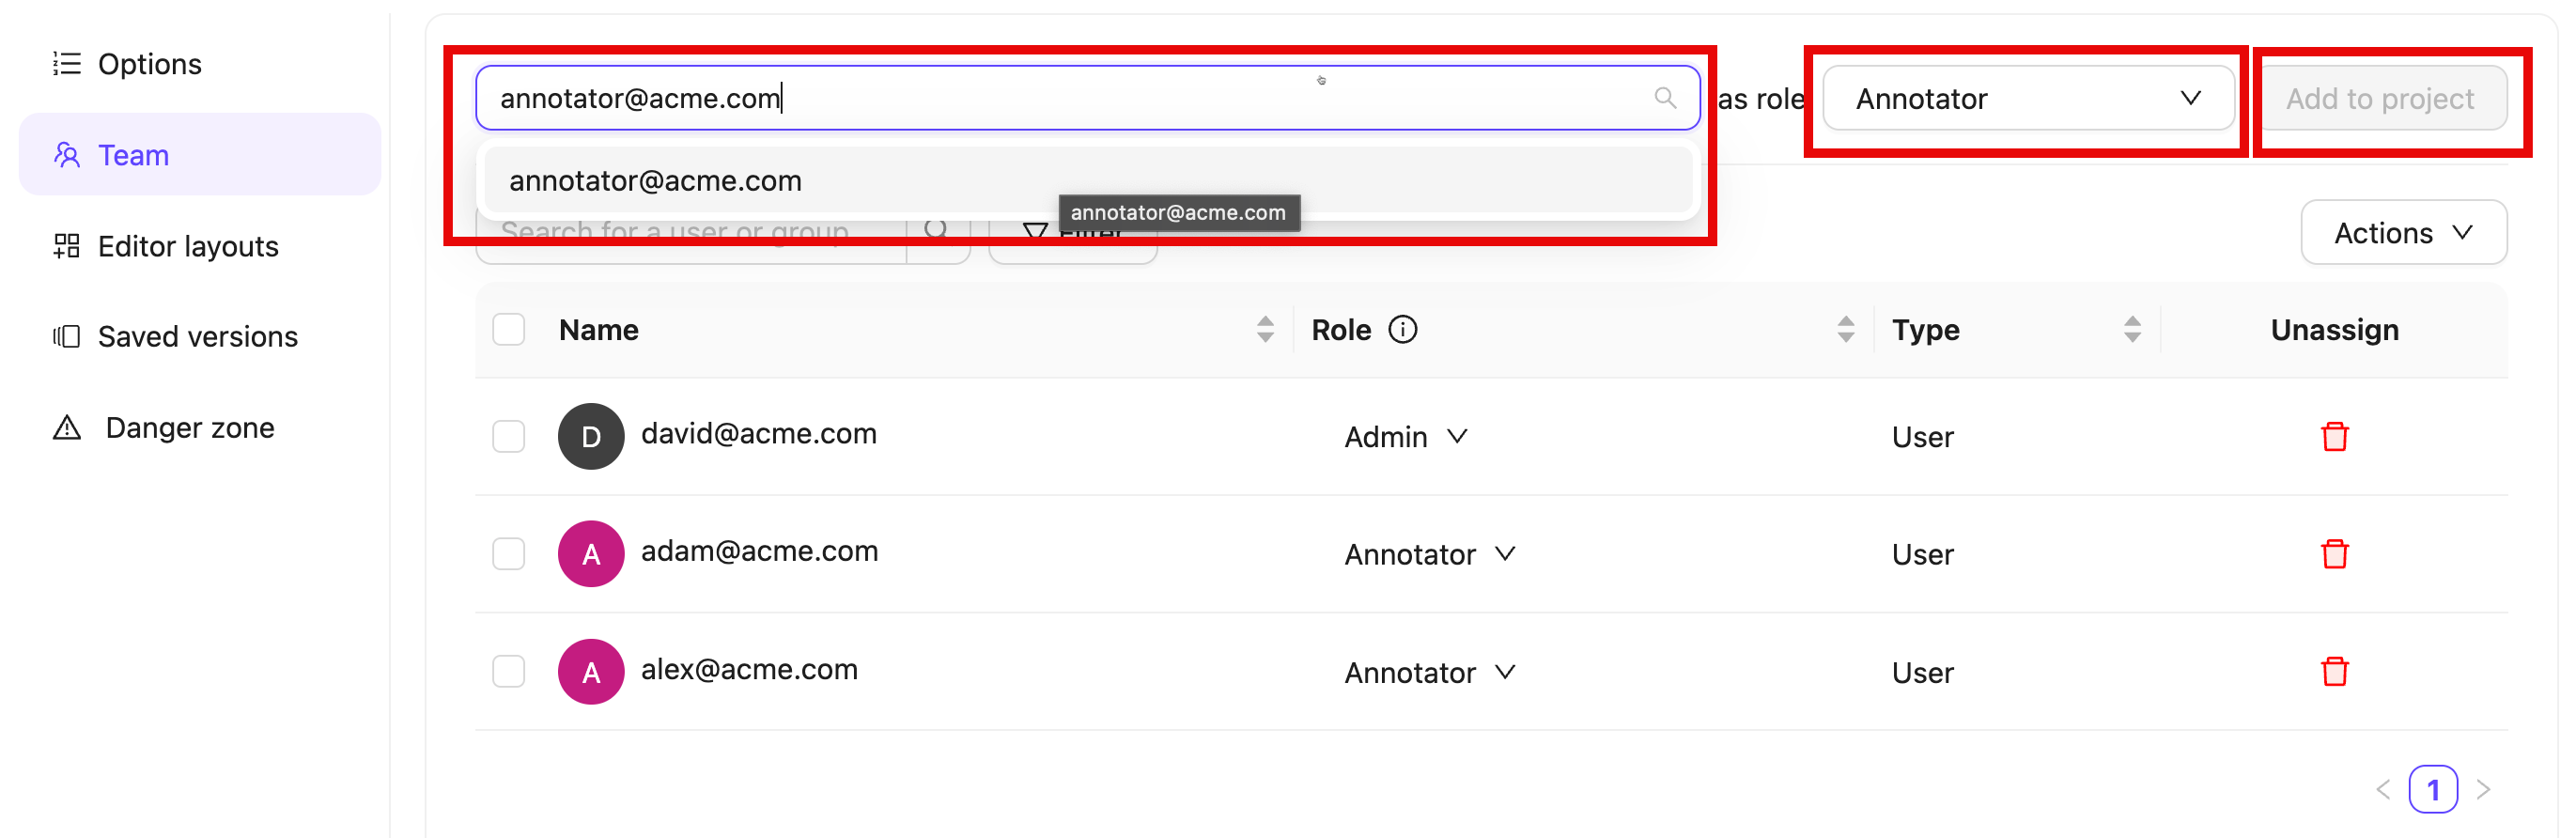
## Manage Project Collaborators
To manage Project collaborators, select the *Team* pane in your project *Settings*. Collaborators can be added individually or as [groups of users](/platform-documentation/General/general-workspace-settings#user-groups).
**To add collaborators to a Project**:
1. Search for the collaborator or the [group](/platform-documentation/General/general-workspace-settings#user-groups) you want to add. Multiple collaborators and groups can be added at once.
You can invite users who are not part of your Workspace. Invitations to join the Workspace are sent to them, and once accepted, they become Project collaborators. See instructions on how to do this [here](/platform-documentation/General/general-workspace-settings#accepting-invites).
Only group members are added when a group is assigned to a Project. Group managers are not included.
2. Select a user role.
* **Annotator**: Can access and label tasks in all or selected Annotate stages in the Project.
* **Reviewer**: Can access and review tasks in all or selected Review stages in the Project.
* **Annotator & Reviewer**: Performs both annotation and review tasks.
* **Team Manager**: Can access and label tasks in all stages in the Project. Can move, assigns, prioritize tasks to users. Can manage Project collaborators.
* **Admin**: Grants full administrative control over the Project.
3. Click **Add to project**.
To remove a user or group from the Project click the *Delete* icon in the *Unassign* column.
**Import collaborators using a CSV**:
1. Click **Actions**.
2. Select **Import collaborators**.
3. Add the CSV file containing users and their roles.
4. Click **Submit**.
CSV files must be formatted in the following manner:
```csv theme={"dark"}
Email,Role,Group
david@acme.com,Admin,
adam@acme.com,Annotator,
joe@acme.com,Annotator,
```
**To change collaborator roles**:
Only Project Admins and Team Managers can modify collaborator roles. Admin roles cannot be changed, not even by other admins.
1. Click the user role in the *Role* column
2. Select a new role from the dropdown.
You can assign the following roles to collaborators:
* **Annotator**: Labels tasks in the Project.
* **Reviewer**: Reviews and validates labeled tasks.
* **Annotator & Reviewer**: Performs both annotation and review tasks.
* **Team Manager**: Assigns tasks to users and manages Project collaborators.
* **Admin**: Grants full administrative control over the Project. This action is irreversible.
***
## Project Explorer Configuration
All collections and embeddings are lost when reconfiguring the project explorer. This action cannot be undone.
You can reconfigure the explorer settings to adjust how your data is processed and analyzed in your Projects.
**To reconfigure project explorer settings**:
1. Navigate to the *Settings* tab of your Project.
2. In the **Project Explorer Configuration** section, click **Configure**.
3. In the configuration modal, adjust the following settings as needed:
* **Video Sampling Rate**: Set the frame sampling rate for video files
* **Custom Embedding Key**: Specify a custom key for embeddings computation
* **Compute Embeddings**: Enable or disable embeddings computation
* **Compute Advanced Metrics**: Enable or disable advanced metrics computation
4. Click **Configure** to apply the new settings.
The reconfiguration process re-imports your Project data with the new settings. This may take some time depending on the size of your Project.
***
## Delete Project
You can delete your Project by going to the *Danger zone* tab of the Project settings.
To delete a Project, click the red **Delete project** button.
Deleting your Project **does not** delete the Datasets attached to the Project, but it does delete the Project's labels and Ontology.