> ## Documentation Index
> Fetch the complete documentation index at: https://docs.encord.com/llms.txt
> Use this file to discover all available pages before exploring further.
# Basics
Data is structured into folders and subfolders. All files must be placed into folders and cannot be added to the top level / root directory.
***
## Create a Folder
1. Navigate to **Data** > **Files & Folders**
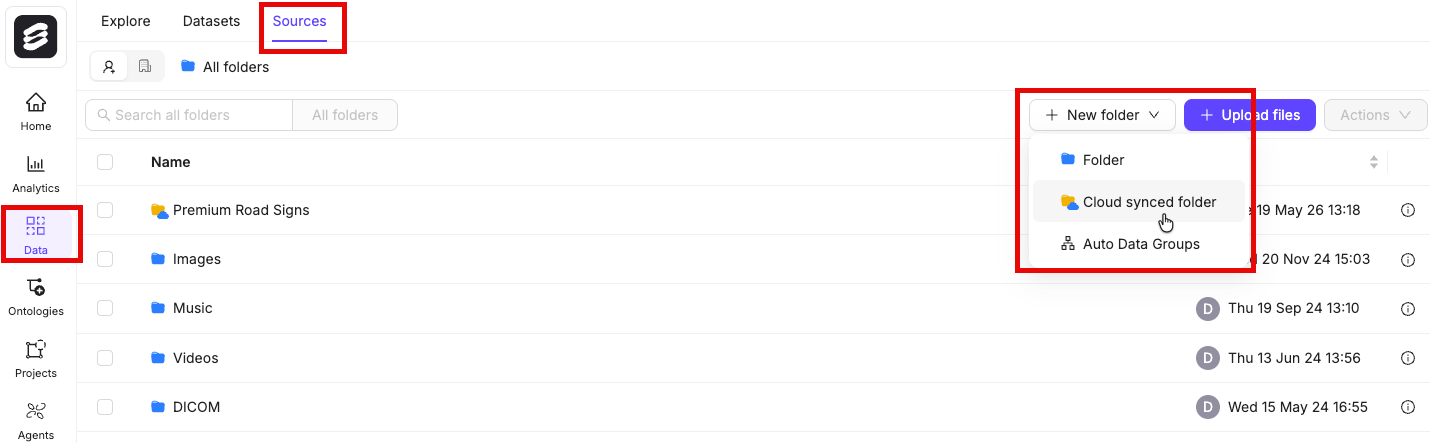
2. Click the **+ New folder** button to create a new folder. Select the type of folder you want to create.
3. Give the folder a meaningful name and description.
4. Click **Create** to create the folder.
The folder is listed in **Files & Folders**.
## Add files to a Folder
1. Navigate to **Data** > **Files & Folders**.
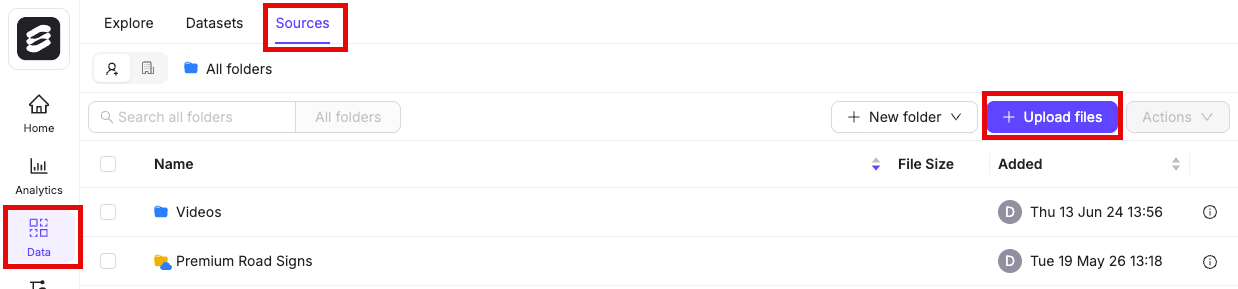
2. Click the **+ Upload files** button
You can also right-click a folder to add data.
3. Select a folder to upload your files to. You can click **+New folder** to create a new folder.
4. Select the type of data you want to add.
* **A** - *Upload* : Drag and drop local images and / or videos. Click **Upload** to finish.
* **B** - *Batch images as* : Create an image group or image sequence from local images. See our section on [creating image groups and image sequences](/platform-documentation/Curate/index-files#create-image-groups-and-image-sequences) for more information. Click **Upload and batch images** to finish.
* **C** - *Audio* Drag and drop local audio files. Click **Upload** to finish.
* **D** - *DICOM* : Create a DICOM series from local DICOM files. Click **Upload** to finish.
To import DICOM files, Encord requires the files to have the following [DICOM tags](https://www.dicomlibrary.com/dicom/dicom-tags/):
Rows
Columns
StudyInstanceUID
SeriesInstanceUID
SOPInstanceUID
PatientID
The following DICOM tags are required to render DICOM images in 3D:
ImagePositionPatient
ImageOrientationPatient
SliceThickness
PixelSpacing
* **E** - *Import from private cloud* : Add any data stored in your cloud storage. At least one [data integration](/platform-documentation/General/annotate-data-integrations) is required to register cloud data. Learn how to upload private cloud data [here](/platform-documentation/Curate/add-files/index-register-cloud-data). Click **Import** to finish.
### Create Image Groups and Image Sequences
Image groups and image sequences are created when you upload files into Encord.
1. Open the *Add data* dialog.
2. Select the *Batch images as* tab.
3. Select *Image group* to create an image group. Select *Image sequence* to create an image sequence.
4. Drag-and-drop the local images you want to batch into an image group or image sequence.
5. Click **Upload and batch images** to create the image group or image sequence.
6. A file representing the image group or image sequence is created in the folder. A new folder appears containing all the constituent images of the image group or image sequence that was created.
* The new folder containing the constituent images is not synced.
* Adding new images to this folder does not add them to the image group or image sequence.
* Files contained in the image group or image sequence cannot be deleted from the folder until the image group or image sequence is deleted.
### Register Cloud Data
We recommend uploading files in batches not exceeding 2GB, to ensure upload does not exceed 3 hours.
To add data from your private cloud you need the following:
* A [private cloud integration](/platform-documentation/General/annotate-data-integrations).
* A [JSON or CSV file specifying the data](/platform-documentation/Curate/add-files/index-register-cloud-data#specify-cloud-data) you want to add from your private cloud.
See our documentation on [data integrations](/platform-documentation/General/annotate-data-integrations), and [adding cloud data](/platform-documentation/Curate/add-files/index-register-cloud-data) for comprehensive guides.
***
## Perform Actions on Selected Files
When you select files in **Data** > **Files & Folders** or **Data** > **Explore**, you can perform various actions on them using the **Actions** button that appears in the toolbar.
1. Select the files you want to perform actions on by clicking on them.
To select multiple files, hold the Shift key and click to select a range, or hold Ctrl (or Cmd on Mac) to select individual files.
2. Click the **Actions** button in the toolbar, or press A on your keyboard.
3. Choose from the available actions:
* [**Add to dataset**](#add-data-to-datasets) — Add the selected files to an existing dataset or create a new dataset
* [**Add to collection**](/platform-documentation/Curate/curation-basics#collections) — Add the selected files to a collection for organization
* **Remove from collection** — Remove the selected files from their current collection
### Add data to Datasets
After data is uploaded to Encord it can be added to one or multiple Datasets.
1. Select the data you want to add to a Dataset.
To add multiple files to a Dataset, bulk-select files by selecting the first file, and then selecting the last file while holding the Shift key on your keyboard.
2. Click the **Actions** button and select **Add to dataset**, or right-click your selection and select **Add to dataset**.
A dialog appears.
3. You have the option to:
* Add data to an existing Dataset by clicking **Add** next to the Dataset's name on the *Existing datasets* tab. You can add data to multiple Datasets.
* Create a new Dataset to add your data. Select the *+New dataset* tab and give the Dataset a meaningful name and description. Click **Add to new dataset** to add the files to the new Dataset.
***
## View, Search, and Manage your Files
Files allows you to search for data units, and view which Datasets each data unit is belongs to.
The global search bar searches all data in Files, irrespective of which folder is currently open.
Click a data unit to see file specific details. Navigate to the *Linked to* tab to see which Datasets this file is added to. Click the details icon next to the Dataset to:
* View the Dataset.
* Remove the selected file from Datasets.
### Delete and Move Files and Folders
Right-click a file, folder, or a selection of multiple files to see the options available to you.
* To delete files and folders, right-click the selection and select **Delete**.
Deleting a file removes it from all Datasets it was added to.
* To move files and folders to a different folder, right-click the selection and select **Move to another folder**. A dialog appears. Start typing the name of the folder, select the folder you want to move the selection to, and click **Move** to confirm.
### Folder Permissions and Activity
Folder details are automatically displayed whenever a folder is:
* Selected
* Open and no data unit is selected
### Manage Folder Collaborators
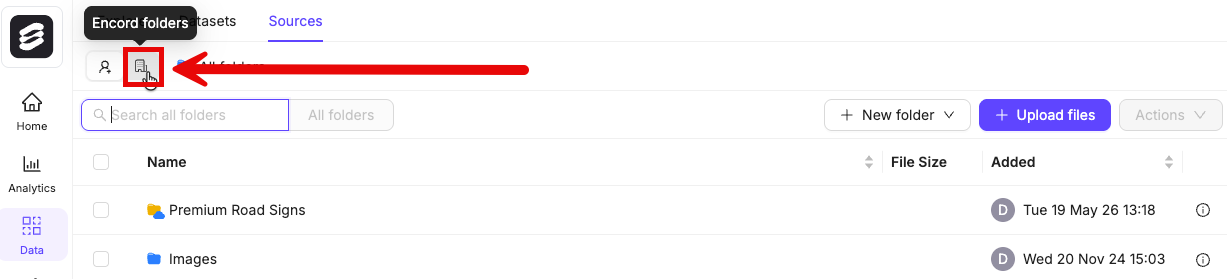
Workspace admins can see all the files and folders created by users in your Workspace.
Click **Manage access** to manage which users within your [Workspace](/platform-documentation/General/general-workspace-settings) can access the folder. A dialog appears with the *Invite* tab open by default.
Select the role you want the users to have, and then start typing their email address into the search bar. Select the user(s) you want to give access to the folder and click **Add** to confirm your selection.
To delete a user from a folder, navigate to the *Manage* tab and click the *Delete* button.
Change a user's access permissions by selecting a new role from the dropdown.
Users with *Admin* permissions cannot be deleted, and their role cannot be changed.
### See All Files in Your Workspace
Workspace admins can access all files stored in their Workspace.
1. Navigate to **Data** > **Explore** in the Encord platform.
2. Click **\[Workspace name] folders**.