> ## Documentation Index
> Fetch the complete documentation index at: https://docs.encord.com/llms.txt
> Use this file to discover all available pages before exploring further.
# Azure Blob
Encord does not currently support Multi-Region Access Points for Azure.
## 1. Set Up the Integration
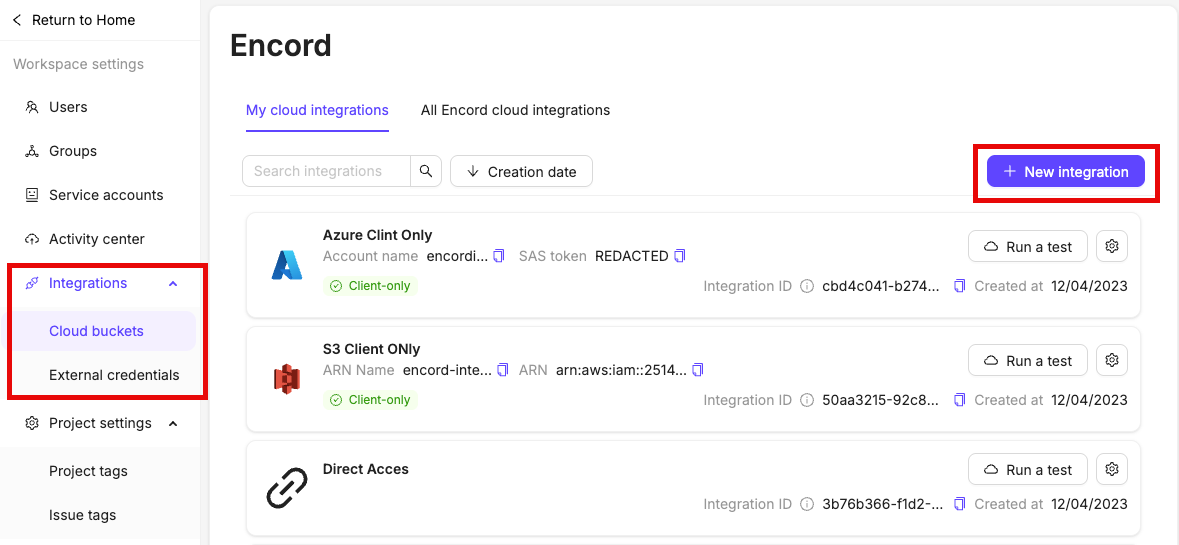
1. In Encord, navigate to the *Integrations* section and click the **Add integration** button.
2. Click on *Azure*.
3. Give your integration a meaningful name.
## 2. Register the Azure Storage Account
1. Paste the name of your Azure storage account into Step 2 of the integration.
## 3. Select Authentication Type
Select your preferred method of authentication in Step 3 the Azure integration window.
* [Shared access signature](#method-1-generate-an-account-level-sas).
* [(Legacy) Azure service principal](#method-2-use-a-service-principal).
## 4. Authenticate Azure
You can authenticate Azure in two different ways:
1. [Generating an account-level shared access signature (SAS)](#method-1-generate-an-account-level-sas).
2. [Using a service principal](#method-2-use-a-service-principal).
Using a service principal to authenticate requires admin privileges for the Azure account.
### Method 1: Generate an Account-Level SAS
1. In [Azure](https://portal.azure.com/#home), navigate to **Storage Accounts** under *Azure services* and select the storage account you wish to integrate.
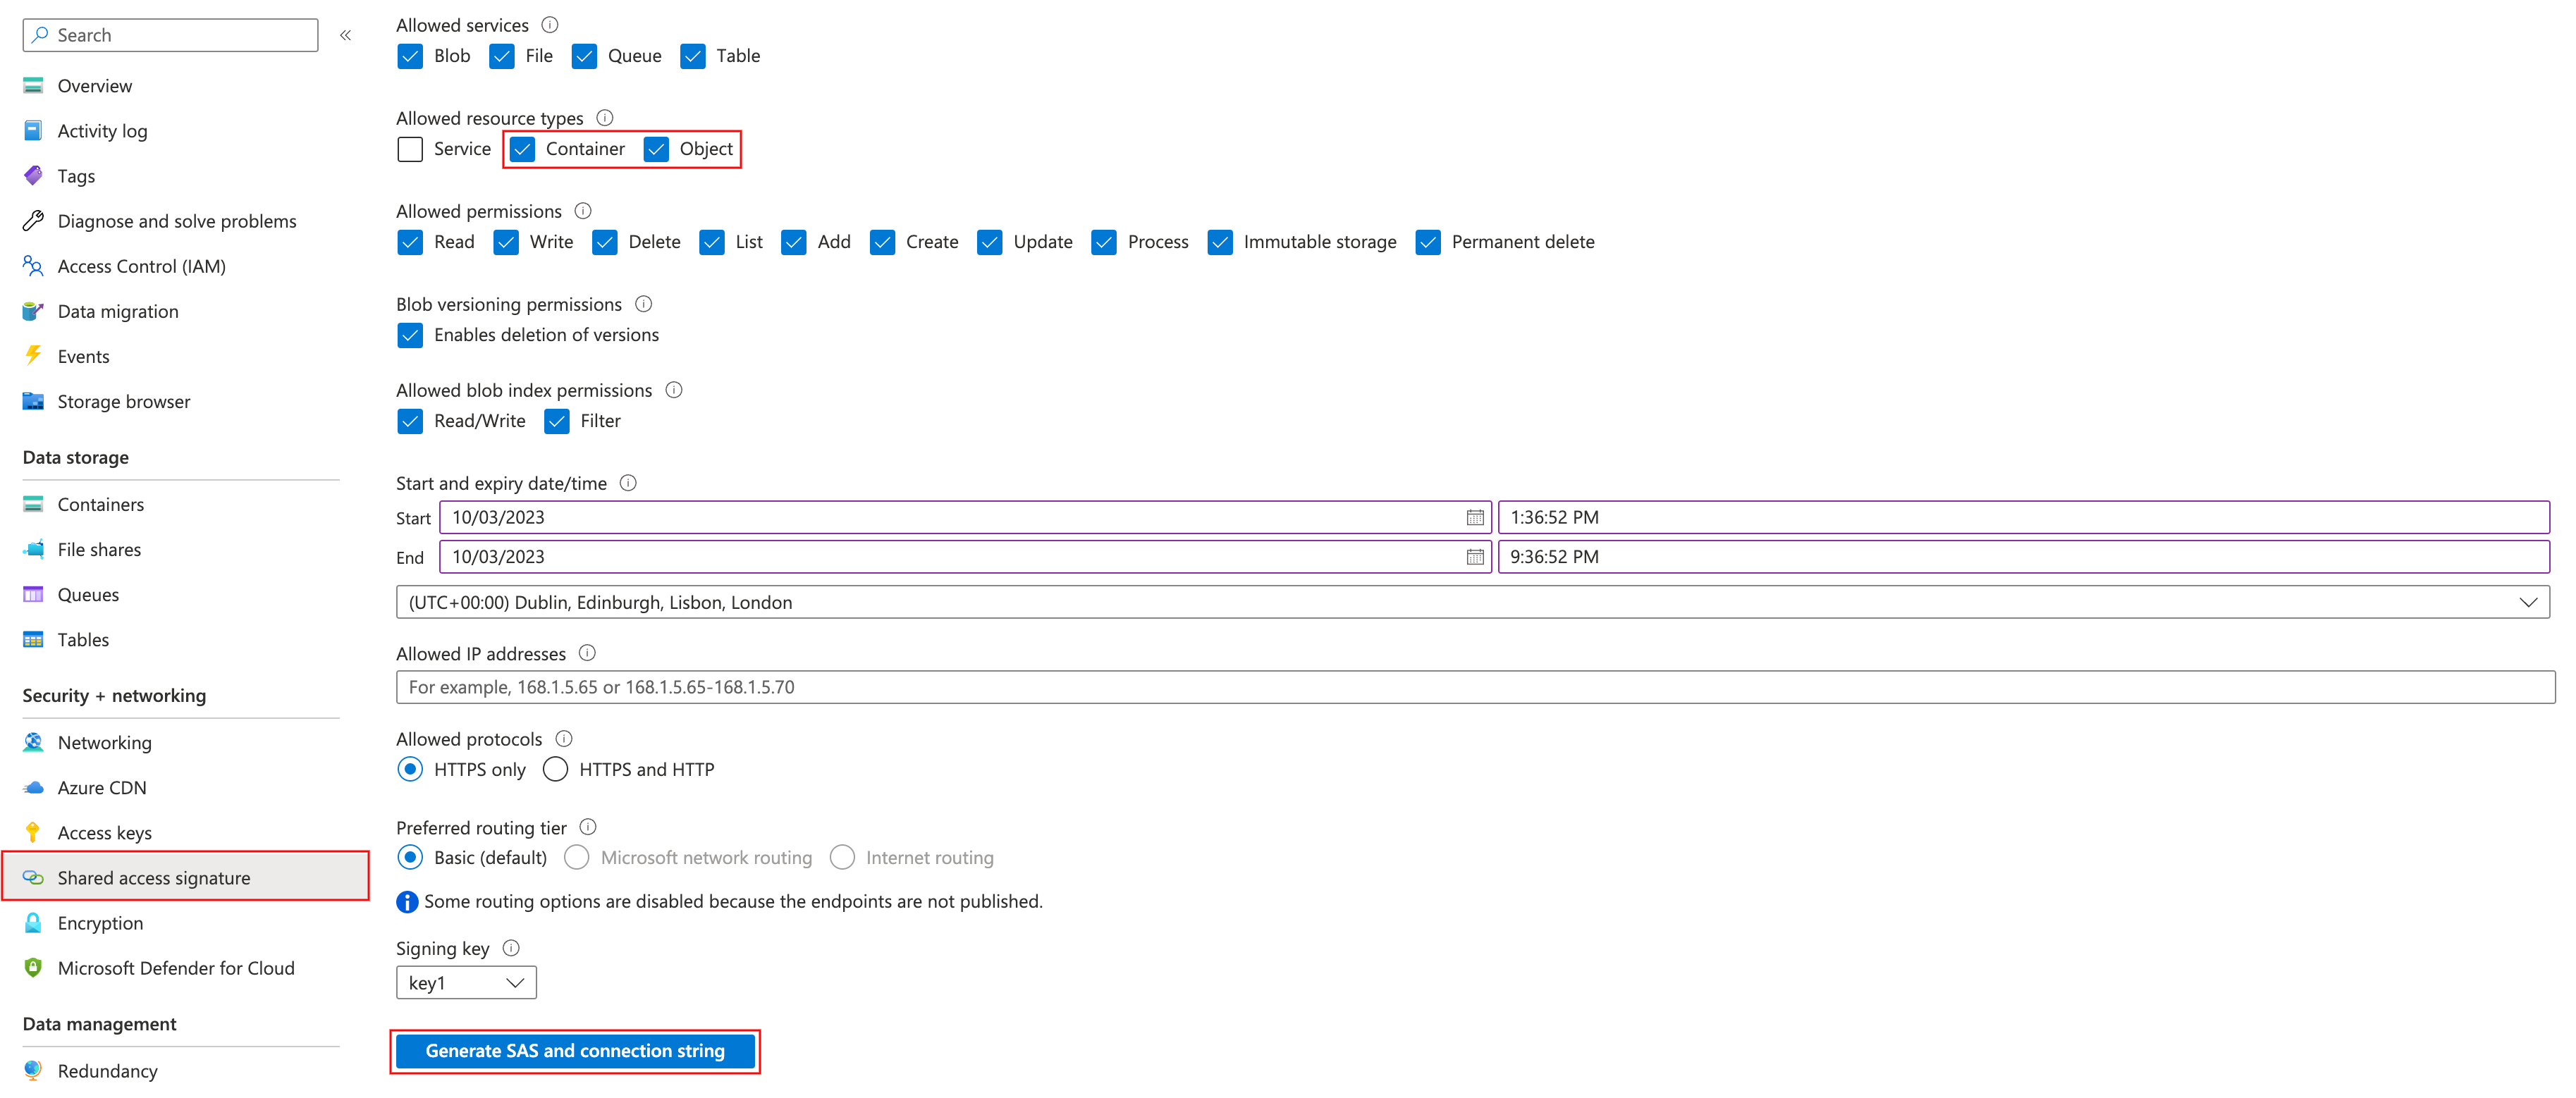
2. Next, click on **Shared access signature** in the *Security + networking* section.
3. You must check the *Container* and *Object* checkboxes under the *Allowed resource types* heading. Ensure you add the necessary permissions:
* Read (required)
* List (required)
* Write (recommended)
* Add (recommended)
* Create (recommended)
*recommended* permissions are necessary to use some of our more advanced features such as [re-encoding data](/platform-documentation/General/general-supported-data#re-encode-videos), and [image sequences](/platform-documentation/General/general-supported-data#image-sequences).
4. Click **Generate SAS and connection string** when you are ready to generate your account-level SAS token.
Your SAS token has a start and end date that can be adjusted, and is valid for the specified time period. Expired tokens must be [updated](#updating-expired-account-level-sas-tokens).
To avoid having to update the token frequently, set the expiration date to be more than one year.
5. Paste the SAS token into Step 4 of the Azure integration window, in Encord.
### Method 2: Use a Service Principal
Using a service principal to authenticate you require you to:
1. [Add the cord-integrator app to your Azure tenant](#add-the-cord-integrator-app-to-azure-tenant).
2. [Find your Azure tenant ID](#find-your-azure-tenant-id).
#### Add the cord-integrator App to Azure Tenant
There are three different ways to add the cord-integrator app to Azure tenant:
1. [Using a browser.](#add-the-cord-integrator-app-in-a-browser)
2. [Using Azure powershell.](#add-the-cord-integrator-app-via-azure-powershell)
3. [By granting storage account and container permissions to `cord-integrator`.](#grant-storage-account-and-container-permissions-to-cord-integrator)
You need to have admin privileges for your Azure account to authenticate via a service principal.
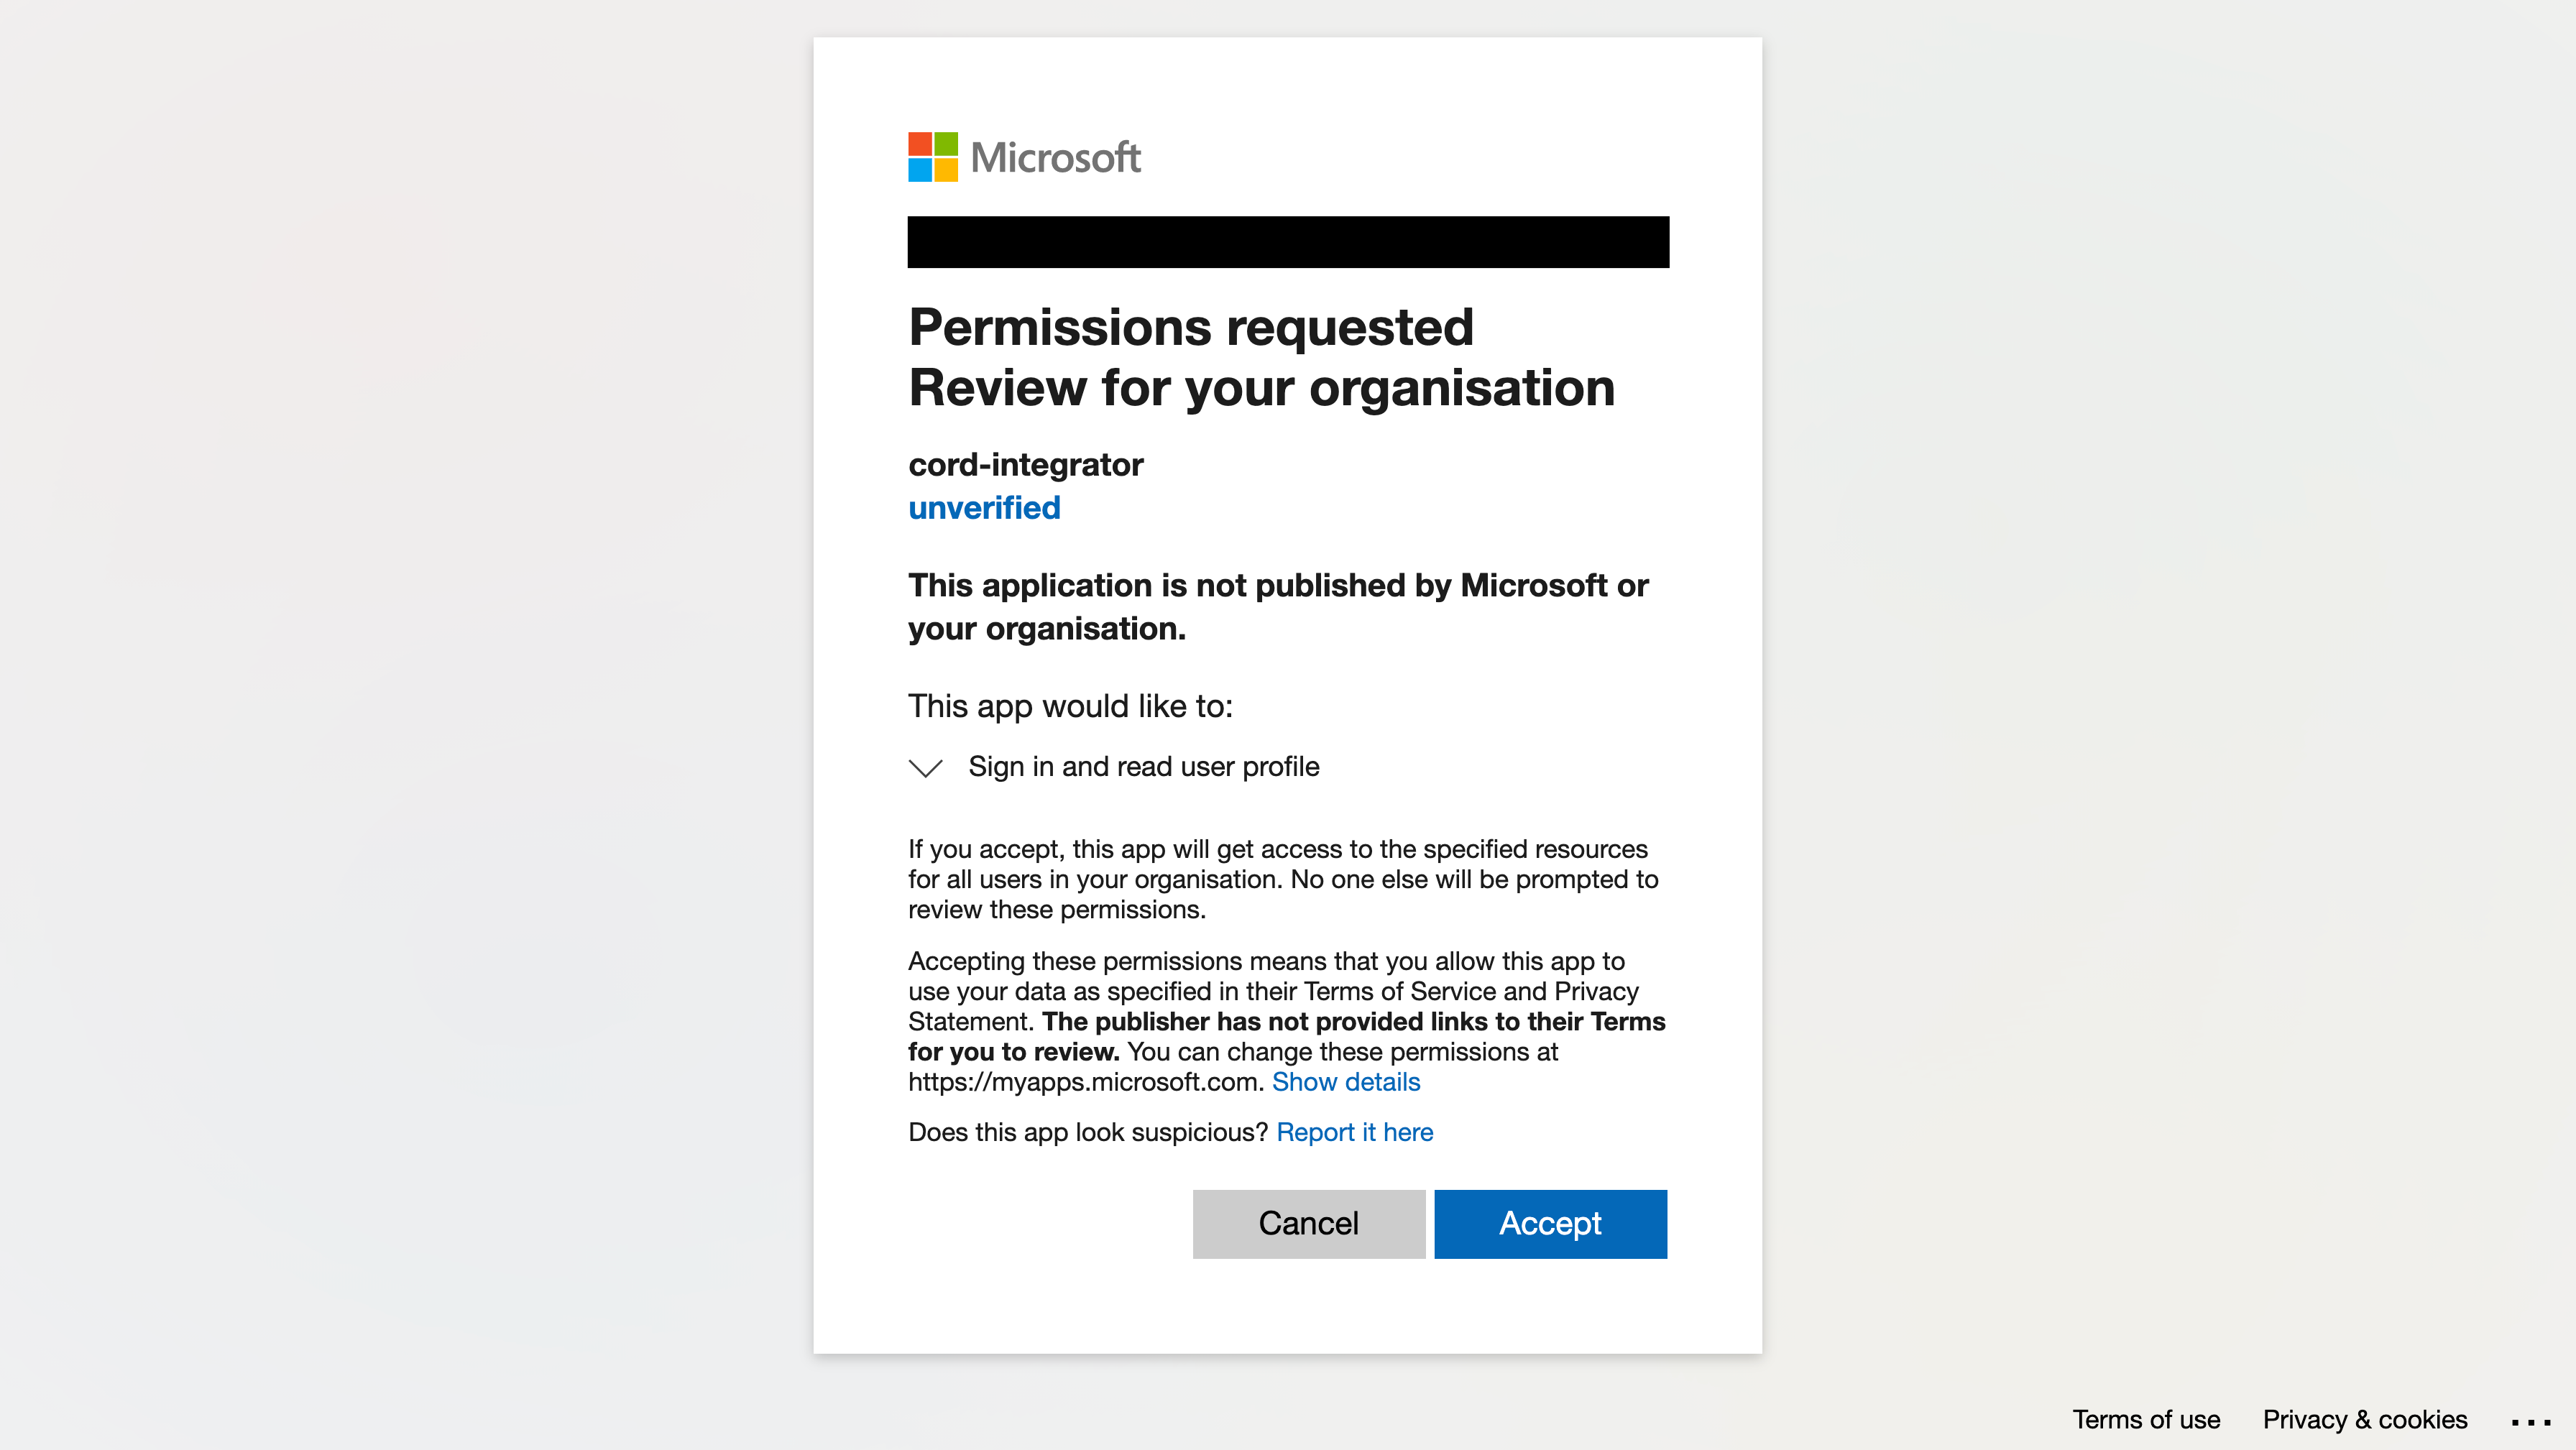
#### Add the cord-integrator App in a Browser
You can add the *cord-integrator* application in the *Settings* of the Encord app. If logged in to the Encord platform, you are redirected to the 'Azure integration' screen after the application was successfully added.
 #### Add the cord-integrator app via Azure Powershell
```
New-AzADServicePrincipal -ApplicationId ab859d51-5577-4d6d-9b87-544df597f38a
```
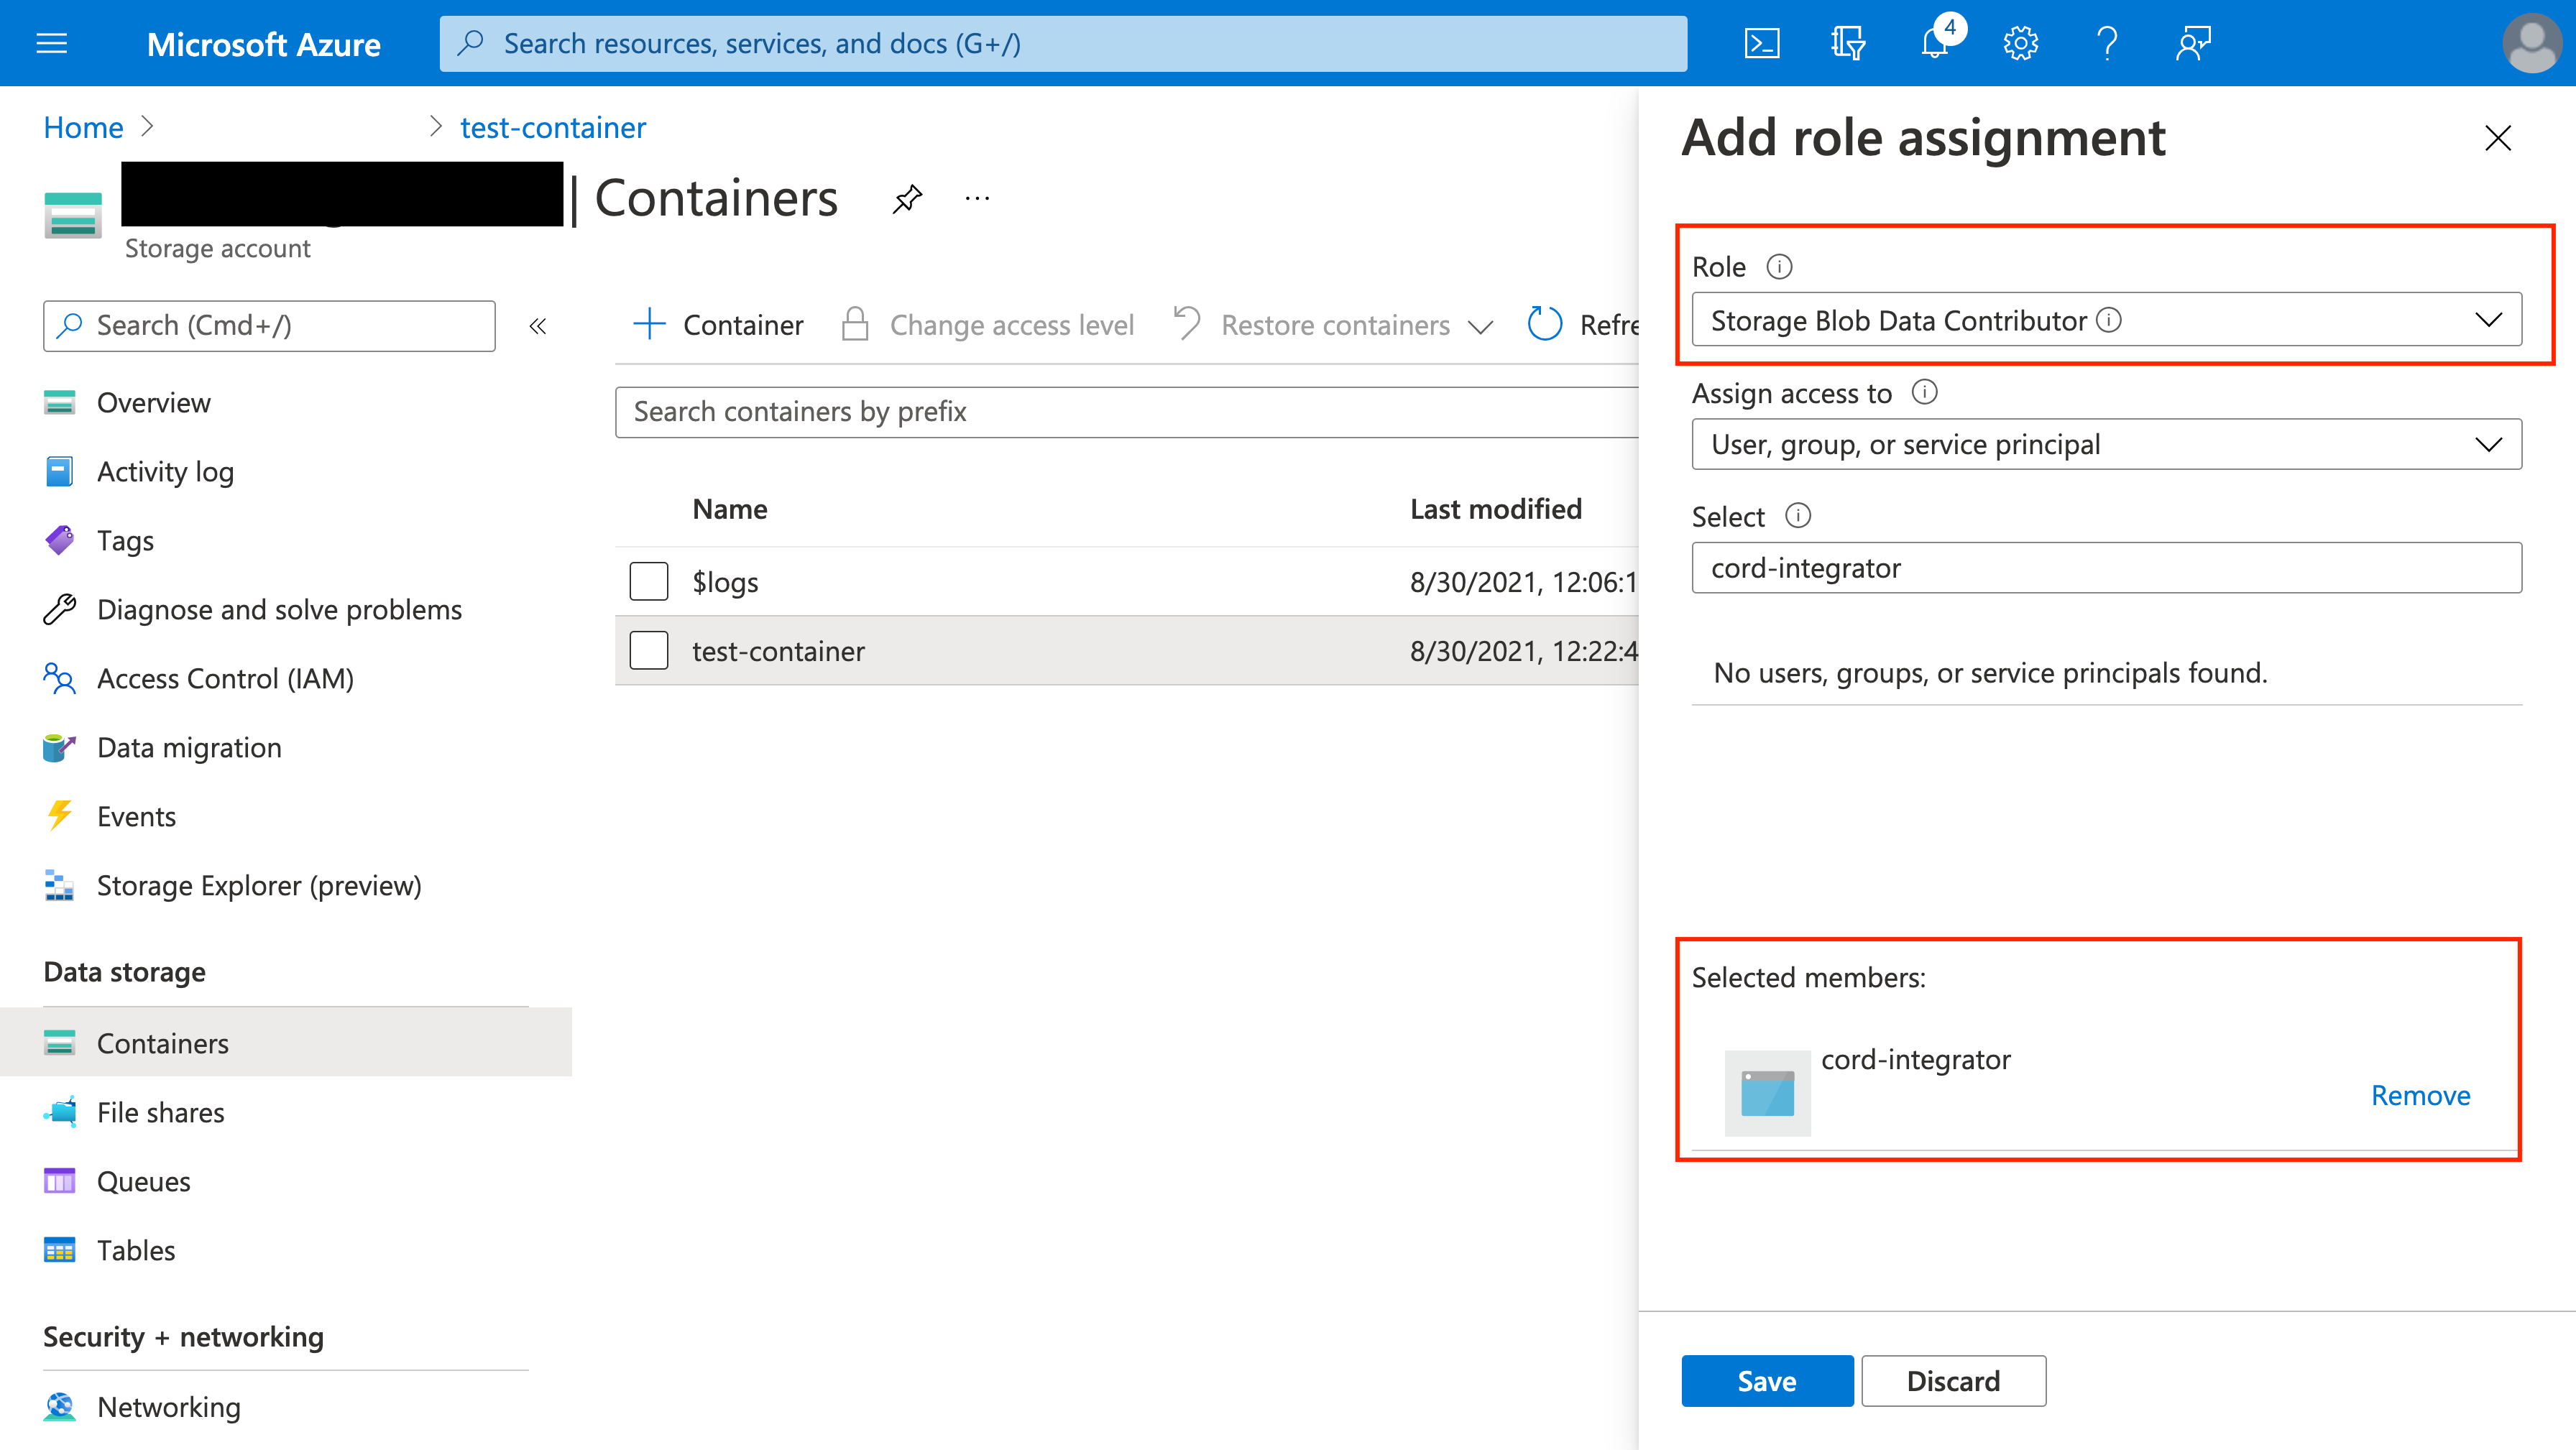
#### Grant Storage Account and Container Permissions to cord-integrator
The *cord-integrator* must be granted two types of permissions in order to function:
* The **Storage Blob Data Contributor** role at the container level
#### Add the cord-integrator app via Azure Powershell
```
New-AzADServicePrincipal -ApplicationId ab859d51-5577-4d6d-9b87-544df597f38a
```
#### Grant Storage Account and Container Permissions to cord-integrator
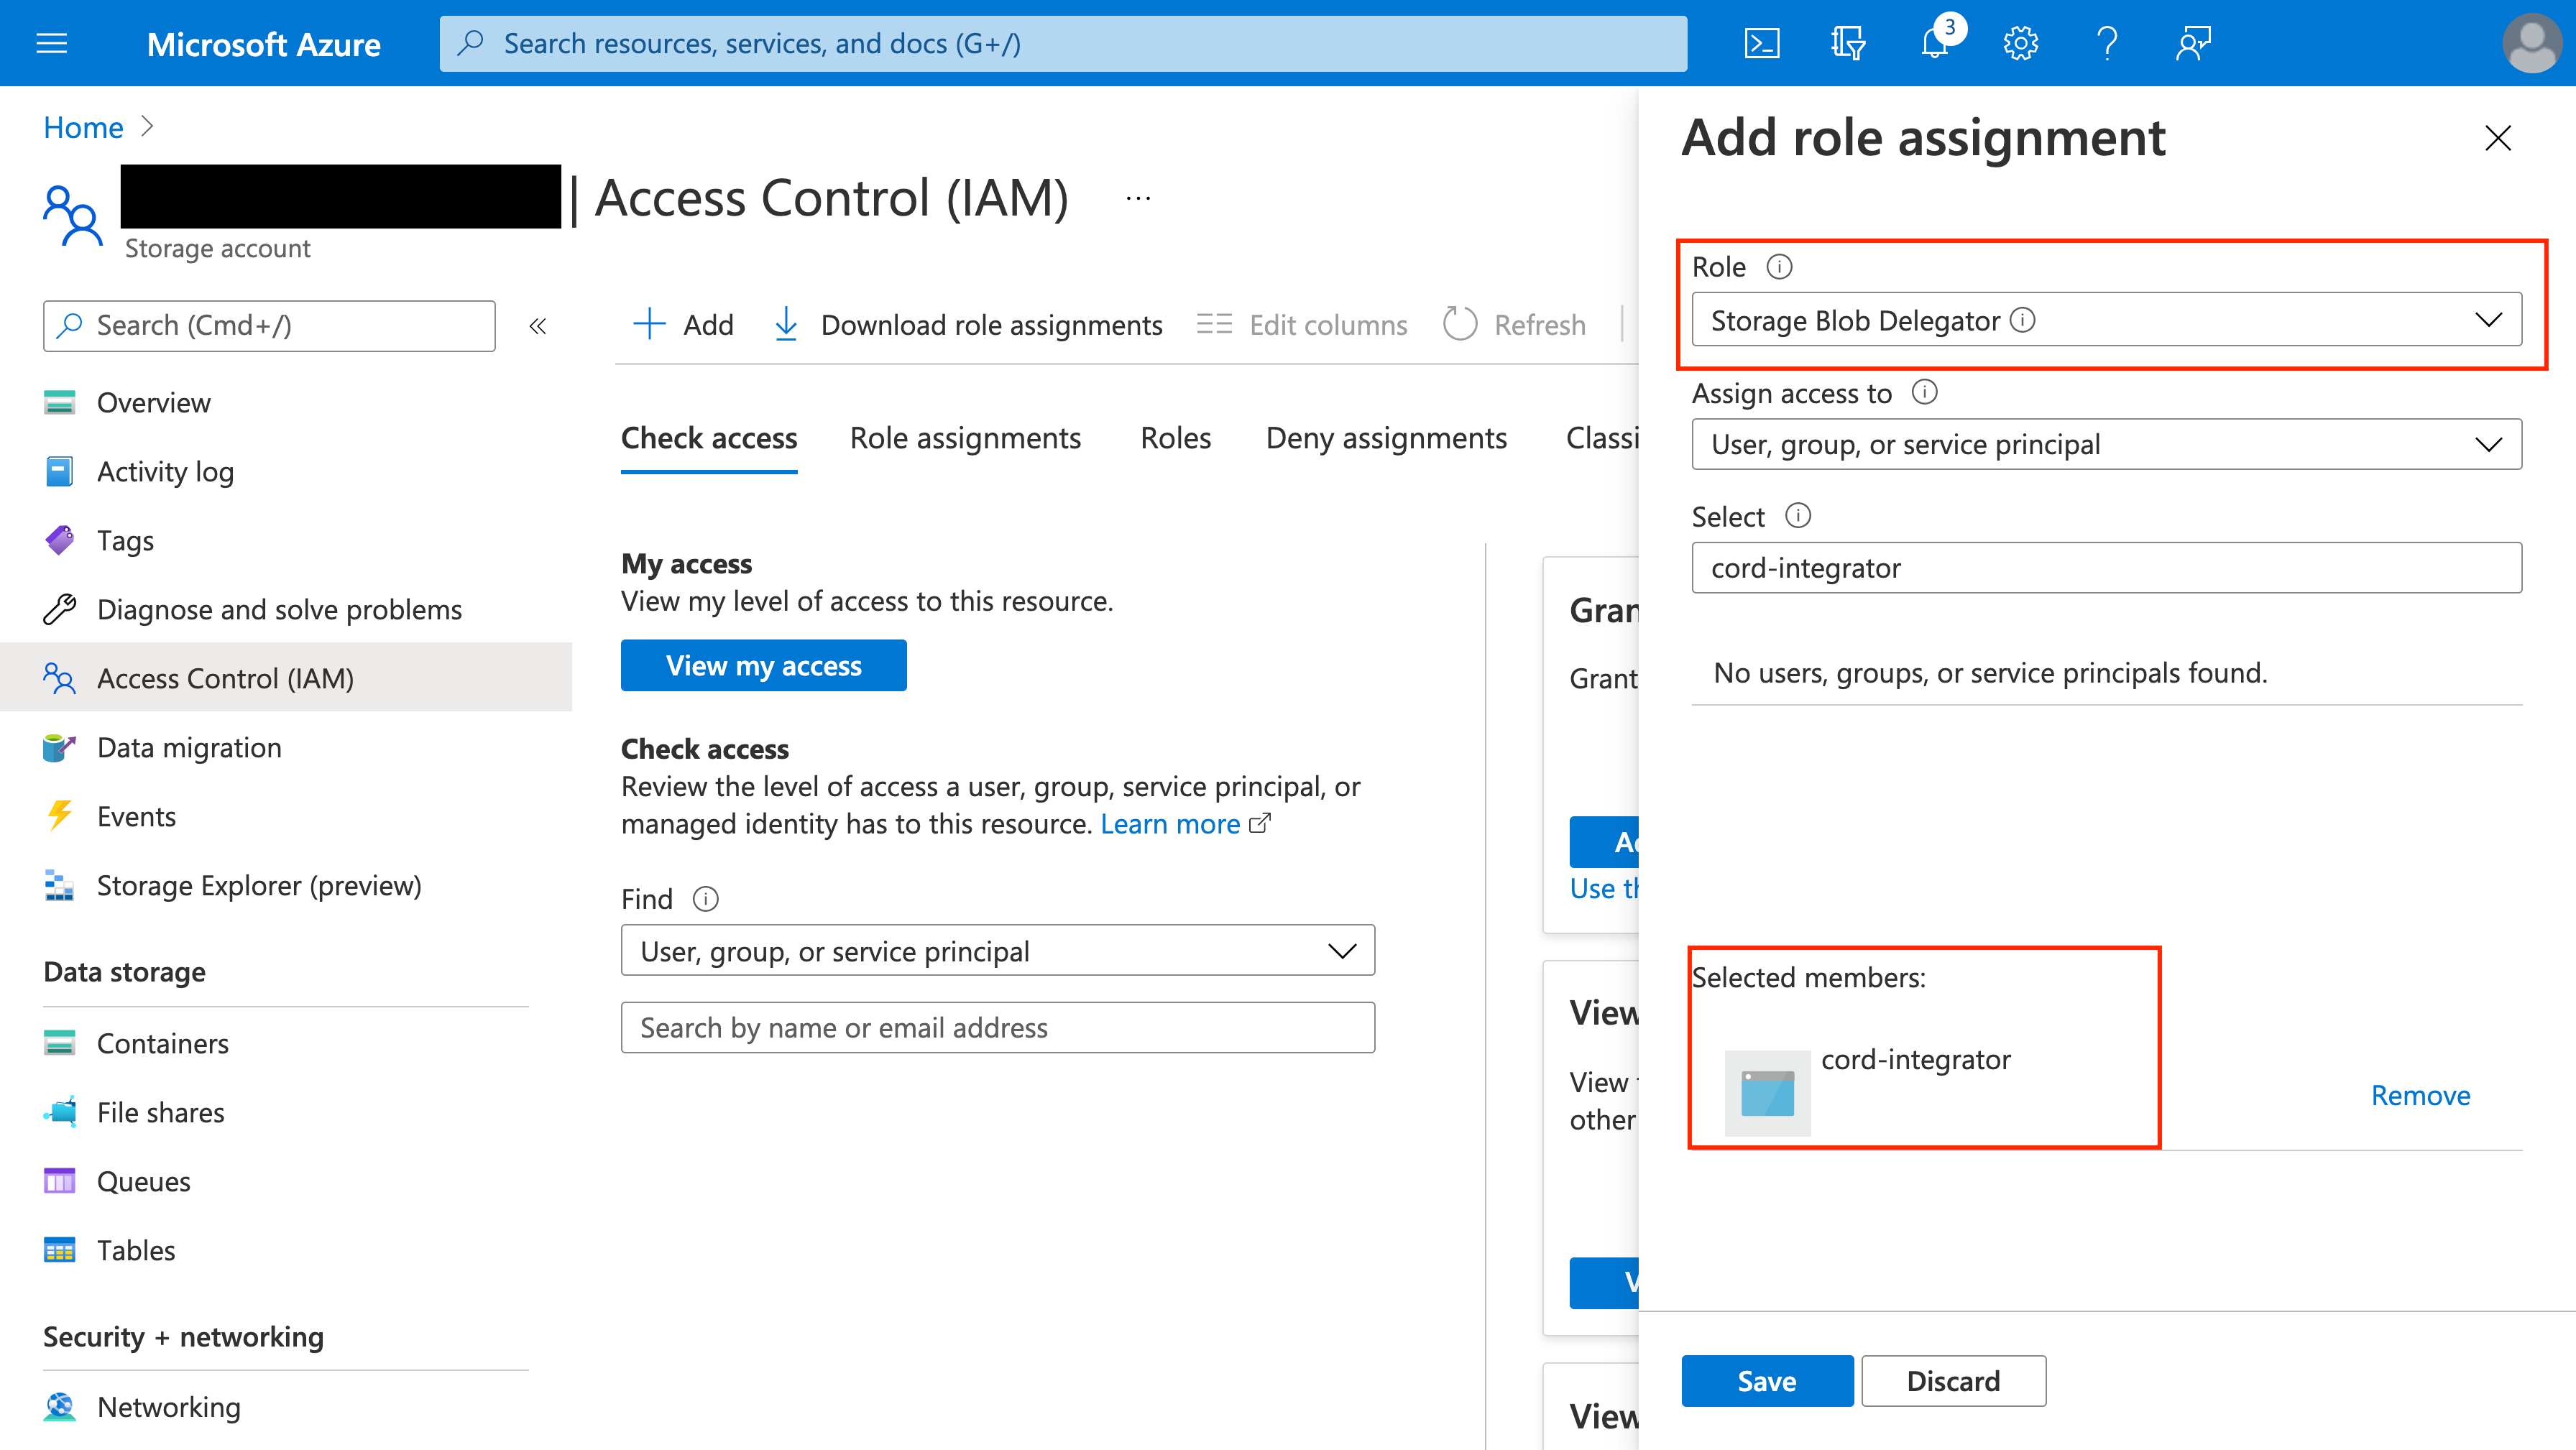
The *cord-integrator* must be granted two types of permissions in order to function:
* The **Storage Blob Data Contributor** role at the container level
 * The **Storage Blob Delegator** role at the storage account level
 #### Find your Azure tenant ID
You can find the Azure Tenant ID in the Active Directory overview of your Azure project.
Paste the tenant ID into Step 4 of the Azure integrations window, after you have added the cord-integrator app, granted it storage account, and container permissions and located your Azure tenant.
## 5. Create a CORS Configuration in Azure
If you use Infrastructure as Code tools like Terraform, they can overwrite your manual CORS settings. To prevent this, always include the correct CORS policy in your Terraform configuration file.
Applying Encord required CORS settings may overwrite existing configurations on your cloud storage bucket. If your bucket already has CORS settings, make sure to append Encord’s required settings instead of replacing them.
A [CORS configuration](https://learn.microsoft.com/en-us/rest/api/storageservices/cross-origin-resource-sharing--cors--support-for-the-azure-storage-services) must be applied to the Azure storage account you want to integrate with Encord. This enables Encord to request resources from the specified service account using a browser.
1. Navigate to the *Resource Sharing (CORS)* section under *Settings* of your storage account.
#### Find your Azure tenant ID
You can find the Azure Tenant ID in the Active Directory overview of your Azure project.
Paste the tenant ID into Step 4 of the Azure integrations window, after you have added the cord-integrator app, granted it storage account, and container permissions and located your Azure tenant.
## 5. Create a CORS Configuration in Azure
If you use Infrastructure as Code tools like Terraform, they can overwrite your manual CORS settings. To prevent this, always include the correct CORS policy in your Terraform configuration file.
Applying Encord required CORS settings may overwrite existing configurations on your cloud storage bucket. If your bucket already has CORS settings, make sure to append Encord’s required settings instead of replacing them.
A [CORS configuration](https://learn.microsoft.com/en-us/rest/api/storageservices/cross-origin-resource-sharing--cors--support-for-the-azure-storage-services) must be applied to the Azure storage account you want to integrate with Encord. This enables Encord to request resources from the specified service account using a browser.
1. Navigate to the *Resource Sharing (CORS)* section under *Settings* of your storage account.
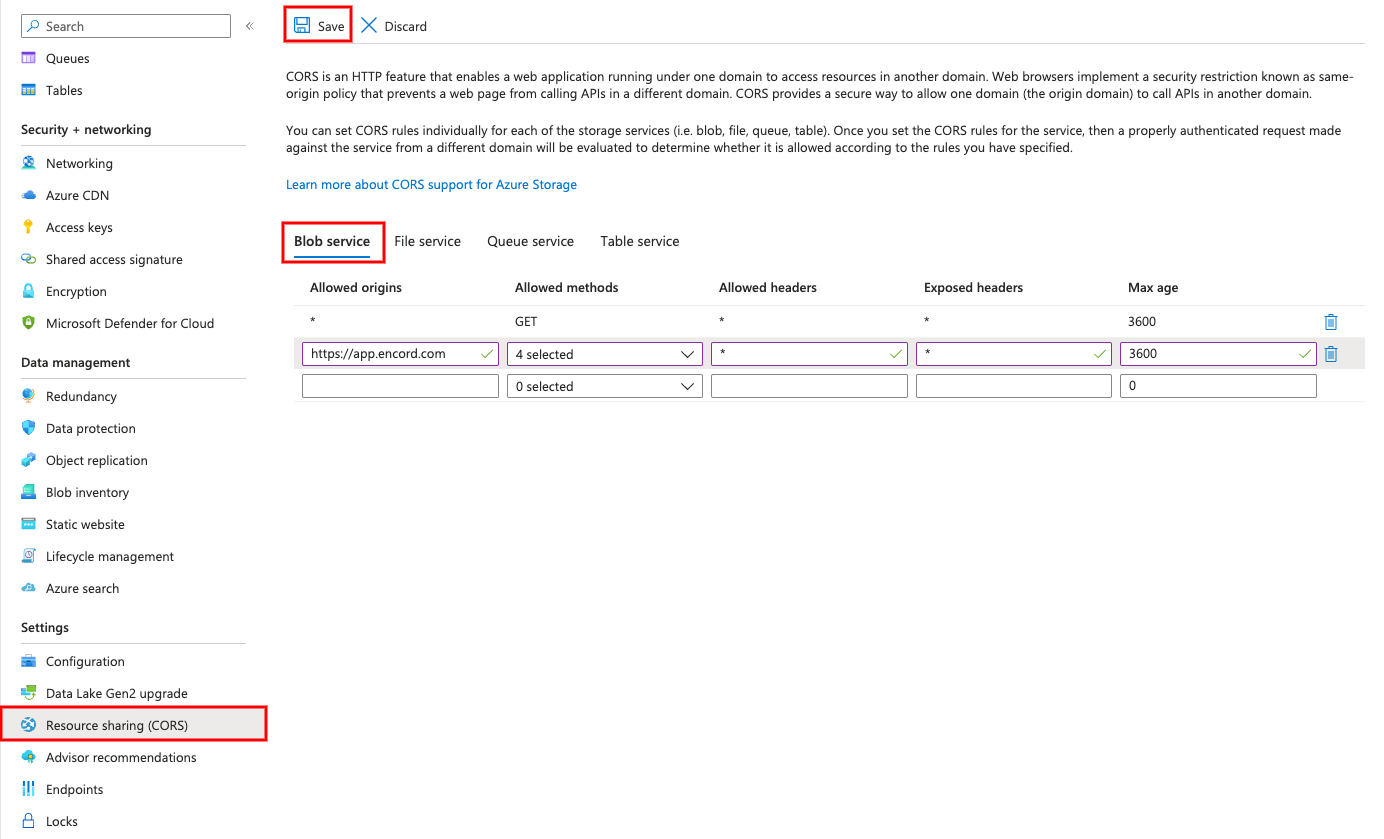 2. Input the following values in the *Blob service* tab of Resource Sharing (CORS) page:
| Allowed origins | Allowed methods | Allowed headers | Exposed headers | Max age |
| --------------------------- | ------------------------------- | :-------------: | :-------------: | :-----: |
| `https://app.encord.com` | `GET`, `POST`, `OPTIONS`, `PUT` | \* | \* | 3600 |
| `https://api.encord.com` | `GET`, `POST`, `OPTIONS`, `PUT` | \* | \* | 3600 |
| `https://app.us.encord.com` | `GET`, `POST`, `OPTIONS`, `PUT` | \* | \* | 3600 |
| `https://api.us.encord.com` | `GET`, `POST`, `OPTIONS`, `PUT` | \* | \* | 3600 |
| Allowed origins | Allowed methods | Allowed headers | Exposed headers | Max age |
| ------------------------ | ------------------------------- | :-------------: | :-------------: | :-----: |
| `https://app.encord.com` | `GET`, `POST`, `OPTIONS`, `PUT` | \* | \* | 3600 |
| `https://api.encord.com` | `GET`, `POST`, `OPTIONS`, `PUT` | \* | \* | 3600 |
| Allowed origins | Allowed methods | Allowed headers | Exposed headers | Max age |
| --------------------------- | ------------------------------- | :-------------: | :-------------: | :-----: |
| `https://app.us.encord.com` | `GET`, `POST`, `OPTIONS`, `PUT` | \* | \* | 3600 |
| `https://api.us.encord.com` | `GET`, `POST`, `OPTIONS`, `PUT` | \* | \* | 3600 |
In the example above, preflight requests are valid for 1 hour. Use the 'Max Age' variable to adjust the number of seconds the browser is allowed to make requests before it must repeat the preflight request.
3. Click **Save** to save the CORS configuration.
4. Click **Create** to finish setting up the integration, in Encord.
## 6. Test Your Integration
Click the **Run a test** button on the integration, to test that the integration works.
2. Input the following values in the *Blob service* tab of Resource Sharing (CORS) page:
| Allowed origins | Allowed methods | Allowed headers | Exposed headers | Max age |
| --------------------------- | ------------------------------- | :-------------: | :-------------: | :-----: |
| `https://app.encord.com` | `GET`, `POST`, `OPTIONS`, `PUT` | \* | \* | 3600 |
| `https://api.encord.com` | `GET`, `POST`, `OPTIONS`, `PUT` | \* | \* | 3600 |
| `https://app.us.encord.com` | `GET`, `POST`, `OPTIONS`, `PUT` | \* | \* | 3600 |
| `https://api.us.encord.com` | `GET`, `POST`, `OPTIONS`, `PUT` | \* | \* | 3600 |
| Allowed origins | Allowed methods | Allowed headers | Exposed headers | Max age |
| ------------------------ | ------------------------------- | :-------------: | :-------------: | :-----: |
| `https://app.encord.com` | `GET`, `POST`, `OPTIONS`, `PUT` | \* | \* | 3600 |
| `https://api.encord.com` | `GET`, `POST`, `OPTIONS`, `PUT` | \* | \* | 3600 |
| Allowed origins | Allowed methods | Allowed headers | Exposed headers | Max age |
| --------------------------- | ------------------------------- | :-------------: | :-------------: | :-----: |
| `https://app.us.encord.com` | `GET`, `POST`, `OPTIONS`, `PUT` | \* | \* | 3600 |
| `https://api.us.encord.com` | `GET`, `POST`, `OPTIONS`, `PUT` | \* | \* | 3600 |
In the example above, preflight requests are valid for 1 hour. Use the 'Max Age' variable to adjust the number of seconds the browser is allowed to make requests before it must repeat the preflight request.
3. Click **Save** to save the CORS configuration.
4. Click **Create** to finish setting up the integration, in Encord.
## 6. Test Your Integration
Click the **Run a test** button on the integration, to test that the integration works.
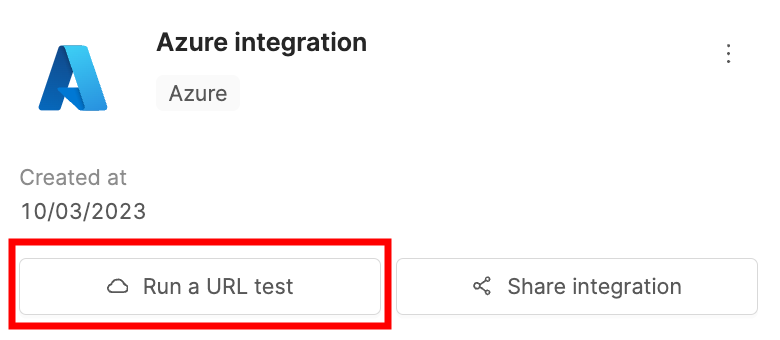
Paste the URL of any object in your Azure storage and click **Check Encord can access this URL**. If the test is successful a green tick appears next to *Encord infrastructure* and *This machine*.

***
## Updating Expired Account-Level SAS Tokens
This section is only applicable if you used an [account-level shared access token](#method-1-generate-an-account-level-sas) to authenticate.
Shared access tokens expire and have to be updated in order to continue providing Encord with access to your Azure storage.
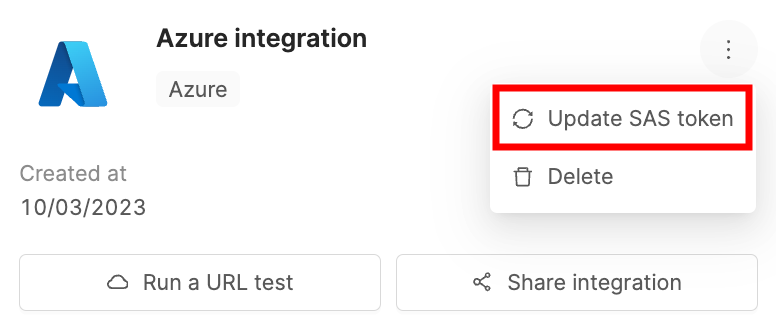
To update the account-level SAS token:
1. Click the three dots icon on your Azure integration.
2. Click **Update SAS token**.
A field for your new SAS token appears.
3. In [Azure](https://portal.azure.com/#home), navigate to **Storage Accounts** under *Azure services* and select the storage account you wish to update the token for.
4. Click on **Shared access signature** in the *Security + networking* section.
5. You must check the *Container* and *Object* checkboxes under the *Allowed resource types* heading. Ensure you add the necessary permissions:
* Read (required)
* List (required)
* Write (recommended)
* Add (recommended)
* Create (recommended)
*recommended* permissions are necessary to use some of our more advanced features such as [re-encoding data](/platform-documentation/General/general-supported-data#re-encode-videos), and [image sequences](/platform-documentation/General/general-supported-data#image-sequences).
6. Click **Generate SAS and connection string** to generate a new account-level SAS token.
Your SAS tokens have a start and end date that can be adjusted, and are only be valid for the specified time period. Expired tokens must be [updated](#updating-expired-account-level-sas-tokens).
To avoid having to update the token frequently, set the expiration date to be more than one year.
7. Paste the new SAS token, in Encord.
***
## Register Azure Data
Navigate to the [Register cloud data](/platform-documentation/General/annotate-data-integrations/annotate-azure-blob-integration) page for guidance on how to register data stored in Azure.