> ## Documentation Index
> Fetch the complete documentation index at: https://docs.encord.com/llms.txt
> Use this file to discover all available pages before exploring further.
# GCP Storage
There are multiple parts to setting up a GCP integration in Encord:
1. Start setting up the integration in Encord.
2. Grant service account access and register your storage bucket with Encord.
3. Set up a CORS configuration.
Ensure all objects in the bucket use the [Standard Storage class](https://cloud.google.com/storage/docs/storage-classes).
## 1. Start Setting Up The Integration
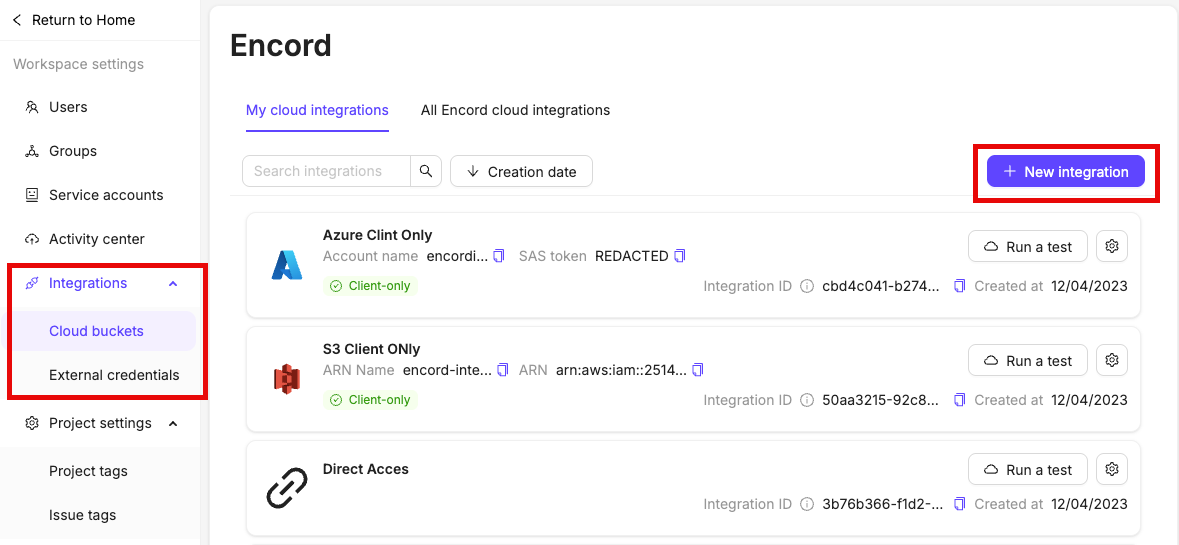
1. Navigate to [Workspace Settings](/platform-documentation/General/general-workspace-settings#workspace-settings) > Cloud Buckets and click **+New integration**.
2. Select **Google Cloud Storage**.
3. Give your integration a meaningful title.
## 2. Grant Service Account Access
1. Log into your Google Cloud account and navigate to the GCP bucket you want to integrate with Encord.
2. Click **Grant Access** to add a service account for Encord, in the bucket's **PERMISSION** tab.
3. Add `cord-cloud-storage-integrator@cord-ai-platform.iam.gserviceaccount.com` as a New Principal and assign the following roles:
* `Storage Object Viewer`
* `Storage Object Creator`
`Storage Object Creator` is needed for features that require write permissions, including [re-encoding data](/platform-documentation/General/general-supported-data#re-encode-videos) and creating [image sequences](/platform-documentation/General/general-supported-data#image-sequences).
### 2.1 Register the cloud bucket with Encord
Paste the name of your GCP bucket into Step 2.1 of the integration in Encord.
## 3. Create a CORS Configuration
If you use Infrastructure as Code tools like Terraform, they can overwrite your manual CORS settings. To prevent this, always include the correct CORS policy in your Terraform configuration file.
Applying Encord required CORS settings may overwrite existing configurations on your cloud storage bucket. If your bucket already has CORS settings, make sure to append Encord’s required settings instead of replacing them.
A [CORS configuration](https://cloud.google.com/storage/docs/cors-configurations) must be applied to the bucket you want to integrate with Encord. A CORS configuration enables Encord to request resources from the specified bucket.
The only way to create a CORS configuration is using the command line or terminal tool.
[Install Google's Cloud CLI](https://cloud.google.com/sdk/docs/install-sdk), and use the following `gcloud` command in your command line or terminal to create a CORS configuration.
```
gcloud storage buckets update gs:// --cors-file="/path/to/you/cors.json"
```
* Replace \ with the name of the bucket you want to integrate.
* Replace `/path/to/you/cors.json` with the full path to your JSON CORS file. A [sample JSON file](#json-configuration-file) is provided below.
Click **Create** in Encord to finish creating the integration, after creating a CORS configuration.
### JSON configuration file
The following JSON file can be used to set up the CORS configuration in Step 3 of your GCP integration.
```json Global theme={"dark"}
[
{
"origin": ["https://app.encord.com", "https://api.encord.com","https://app.us.encord.com", "https://api.us.encord.com"],
"method": ["GET"],
"responseHeader": ["Content-Type"],
"maxAgeSeconds": 3600
}
]
```
```json EU theme={"dark"}
[
{
"origin": ["https://app.encord.com", "https://api.encord.com"],
"method": ["GET"],
"responseHeader": ["Content-Type"],
"maxAgeSeconds": 3600
}
]
```
```json US theme={"dark"}
[
{
"origin": ["https://app.us.encord.com", "https://api.us.encord.com"],
"method": ["GET"],
"responseHeader": ["Content-Type"],
"maxAgeSeconds": 3600
}
]
```
* Preflight requests are valid for 1 hour. Use the `maxAgeSeconds` variable to adjust the number of seconds the browser is allowed to make requests before it must repeat the preflight request.
* Successful browser requests return the `Content-Type` of the resource in the response, as set by the `responseHeader`.
Consult the [GCP documentation](https://cloud.google.com/storage/docs/cors-configurations), to customize the file further.
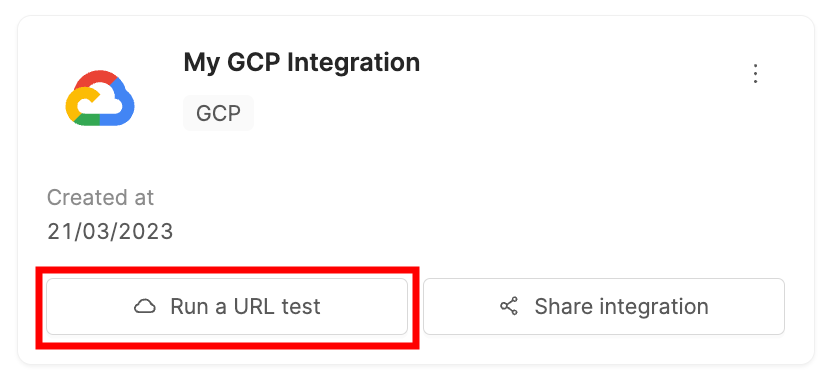
## 4. Test Integration
Click the **Run a test** button on the integration to test the integration.
Paste the URL of any object in the bucket and click **Check Encord can access this URL**. If the test is successful a green tick appears next to *Encord infrastructure* and *This machine*.
***
## Register GCP Data
See the [Register cloud data](/platform-documentation/Curate/add-files/index-register-cloud-data) page for guidance on how to register data stored in GCP.
We recommend setting the expiration time for pre-signed URLs (found in your cloud storage settings) to be greater than the time it takes to complete an annotation task. [More information can be found in the GCP documentation](https://cloud.google.com/storage/docs/access-control/signed-urls).