> ## Documentation Index
> Fetch the complete documentation index at: https://docs.encord.com/llms.txt
> Use this file to discover all available pages before exploring further.

# Create Projects

Labeling activities are organized and managed in Projects. It brings together Datasets, which store the data to be labeled, and Ontologies, which define the concepts and relationships to be annotated.

## Custom Projects

**To create a new annotation Project**:

1. In the Encord platform, select **Projects** under **Annotate**.
2. Click the **+ New project** button to create a new Project.

<div class="flex justify-center">
  <img src="https://storage.googleapis.com/docs-media.encord.com/static/img/create-project-new.png" width="600" />
</div>

### Project Details

Give the Project a meaningful Project title and description.

<div class="flex justify-center">
  <img src="https://storage.googleapis.com/docs-media.encord.com/static/img/project-details.png" width="700" />
</div>

### Add Project Tags

If you are part of an [Workspace](/platform-documentation/General/general-workspace-settings), an optional [Project tags](/platform-documentation/Annotate/annotate-projects/annotate-project-settings#project-tags) drop-down is visible. Project tags are useful for categorizing and finding your Projects. Select as many tags as are relevant for your Project.

<div class="flex justify-center">
  <img src="https://storage.googleapis.com/docs-media.encord.com/static/img/project-tags-2.png" width="700" />
</div>

### Workflow

To configure your Workflow, ensure **Workflow** is selected in the Project Configuration.

The Workflow determines how tasks move through your Project from annotation to completion. A simple Workflow containing one Annotation stage and one Review stage is provided by default.

See our documentation on Workflows to:

* Learn how to [customize Workflows](/platform-documentation/Annotate/annotate-projects/annotate-workflows-and-templates#creating-workflows).
* Learn how to [create Workflow templates](/platform-documentation/Annotate/annotate-projects/annotate-workflows-and-templates#templates) that can be seamlessly added to any Project you create.

### Data

1. Click the **Data** button.

2. Select your data source:
   * **Folder**: One folder can be attached to a Project at a time. Optionally filter the folder so only matching files are included in the Project.
   * **Dataset**: One or more Datasets can be attached to a Project.

<Note>
  All files from the folder and Datasets you attach to the Project are available for annotation in the Project.
</Note>

<div class="flex justify-center">
  <img src="https://storage.googleapis.com/docs-media.encord.com/static/img/projects-add-data.png" width="800" />
</div>

### Continuous Data Flow

If a cloud-synced folder is attached to the Project, you can enable continuous data flow. Any new files added to the cloud-synced folder will automatically flow into the Project. New files are filtered using the same rules before being added.

<Note>
  Continuous data flow requires **Auto Sync** to be enabled. If **Auto Sync** is not enabled, a toggle is displayed allowing you to switch it on.
</Note>

<div class="flex justify-center">
  <img src="https://storage.googleapis.com/docs-media.encord.com/static/img/cloud-sync-folder-auto-sync-filter.png" width="800" />
</div>

### Ontology

1. Click the **Ontology** button.

2. Select an existing Ontology from the list using the **Select** button, or [create a new Ontology](/platform-documentation/Annotate/annotate-ontologies/annotate-create-ontologies) by clicking the **+ New ontology** button.

<div class="flex justify-center">
  <img src="https://storage.googleapis.com/docs-media.encord.com/static/img/create-project-ontology.png" width="800" />
</div>

### Collaborators

Add users to the Project and assign them roles such as Team Managers, Annotators, and Reviewers. As the Project creator, you are automatically assigned the role of Administrator.

<Note>A full list of permissions and user-based access controls can be found [here](/platform-documentation/Annotate/roles-and-permissions#projects). </Note>

1. Click the **Collaborators** button.

2. Start typing the email address of a user you want to add to the Project.

3. Select a role for the user from the drop-down menu.

4. Click **Add to project** to add the user(s) to the Project.

<Tip>You can [add more users and manage all users](/platform-documentation/Annotate/annotate-projects/annotate-project-settings#manage-project-collaborators) after Project creation. </Tip>

<div class="flex justify-center">
  <img src="https://storage.googleapis.com/docs-media.encord.com/static/img/project-collaborators.png" width="800" />
</div>

### Create Project

Once you are ready, click the **Create Project** button to finish creating your Project. For documentation on managing and administering your Project see our [documentation here](/platform-documentation/Annotate/annotate-projects/annotate-manage-annotation-projects).

<div class="flex justify-center">
  <img src="https://storage.googleapis.com/docs-media.encord.com/static/img/finish-create-project.png" width="600" />
</div>

***

## Create from a Template

<iframe className="w-full aspect-video rounded-xl" src="https://www.loom.com/embed/d0cbb4d0c9a2493a8114563e6e571a17" title="YouTube video player" frameBorder="0" allow="accelerometer; autoplay; clipboard-write; encrypted-media; gyroscope; picture-in-picture" allowFullScreen />

Templates provide streamlined process to create your Projects with Ontologies, Workflows and Custom Layouts so you can start annotating immediately. Each template can be customized after creation.

<div class="flex justify-center">
  <img src="https://storage.googleapis.com/docs-media.encord.com/static/img/project-templates.png" width="600" />
</div>

**Create a Project from a Template**:

1. Navigate to **Projects > Project Templates**.
2. Browse or search the available templates.
3. Click a template card. Encord creates the Project automatically and opens it.
4. Optionally edit the Project's components to fit your needs.

### Available Templates

<table>
  <thead>
    <tr>
      <th>Template</th>
      <th>Best for</th>
      <th>Description</th>
    </tr>
  </thead>

  <tbody>
    <tr>
      <td>
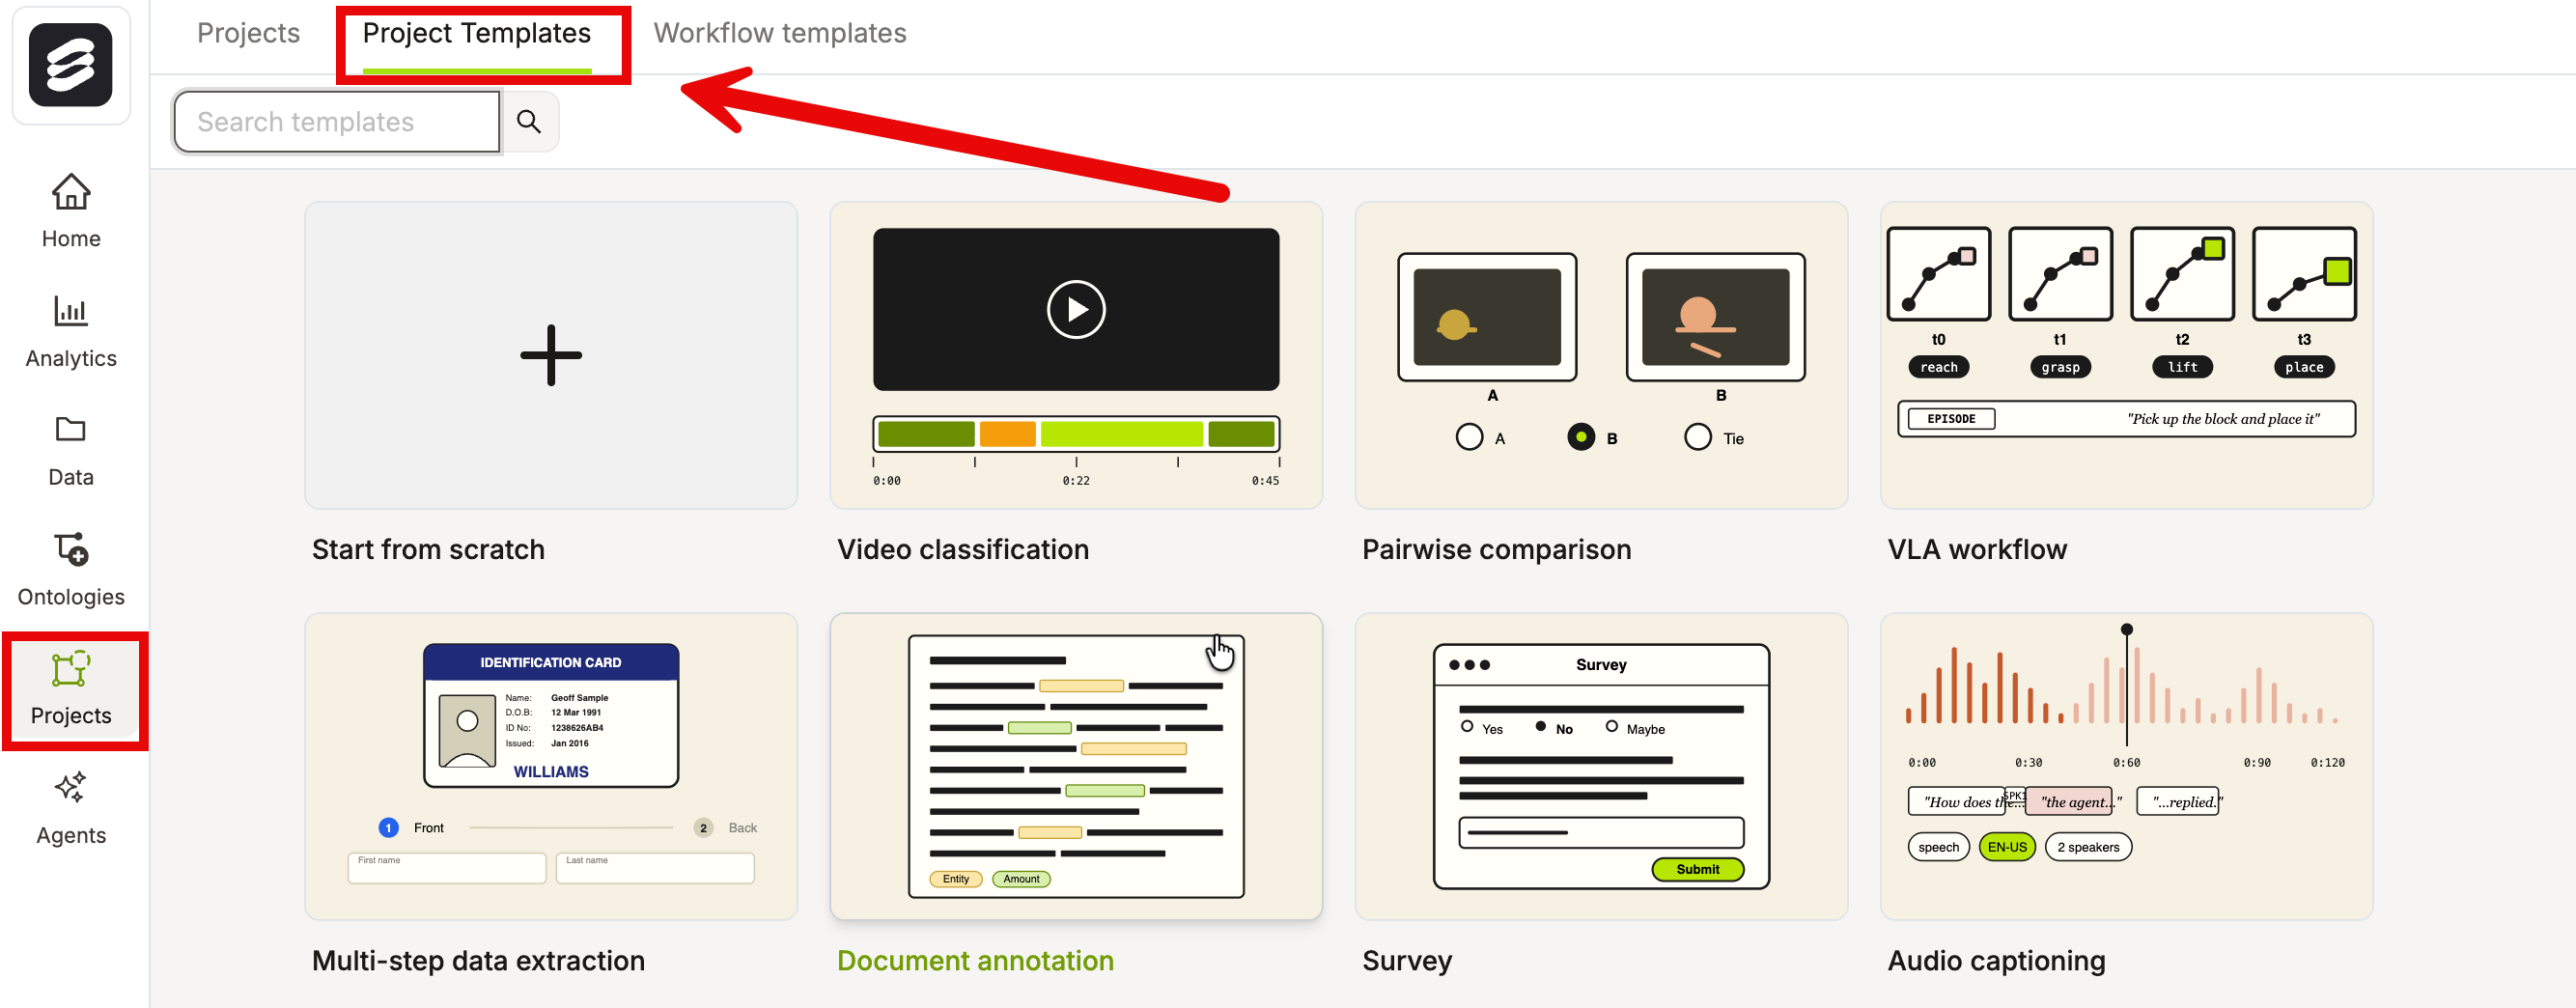
Video classification</td>
      <td>Tracking scene actors across video with clip-level labels.</td>
      <td>Includes bounding-box tracking of scene actors, with clip-level quality and event-type classifications.</td>
    </tr>

    <tr>
      <td>Pairwise comparison</td>
      <td>Side-by-side evaluation of two outputs.</td>
      <td>Configured for comparing two items and recording a preference or score.</td>
    </tr>

    <tr>
      <td>VLA workflow</td>
      <td>Robotics training data: vision, language, and action labeling.</td>
      <td>Pre-configured for vision-language-action (VLA) labeling. Includes target-object bounding boxes with category and instance attributes, and frame-level action classifications. Suitable for manipulation and navigation tasks.</td>
    </tr>

    <tr>
      <td>Multi-step data extraction</td>
      <td>Structured field extraction from identity documents across multiple review steps.</td>
      <td>Runs extraction across two annotation steps: the first step captures front-of-card identity fields, the second captures back-of-card details. Use this as a pattern for any multi-step document extraction workflow.</td>
    </tr>

    <tr>
      <td>Document annotation</td>
      <td>Text region labeling in documents with entity and sentiment analysis.</td>
      <td>Annotates text regions for sentiment and named entities, plus document-level type and language classifications. Suitable for contracts, reports, forms, and other structured documents.</td>
    </tr>

    <tr>
      <td>Survey</td>
      <td>Collecting structured viewer or reviewer feedback.</td>
      <td>Captures overall impression, free-text feedback, and a recommendation rating in a structured survey format. Use for content review, data quality audits, or preference collection.</td>
    </tr>

    <tr>
      <td>Audio captioning</td>
      <td>Speaker-level transcription and audio quality assessment.</td>
      <td>Annotates audio regions per speaker with a transcript field, and captures an overall audio quality rating. Use for ASR training data, podcast transcription, or audio QA workflows.</td>
    </tr>

    <tr>
      <td>2D object detection with SAM</td>
      <td>Detecting vehicles, pedestrians, and cyclists with scene-level context.</td>
      <td>Provides bounding-box classes for vehicles, pedestrians, and cyclists, along with scene-level classifications for scene type, weather, and time of day. Includes SAM-assisted labeling for faster segmentation. Use as a base for any autonomous driving or smart-city detection Project.</td>
    </tr>

    <tr>
      <td>Real or generated</td>
      <td>Classifying media as authentic or AI-generated.</td>
      <td>Labels media as real or AI-generated, with a confidence rating and multi-select attributes for tell-tale signs (e.g. artifacts, unnatural lighting). Use for content moderation, synthetic data audits, or AI-detection benchmarking.</td>
    </tr>
  </tbody>
</table>
