Modal provides a serverless cloud for engineers and researchers who want to build compute-intensive applications without thinking about infrastructure.
The cloud service is well suited for building and hosting Encord Editor Agents.
This example places a bitmask “ball” in the center of an image in the Label Editor.
See the Editor Agent examples for more sophisticated use cases. Everything in the FastAPI examples can also be done using Modal, as Modal acts as a wrapper around FastAPI.
For a complete code example, go here. STEP 1: Authentication
You need to authenticate with Encord first.
Once you have a private access key (preferably corresponding to a service account), you must also ensure that you have signed up for Modal.
Now you can configure the secret:
- Go to
https://modal.com/secrets.
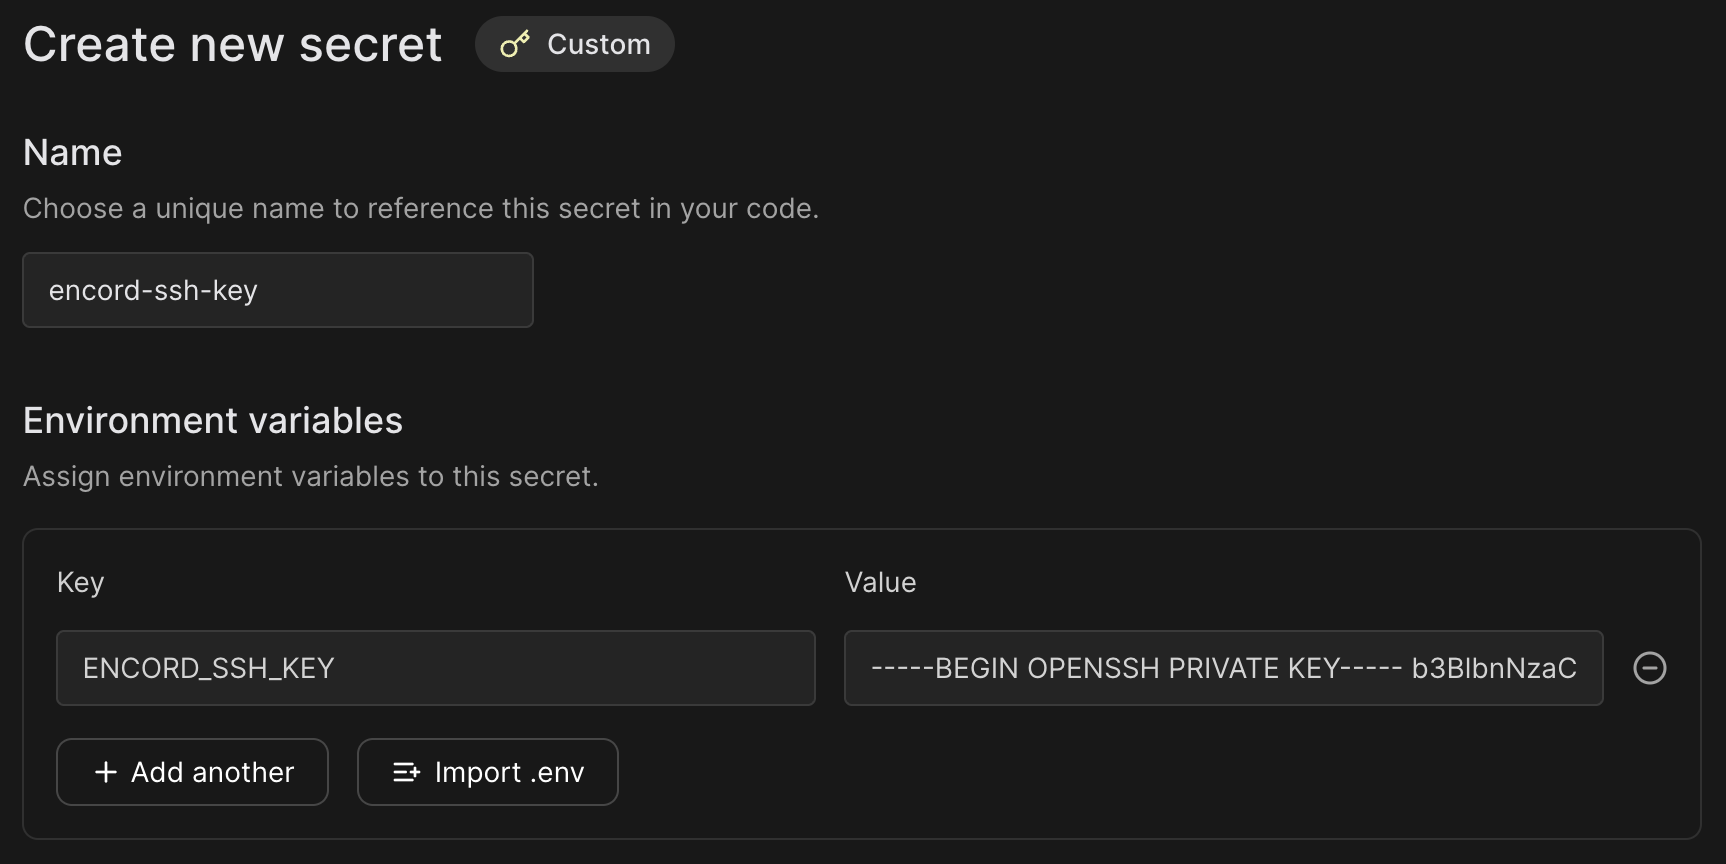
- Click “Create new secret”.
- Choose the “Custom” option.
- Name it
encord-ssh-key (you can choose the name but it needs to match the name in the code below).
- Add an environment variable names
ENCORD_SSH_KEY with the content of your private access key file. Similar to the figure below.
 This setup allows
 encord-agents to authenticate with Encord using the provided key.
STEP 2: Installation
Ensure that you have installed encord-agents and modal:
python -m venv venv
source venv/bin/activate
python -m pip install encord-agents modal
STEP 3: Inspecting the Modal Template
Now you need a template for creating an endpoint that can be used for defining an Editor Agent.
The following example:
-
Creates a Docker Image – We define a container that includes all necessary dependencies:
encord-agents: The library for building agentsmodal: For hosting the agentlibgl: Required by opencv
Modal automatically handles setting up this container for you.
-
Defines an App – We create a FastAPI application to manage the agent’s endpoints.
-
Sets Up Authentication – We add an endpoint that uses an access key for authentication.
- The access key should be stored as
ENCORD_SSH_KEY.
encord-agents automatically detects this key and use it to authenticate with the Encord SDK.
-
Implements the Agent Logic – defines what the agent should do when triggered.
- Check out these examples to see different ways to customize your agent.
Since this is a FastAPI route, you can also take advantage of built-in dependencies from encord_agents.fastapi.dependencies to simplify your setup.
from typing_extensions import Annotated
from fastapi import Depends
from encord_agents.fastapi.dependencies import LabelRowV2, dep_label_row
from encord_agents import FrameData

import modal

# 1. Define the docker image to run the code.
image = (
    modal.Image.debian_slim(python_version="3.12")
    .apt_install(
        "libgl1",
        "libglib2.0-0",
    ).pip_install(
        "fastapi[standard]",
        "encord-agents",
    )
)

# 2. Define the app to  hold the endpoint
app = modal.App(name="encord-agents-add-ball", image=image)


# 3. Define the endpoint with access to the secret that we set up.
@app.function(secrets=[modal.Secret.from_name("encord-ssh-key")])
@modal.web_endpoint(method="POST")
def put_ball_on_image(
    frame_data: FrameData,
    label_row: Annotated[LabelRowV2, Depends(dep_label_row)],
):
	# 4. The agent logic goes here
	# This is really a FastAPI endpoint ✨
	...
STEP 4: Defining the Agent
The following example adds a circular bitmask in the middle of the current frame.
However, it could easily be running your own model (even on the GPU).
In the function definition of your route, add the following code to:
- Ensure that the Project’s Ontology has a bitmask object. If it does not, there’s nothing to do here.
- Ensure that the task is a visual data unit (an image, image group, image sequence, or video).
- Places a bitmask with the appropriate shape and fills in a sphere.
- Adds the bitmask to the label row.
- Saves the labels.
@app.function(secrets=[modal.Secret.from_name("encord-ssh-key")])
@modal.web_endpoint(method="POST")
def put_ball_on_image(
    frame_data: FrameData,
    label_row: Annotated[LabelRowV2, Depends(dep_label_row)],
):
    # 1. Find the first bitmask ontology object
	#    Exit if no one is found
    bitmask_object = next(
        (o for o in label_row.ontology_structure.objects if o.shape == Shape.BITMASK),
        None,
    )
    bitmask_object = next((o for o in label_row.ontology_structure.objects if o.shape == Shape.BITMASK), None)
    if not bitmask_object:
        return

    # 2. Ensure we can read image width/height
	#	 Otherwise, it's probably not a vision asset
    w, h = label_row.width, label_row.height
    if w is None or h is None:
        return

    # 3. Construct bitmask with ball in the center
    cw, ch = w//2, h//2
    radius = min(cw, ch) // 2
    mask = np.zeros((h, w), dtype=np.uint8)
    cv2.circle(mask, (cw, ch), radius, 255, -1)  # type: ignore


    # 4. Add it as a label
    ins = bitmask_object.create_instance()
    ins.set_for_frames(
        frames=frame_data.frame,
        confidence=0.8,
        coordinates=BitmaskCoordinates(mask > 0)
    )
    label_row.add_object_instance(ins)

    # 5. Save update
    label_row.save()
encord_agents library sends a 200 response to the Label Editor, causing the editor to refresh its state. The result is a sphere in the middle of the image.
STEP 5: Testing the Agent
To test the agent, there is a dedicated CLI tool.
You must first run the agent locally (with your Python environment sourced).
Assuming that the python file you created is named example.py, you can run:
The command should print a url similar to this
└── 🔨 Created web function put_ball_on_image =>
    https://<your_project>-put-ball-on-image-dev.modal.run
<agent_url>.
Now, go to the Encord Label Editor in your browser, viewing an asset for which you would like to test your agent.
Copy the url; let’s call it <editor_url>.
It should follow this pattern:
https://app.encord.com/label_editor/<project_hash>/<data_hash>/<frame>
encord_agents test custom '<agent_url>' '<editor_url>'
<agent_url> and the <editor_url> with the relevant urls.
You should see a green box detaining the request and the response.
If the status code is 200, refresh your browser to see the new bitmask in the Label Editor.
STEP 6: Deployment
When you are done developing your agent, run the following to deploy your agent.
Copy the displayed url and configure it in the Encord platform by following the documentation.
Once that is done, you can right-click the frame in the Label Editor to trigger the agent.