> ## Documentation Index
> Fetch the complete documentation index at: https://docs.encord.com/llms.txt
> Use this file to discover all available pages before exploring further.
# DICOM and NifTi
Encord provides native support for Digital Imaging and Communications in Medicine (DICOM) browser rendering and data annotations. The editor also supports NIfTI (Neuroimaging Informatics Technology Initiative). With the DICOM editor, you can:
* Annotate modalities such as CT, X-ray, and MRI.
* Label using any annotation type for the Primary view and bitmasks in non-Primary views in 2 and 3 dimensions, and seamlessly toggle between axial, coronal, and sagittal views.
* Render 20,000 pixel intensities and set custom window widths and levels.
* Natively display DICOM metadata.
* Track and interpolate objects between slices.
* Reduce manual annotations with automation features.
"Slices" and "Frames" are used interchangeably in our DICOM editor documentation.
The following video provides a summary of DICOM Label Editor capabilities.
**We recommend using the Firefox browser when working with DICOM or NIfTI files**, as it does not have a tab memory limit. Tab memory limits in other browsers such as Chrome may cause issues when loading large DICOM or NIfTI files.
 DICOM editor components:
* **A**. Load previous/next DICOM file.
* **B**. Toolbar with scissors (bulk vertex removal), measurement tools, windowing adjustment, image centering, and zoom.
* **C**. Editor menu.
* **D**. Slice slider and sliceskip interval.
* **E**. Instances and frame labels.
* **F**. Classes.
The following sections describe general functionality for all DICOM modalities. If you are looking for Mammography specific features on the Encord platform please have a look [here](/platform-documentation/Annotate/annotate-label-editor/annotate-mammo)
If you have questions regarding a specific modality or datatype, please reach out to us at [support@encord.com](mailto:support@encord.com).
## Task Management
Before we get into the details of the label editor and making annotations, a quick note about scheduling annotation work. Annotation is done in the annotation phase of the task management system. In order to ensure annotation work is saved properly, it's crucial that each labeling task is properly assigned to an annotator, annotators always access the task through the *Queue* tab in the Task Management System, and only the assigned annotator works on any given task at any given time.
***
## Navigation
### Move between slices
There are a number of different ways to skip through slices in a DICOM file:
* Using Left and Right arrow keys on your keyboard.
* Using the forward and backward buttons on the editor.
* By scrolling using your mousewheel or trackpad.
* By scrubbing through, or clicking anywhere on the progress bar.
The number of slices skipped is determined by the specified *Frameskip interval*. *Frameskip intervals* can be set using the predefined values, or customized by entering a value in the *New* input and clicking the *Plus* icon.
***
### Zoom and Pan
* Hold the Shift key and drag to pan, and move a DICOM slice around on the page.
* To zoom in or out of a slice:
* Hold Shift and use the Up and Down keys to zoom into the center of the slice.
* Hold Shift while scrolling using your laptop's trackpad to zoom into a particular point.
You can zoom and pan on every slice / view in a series.
***
### Progressive Loading
You don't have to wait for your file to finish loading before navigating to your desired frame! Simply drag the cursor to, or click the progress bar on, the location of the frame you would like to view while it is still loading, and the file will continue loading from the desired location, as seen in the following video. The light-blue color on the progress bar indicates how much of your file has been loaded.
***
### Crosshair Navigation
Crosshair mode can be activated using the *Crosshair* icon in the floating bar.
Left-clicking in a view updates the other views automatically so that the displayed image planes match the selected location.
***
### Deeplinking - Copy and share URLs
Seamlessly copy the URL of the slice currently being viewed by clicking the *Share* icon, shown below.
Share the URL to guide users to a specific slice or frame.
***
## Display
NifTi uses AXIAL orientation for the primary view.
DICOM uses DICOM uses the data from the header (slice orientation and slice position tags) for the orientation for the primary view.
### Intensity values
The Encord DICOM viewer renders DICOM files natively in the browser, enabling the display of the full range of the intensity values (i.e., 20,000+ pixel intensities).
Intensity values take the form of [Hounsfield units](https://en.wikipedia.org/wiki/Hounsfield_scale) for CT scans.
Intensity values are projected directly on the image. The example below has the cursor pointing to Hounsfield Value 1591 o.
***
### Window Width (WW) and Window Level (WL)
Toggle the DICOM windowing settings menu by clicking the *sliders* icon in the viewer pane. Adjust window width and level using the sliders or setting your required input values. Save custom levels as presets for quick access later.
Use the windowing adjustment functionality by clicking the *Adjust windowing* button in the toolbar or pressing alt + w on your keyboard. Next, press the left mouse button and drag the mouse to change the window width or level:
* **Up**: Increase window level.
* **Down**: Decrease window level.
* **Left**: Shrink window width.
* **Right**: Expand window width.
***
### VOI LUT Transfer Function
The **VOI (Value Of Interest) LUT (Look-Up Table) Function**, specified in the DICOM metadata Tag [(0028,1056)](https://dicom.innolitics.com/ciods/ct-image/voi-lut/00281056), defines how pixel values are mapped from **Modality LUT output** to **Presentation LUT input**, affecting image contrast and brightness.
The Encord DICOM viewer supports **Linear** and **Sigmoid** VOI LUT transfer functions.
For a detailed explanation of VOI LUT Transfer Functions, refer to the official DICOM documentation [here](https://dicom.nema.org/medical/dicom/current/output/chtml/part17/chapter_Y.html).
* By default, the VOI LUT Transfer Function is set to the value provided in the DICOM metadata. If no value is provided the Linear VOI LUT Transfer Function is used.
* You can **manually switch between Linear and Sigmoid transfer functions** using the toggle.
* This function controls how grayscale values are adjusted for optimal image display, ensuring better visibility of structures in medical imaging.
***
### Multiplanar Reconstruction (MPR)
Encord's MPR display reconstructs 2D orthogonal images (coronal, sagittal, axial) for enhanced visualization, analysis, and annotation of anatomy. Annotations made in the one view automatically appear in all other views, and cross-reference lines are projected across all three views, assisting with precise anatomy annotation.
MPR views are toggled on or off in the [DICOM editor settings](#dicom-editor-settings).
All reconstructed views can be [rendered in 3D](#3d-volume-rendering).
By default, the primary view is shown in the main annotation window on the left of the Label Editor, and reconstructed images are shown in smaller windows on the right. Use the MPR dropdown to switch between different views in any window - the primary view is always clearly labeled with the word **PRIMARY**.
**Labeling reconstructed views**
Only [Bitmask](#segmentation-masks--bitmasks) labels can be applied to reconstructed views.
Labels can be applied to primary and reconstructed views. When a label is created it automatically shows up in all other views. You can change the tile currently being annotated using the [*Annotate from this tile* button](#switch-annotation-series), however we recommend creating labels in the main annotation window.
**How to disable MPR**
MPR views are automatically displayed when a 3D volume is detected. To turn this off, disable the *Default to MPR layout* toggle in the *DICOM settings* section of the [Editor settings](#dicom-editor-settings).
***
### 3D Volume Rendering
Medical scans can be explored in 3 dimensions, allowing for a more intuitive assessment of anatomical structures.
3D volume rendering is only available for volumes - which Encord determines through `.dcm` file tags.
To enable 3D volume rendering:
1. Open the Additional controls pane by clicking the *Additional controls* icon.
2. Enable the *Full 3D* toggle.
3. (Optional) The 3D volume can be rotated by clicking and moving the mouse while holding down the Alt key on Windows, or the Option key on Mac.
***
### Switching Series in the Label Editor
Use the drop-down menu in the viewport to seamlessly switch between any series in the Project.
* **1** - Patient ID
* **2** - [Study ID](https://www.google.com/url?q=https://dicom.innolitics.com/ciods/rt-plan/general-study/0020000d\&sa=D\&source=docs\&ust=1705516719484780\&usg=AOvVaw10I1qZ4k1Z8xnmPfmLf8MF)
* **3** - Series title
Click a Series title to open the series in the Label Editor.
If the *Study level Classifications* toggle in the Project's Settings is Enabled you can click the Study ID to apply Classifications to the entire study.
### Multiple Series Viewing
In the drop-down menu of the viewport you can add other series to be viewed at the same time. Annotations will be seen on all the series being viewed, as seen in the screenshot below.
Only series that are part of the same [Dataset](/platform-documentation/Annotate/annotate-datasets/annotate-datasets) are available for selection. If you want to view multiple series in one session, ensure they are part of the same Dataset.
We are currently working on a feature that will allow for synchronous scrolling of multiple series.
***
### Maximum intensity projection (MIP)
Clicking the *sliders* icon in the corresponding viewer pane and then changing the slab thickness (ST) to something greater than 0 enables MIP mode. MIP can be switched on/off for each individual view. Note that annotations are not shown in MIP mode. To disable MIP mode change the ST back to 0.
***
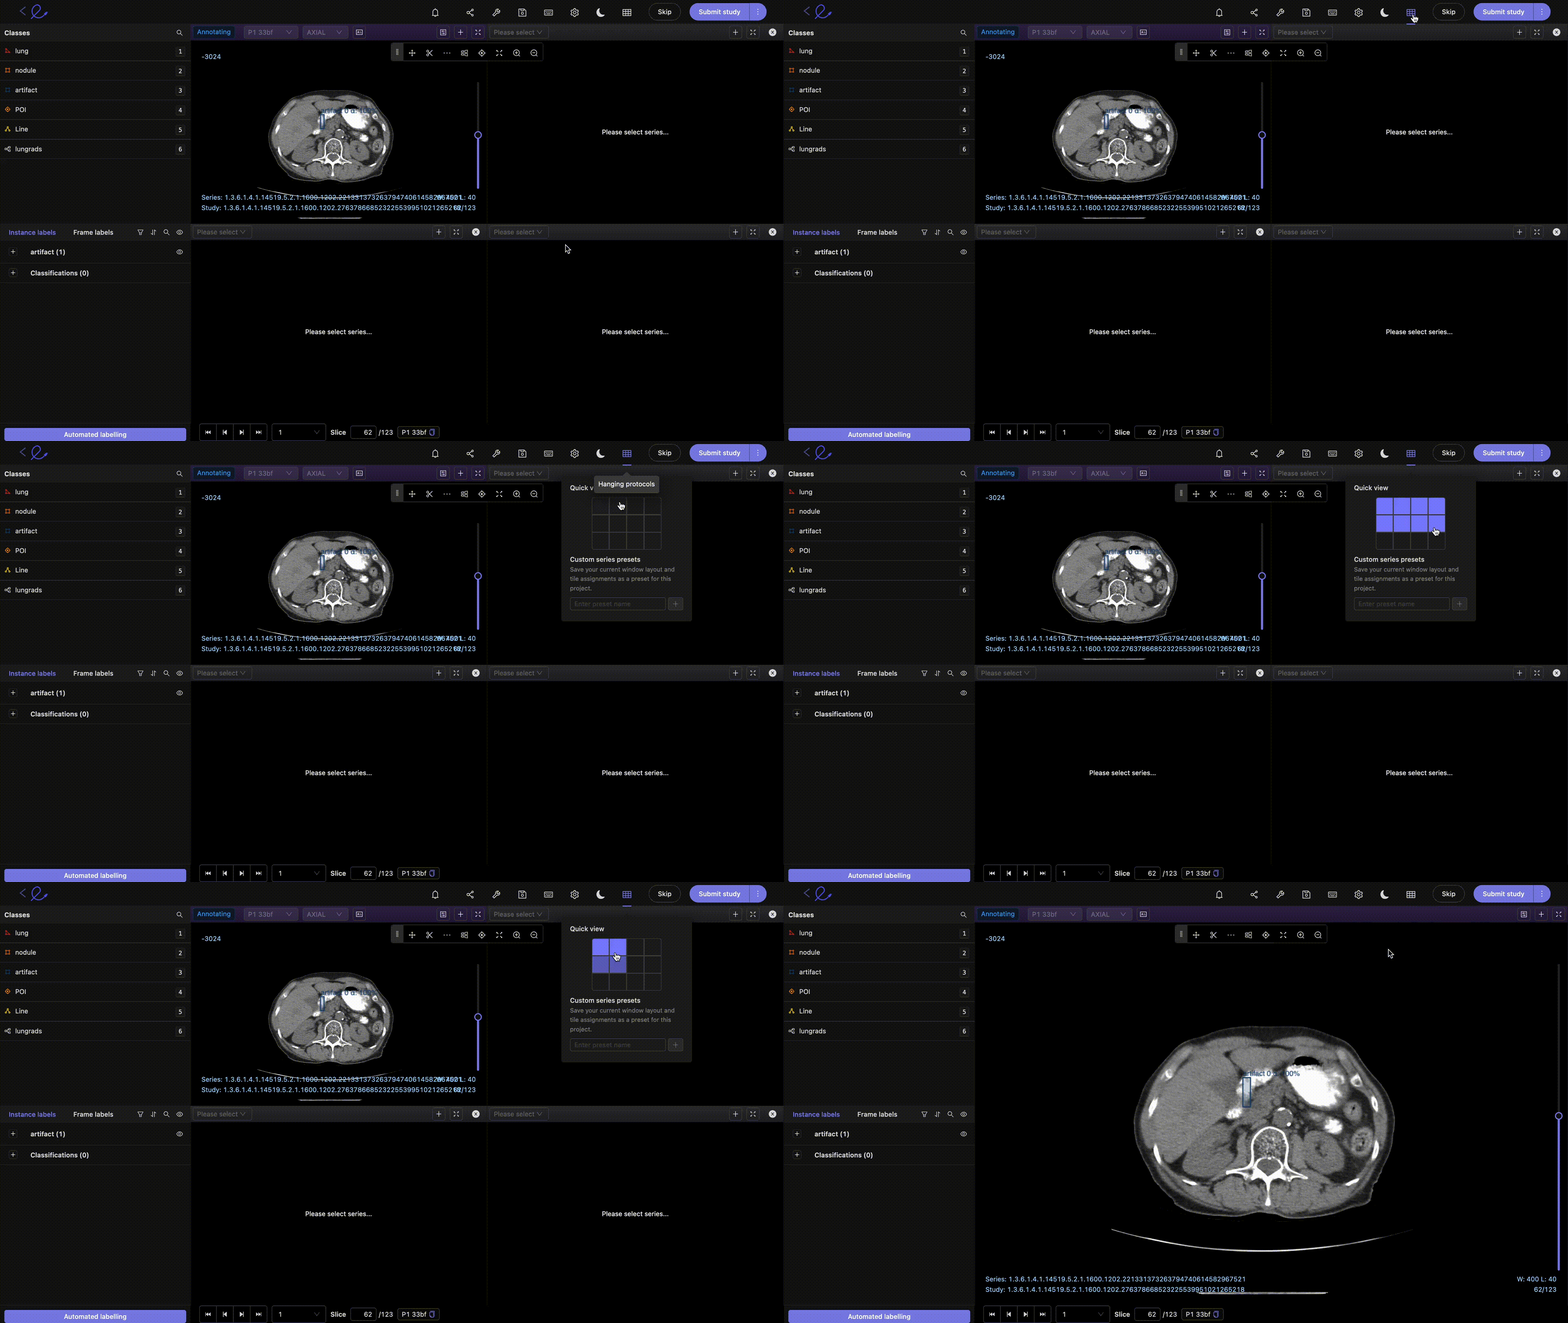
### Hanging protocols
Hanging protocols allow you to select how many entities within a study are displayed at the same time. This allows you to, for example, view the same CT scan slice at different moments in time.
#### Presets
You can save presets for a given layout by typing a meaningful name after making a protocol selection, and clicking the **+** button. Click the tick icon next to a preset name to select the preset as your default layout.
#### Default layouts
You can specify any preset, including [*Auto layout*](#auto-layouts), as the default layout for studies in the Label Editor.
Click the tick icon next to a preset in the [hanging protocols menu](#hanging-protocols), to select the preset as your default layout.
You can reset the Label Editor to the default layout by clicking the *Reset layout to default* icon.
#### Auto layouts
Auto layouts are common layouts for viewing DICOM studies in the Label Editor. Auto layouts are set in the [DICOM editor settings](#dicom-editor-settings). This includes the *MPR layout* setting and the *Mammography layout* setting for mammography files.
Selecting the **Auto layout** option resets the Label Editor to your auto layout. You can specify the **Auto layout** option as your [default layout](#default-layouts).
***
### Metadata
Metadata is not supported for NIfTI.
Ensure your DICOM files and [metadata](/platform-documentation/Annotate/annotate-label-editor/annotate-dicom#metadata) follow the format outlined in the [official DICOM specification](https://dicom.nema.org/medical/dicom/current/output/chtml/part05/sect_6.2.html).
The Encord DICOM metadata viewer renders DICOM files natively in the browser, allowing you to access all defined metadata fields and sequences associated with the DICOM file.
The metadata viewer is displayed by toggling the *View metadata* button above the series being annotated. The metadata viewer contains a search bar allowing you to search for specific types of metadata.
A note appears warning the user if 'Pixel spacing' is missing from an entity's metadata. Pixel spacing is essential for [making accurate distance measurements](#distance-measurement).
The metadata is organized into the following columns for easy interpretation:
* **Field Name**: This column displays the name of the metadata field.
* **Tag**: Represented in the format (group, element), the Tag column consists of two hexadecimal values enclosed in brackets. These values uniquely identify the metadata field.
* **Content**: This column shows the data or value associated with the field.
Metadata sequences provide additional layers of information and can be identified by the presence of the **+** icon. Clicking the **+** icon expands the sequence, revealing nested fields and changing to a **-** icon. Clicking the **-** icon collapses the sequence.
#### Understanding the Tag column
The Tag column plays a vital role in identifying the type of metadata field:
* **Private fields**: If the fourth character of the group value in the Tag is an odd number - for example (0013,1001) - the field is considered private. Private fields may or may not display accurate Field Name and Content. In many cases, these fields have the Field Name listed as 'Unknown' and may contain empty or nonsensical content.
* **Standard fields**: If the fourth character of the group value is an even number and the Content field is empty - for example (0010,2000) - the field is genuinely empty and not a result of data being hidden.
#### Data overlay toggle
The *Data overlay* toggle, located in the *Additional controls*, allows you to display or hide metadata overlay. When toggled on, metadata displays in the bottom left corner of the series being annotated.
Custom DICOM metadata such as text reports from radiological descriptions can be rendered in popout drawers. To add drawers with custom DICOM metadata, contact [support@encord.com](mailto:support@encord.com) with the information you wish to represent.
#### Custom overlay
Create a custom overlay to display specific [metadata](#metadata) in the Label Editor by default.
To set a custom overlay:
1. Navigate to the *Settings* tab of your Project.
2. Click **Upload** in the *DICOM* section.
3. Upload a JSON file specifying the custom overlay you want to display in the Label Editor.
4. Click the **Preview** button to see what the custom overlay looks like.
**Specifying custom overlays**:
A JSON file is used to define which elements are displayed as overlays in the Label Editor. The following JSON schema includes all possible overlay elements you can configure.
Examples of overlay JSON files can be found [here](https://github.com/encord-team/dicom/tree/main/overlay/examples).
```json theme={"dark"}
{
"title": "DicomOverlayModel",
"type": "object",
"properties": {
"items": { "$ref": "#/definitions/OverlayItems" },
"fontSize": {
"title": "Fontsize",
"description": "The font size relative to Encord's default size. Default value is 1",
"exclusiveMinimum": 0.5,
"exclusiveMaximum": 3,
"type": "number"
}
},
"required": ["items"],
"definitions": {
"OverlayItem": {
"title": "OverlayItem",
"type": "object",
"properties": {
"content": {
"title": "Content",
"description": "A template string used to format a .dcm tag value, for example 'Modality: {00080060}', or information about the context, e.g. {sliceNumber}.\n- {sliceNumber}: the current slice number out of the total number of slices, starting from 0. Empty if there is only one slice. Example: '3/200'.\n- {pixelValue}: the pixel value at the current mouse position. Only for grayscale images.\n- {windowing}: the current windowing width and length. Example: 'W: 400 L: 40'",
"maxLength": 100,
"pattern": ".*\\{([0-9a-f]{8}|(sliceNumber)|(pixelValue)|(windowing))\\}.*",
"type": "string"
}
},
"required": ["content"],
"additionalProperties": false
},
"OverlayItems": {
"title": "OverlayItems",
"type": "object",
"properties": {
"bottomLeft": {
"title": "Bottomleft",
"maxItems": 10,
"type": "array",
"items": { "$ref": "#/definitions/OverlayItem" }
},
"bottomRight": {
"title": "Bottomright",
"maxItems": 10,
"type": "array",
"items": { "$ref": "#/definitions/OverlayItem" }
},
"topLeft": {
"title": "Topleft",
"maxItems": 10,
"type": "array",
"items": { "$ref": "#/definitions/OverlayItem" }
},
"topRight": {
"title": "Topright",
"maxItems": 10,
"type": "array",
"items": { "$ref": "#/definitions/OverlayItem" }
}
},
"additionalProperties": false
}
}
}
```
***
## Switch annotation series
You can seamlessly switch the series you'd like to annotate.
**To select a tile for annotation**
* Click the *Switch tiles* icon highlighted in the image below.
* Click the three dots icon highlighted in the image below and select **Annotate from this tile**.
**To move a tile to the one currently being annotated**
1. Click the three dots icon highlighted in the image below
2. Select **Annotate and swap tiles**.
***
### Editor switch
The 'Editor switch' button (
DICOM editor components:
* **A**. Load previous/next DICOM file.
* **B**. Toolbar with scissors (bulk vertex removal), measurement tools, windowing adjustment, image centering, and zoom.
* **C**. Editor menu.
* **D**. Slice slider and sliceskip interval.
* **E**. Instances and frame labels.
* **F**. Classes.
The following sections describe general functionality for all DICOM modalities. If you are looking for Mammography specific features on the Encord platform please have a look [here](/platform-documentation/Annotate/annotate-label-editor/annotate-mammo)
If you have questions regarding a specific modality or datatype, please reach out to us at [support@encord.com](mailto:support@encord.com).
## Task Management
Before we get into the details of the label editor and making annotations, a quick note about scheduling annotation work. Annotation is done in the annotation phase of the task management system. In order to ensure annotation work is saved properly, it's crucial that each labeling task is properly assigned to an annotator, annotators always access the task through the *Queue* tab in the Task Management System, and only the assigned annotator works on any given task at any given time.
***
## Navigation
### Move between slices
There are a number of different ways to skip through slices in a DICOM file:
* Using Left and Right arrow keys on your keyboard.
* Using the forward and backward buttons on the editor.
* By scrolling using your mousewheel or trackpad.
* By scrubbing through, or clicking anywhere on the progress bar.
The number of slices skipped is determined by the specified *Frameskip interval*. *Frameskip intervals* can be set using the predefined values, or customized by entering a value in the *New* input and clicking the *Plus* icon.
***
### Zoom and Pan
* Hold the Shift key and drag to pan, and move a DICOM slice around on the page.
* To zoom in or out of a slice:
* Hold Shift and use the Up and Down keys to zoom into the center of the slice.
* Hold Shift while scrolling using your laptop's trackpad to zoom into a particular point.
You can zoom and pan on every slice / view in a series.
***
### Progressive Loading
You don't have to wait for your file to finish loading before navigating to your desired frame! Simply drag the cursor to, or click the progress bar on, the location of the frame you would like to view while it is still loading, and the file will continue loading from the desired location, as seen in the following video. The light-blue color on the progress bar indicates how much of your file has been loaded.
***
### Crosshair Navigation
Crosshair mode can be activated using the *Crosshair* icon in the floating bar.
Left-clicking in a view updates the other views automatically so that the displayed image planes match the selected location.
***
### Deeplinking - Copy and share URLs
Seamlessly copy the URL of the slice currently being viewed by clicking the *Share* icon, shown below.
Share the URL to guide users to a specific slice or frame.
***
## Display
NifTi uses AXIAL orientation for the primary view.
DICOM uses DICOM uses the data from the header (slice orientation and slice position tags) for the orientation for the primary view.
### Intensity values
The Encord DICOM viewer renders DICOM files natively in the browser, enabling the display of the full range of the intensity values (i.e., 20,000+ pixel intensities).
Intensity values take the form of [Hounsfield units](https://en.wikipedia.org/wiki/Hounsfield_scale) for CT scans.
Intensity values are projected directly on the image. The example below has the cursor pointing to Hounsfield Value 1591 o.
***
### Window Width (WW) and Window Level (WL)
Toggle the DICOM windowing settings menu by clicking the *sliders* icon in the viewer pane. Adjust window width and level using the sliders or setting your required input values. Save custom levels as presets for quick access later.
Use the windowing adjustment functionality by clicking the *Adjust windowing* button in the toolbar or pressing alt + w on your keyboard. Next, press the left mouse button and drag the mouse to change the window width or level:
* **Up**: Increase window level.
* **Down**: Decrease window level.
* **Left**: Shrink window width.
* **Right**: Expand window width.
***
### VOI LUT Transfer Function
The **VOI (Value Of Interest) LUT (Look-Up Table) Function**, specified in the DICOM metadata Tag [(0028,1056)](https://dicom.innolitics.com/ciods/ct-image/voi-lut/00281056), defines how pixel values are mapped from **Modality LUT output** to **Presentation LUT input**, affecting image contrast and brightness.
The Encord DICOM viewer supports **Linear** and **Sigmoid** VOI LUT transfer functions.
For a detailed explanation of VOI LUT Transfer Functions, refer to the official DICOM documentation [here](https://dicom.nema.org/medical/dicom/current/output/chtml/part17/chapter_Y.html).
* By default, the VOI LUT Transfer Function is set to the value provided in the DICOM metadata. If no value is provided the Linear VOI LUT Transfer Function is used.
* You can **manually switch between Linear and Sigmoid transfer functions** using the toggle.
* This function controls how grayscale values are adjusted for optimal image display, ensuring better visibility of structures in medical imaging.
***
### Multiplanar Reconstruction (MPR)
Encord's MPR display reconstructs 2D orthogonal images (coronal, sagittal, axial) for enhanced visualization, analysis, and annotation of anatomy. Annotations made in the one view automatically appear in all other views, and cross-reference lines are projected across all three views, assisting with precise anatomy annotation.
MPR views are toggled on or off in the [DICOM editor settings](#dicom-editor-settings).
All reconstructed views can be [rendered in 3D](#3d-volume-rendering).
By default, the primary view is shown in the main annotation window on the left of the Label Editor, and reconstructed images are shown in smaller windows on the right. Use the MPR dropdown to switch between different views in any window - the primary view is always clearly labeled with the word **PRIMARY**.
**Labeling reconstructed views**
Only [Bitmask](#segmentation-masks--bitmasks) labels can be applied to reconstructed views.
Labels can be applied to primary and reconstructed views. When a label is created it automatically shows up in all other views. You can change the tile currently being annotated using the [*Annotate from this tile* button](#switch-annotation-series), however we recommend creating labels in the main annotation window.
**How to disable MPR**
MPR views are automatically displayed when a 3D volume is detected. To turn this off, disable the *Default to MPR layout* toggle in the *DICOM settings* section of the [Editor settings](#dicom-editor-settings).
***
### 3D Volume Rendering
Medical scans can be explored in 3 dimensions, allowing for a more intuitive assessment of anatomical structures.
3D volume rendering is only available for volumes - which Encord determines through `.dcm` file tags.
To enable 3D volume rendering:
1. Open the Additional controls pane by clicking the *Additional controls* icon.
2. Enable the *Full 3D* toggle.
3. (Optional) The 3D volume can be rotated by clicking and moving the mouse while holding down the Alt key on Windows, or the Option key on Mac.
***
### Switching Series in the Label Editor
Use the drop-down menu in the viewport to seamlessly switch between any series in the Project.
* **1** - Patient ID
* **2** - [Study ID](https://www.google.com/url?q=https://dicom.innolitics.com/ciods/rt-plan/general-study/0020000d\&sa=D\&source=docs\&ust=1705516719484780\&usg=AOvVaw10I1qZ4k1Z8xnmPfmLf8MF)
* **3** - Series title
Click a Series title to open the series in the Label Editor.
If the *Study level Classifications* toggle in the Project's Settings is Enabled you can click the Study ID to apply Classifications to the entire study.
### Multiple Series Viewing
In the drop-down menu of the viewport you can add other series to be viewed at the same time. Annotations will be seen on all the series being viewed, as seen in the screenshot below.
Only series that are part of the same [Dataset](/platform-documentation/Annotate/annotate-datasets/annotate-datasets) are available for selection. If you want to view multiple series in one session, ensure they are part of the same Dataset.
We are currently working on a feature that will allow for synchronous scrolling of multiple series.
***
### Maximum intensity projection (MIP)
Clicking the *sliders* icon in the corresponding viewer pane and then changing the slab thickness (ST) to something greater than 0 enables MIP mode. MIP can be switched on/off for each individual view. Note that annotations are not shown in MIP mode. To disable MIP mode change the ST back to 0.
***
### Hanging protocols
Hanging protocols allow you to select how many entities within a study are displayed at the same time. This allows you to, for example, view the same CT scan slice at different moments in time.
#### Presets
You can save presets for a given layout by typing a meaningful name after making a protocol selection, and clicking the **+** button. Click the tick icon next to a preset name to select the preset as your default layout.
#### Default layouts
You can specify any preset, including [*Auto layout*](#auto-layouts), as the default layout for studies in the Label Editor.
Click the tick icon next to a preset in the [hanging protocols menu](#hanging-protocols), to select the preset as your default layout.
You can reset the Label Editor to the default layout by clicking the *Reset layout to default* icon.
#### Auto layouts
Auto layouts are common layouts for viewing DICOM studies in the Label Editor. Auto layouts are set in the [DICOM editor settings](#dicom-editor-settings). This includes the *MPR layout* setting and the *Mammography layout* setting for mammography files.
Selecting the **Auto layout** option resets the Label Editor to your auto layout. You can specify the **Auto layout** option as your [default layout](#default-layouts).
***
### Metadata
Metadata is not supported for NIfTI.
Ensure your DICOM files and [metadata](/platform-documentation/Annotate/annotate-label-editor/annotate-dicom#metadata) follow the format outlined in the [official DICOM specification](https://dicom.nema.org/medical/dicom/current/output/chtml/part05/sect_6.2.html).
The Encord DICOM metadata viewer renders DICOM files natively in the browser, allowing you to access all defined metadata fields and sequences associated with the DICOM file.
The metadata viewer is displayed by toggling the *View metadata* button above the series being annotated. The metadata viewer contains a search bar allowing you to search for specific types of metadata.
A note appears warning the user if 'Pixel spacing' is missing from an entity's metadata. Pixel spacing is essential for [making accurate distance measurements](#distance-measurement).
The metadata is organized into the following columns for easy interpretation:
* **Field Name**: This column displays the name of the metadata field.
* **Tag**: Represented in the format (group, element), the Tag column consists of two hexadecimal values enclosed in brackets. These values uniquely identify the metadata field.
* **Content**: This column shows the data or value associated with the field.
Metadata sequences provide additional layers of information and can be identified by the presence of the **+** icon. Clicking the **+** icon expands the sequence, revealing nested fields and changing to a **-** icon. Clicking the **-** icon collapses the sequence.
#### Understanding the Tag column
The Tag column plays a vital role in identifying the type of metadata field:
* **Private fields**: If the fourth character of the group value in the Tag is an odd number - for example (0013,1001) - the field is considered private. Private fields may or may not display accurate Field Name and Content. In many cases, these fields have the Field Name listed as 'Unknown' and may contain empty or nonsensical content.
* **Standard fields**: If the fourth character of the group value is an even number and the Content field is empty - for example (0010,2000) - the field is genuinely empty and not a result of data being hidden.
#### Data overlay toggle
The *Data overlay* toggle, located in the *Additional controls*, allows you to display or hide metadata overlay. When toggled on, metadata displays in the bottom left corner of the series being annotated.
Custom DICOM metadata such as text reports from radiological descriptions can be rendered in popout drawers. To add drawers with custom DICOM metadata, contact [support@encord.com](mailto:support@encord.com) with the information you wish to represent.
#### Custom overlay
Create a custom overlay to display specific [metadata](#metadata) in the Label Editor by default.
To set a custom overlay:
1. Navigate to the *Settings* tab of your Project.
2. Click **Upload** in the *DICOM* section.
3. Upload a JSON file specifying the custom overlay you want to display in the Label Editor.
4. Click the **Preview** button to see what the custom overlay looks like.
**Specifying custom overlays**:
A JSON file is used to define which elements are displayed as overlays in the Label Editor. The following JSON schema includes all possible overlay elements you can configure.
Examples of overlay JSON files can be found [here](https://github.com/encord-team/dicom/tree/main/overlay/examples).
```json theme={"dark"}
{
"title": "DicomOverlayModel",
"type": "object",
"properties": {
"items": { "$ref": "#/definitions/OverlayItems" },
"fontSize": {
"title": "Fontsize",
"description": "The font size relative to Encord's default size. Default value is 1",
"exclusiveMinimum": 0.5,
"exclusiveMaximum": 3,
"type": "number"
}
},
"required": ["items"],
"definitions": {
"OverlayItem": {
"title": "OverlayItem",
"type": "object",
"properties": {
"content": {
"title": "Content",
"description": "A template string used to format a .dcm tag value, for example 'Modality: {00080060}', or information about the context, e.g. {sliceNumber}.\n- {sliceNumber}: the current slice number out of the total number of slices, starting from 0. Empty if there is only one slice. Example: '3/200'.\n- {pixelValue}: the pixel value at the current mouse position. Only for grayscale images.\n- {windowing}: the current windowing width and length. Example: 'W: 400 L: 40'",
"maxLength": 100,
"pattern": ".*\\{([0-9a-f]{8}|(sliceNumber)|(pixelValue)|(windowing))\\}.*",
"type": "string"
}
},
"required": ["content"],
"additionalProperties": false
},
"OverlayItems": {
"title": "OverlayItems",
"type": "object",
"properties": {
"bottomLeft": {
"title": "Bottomleft",
"maxItems": 10,
"type": "array",
"items": { "$ref": "#/definitions/OverlayItem" }
},
"bottomRight": {
"title": "Bottomright",
"maxItems": 10,
"type": "array",
"items": { "$ref": "#/definitions/OverlayItem" }
},
"topLeft": {
"title": "Topleft",
"maxItems": 10,
"type": "array",
"items": { "$ref": "#/definitions/OverlayItem" }
},
"topRight": {
"title": "Topright",
"maxItems": 10,
"type": "array",
"items": { "$ref": "#/definitions/OverlayItem" }
}
},
"additionalProperties": false
}
}
}
```
***
## Switch annotation series
You can seamlessly switch the series you'd like to annotate.
**To select a tile for annotation**
* Click the *Switch tiles* icon highlighted in the image below.
* Click the three dots icon highlighted in the image below and select **Annotate from this tile**.
**To move a tile to the one currently being annotated**
1. Click the three dots icon highlighted in the image below
2. Select **Annotate and swap tiles**.
***
### Editor switch
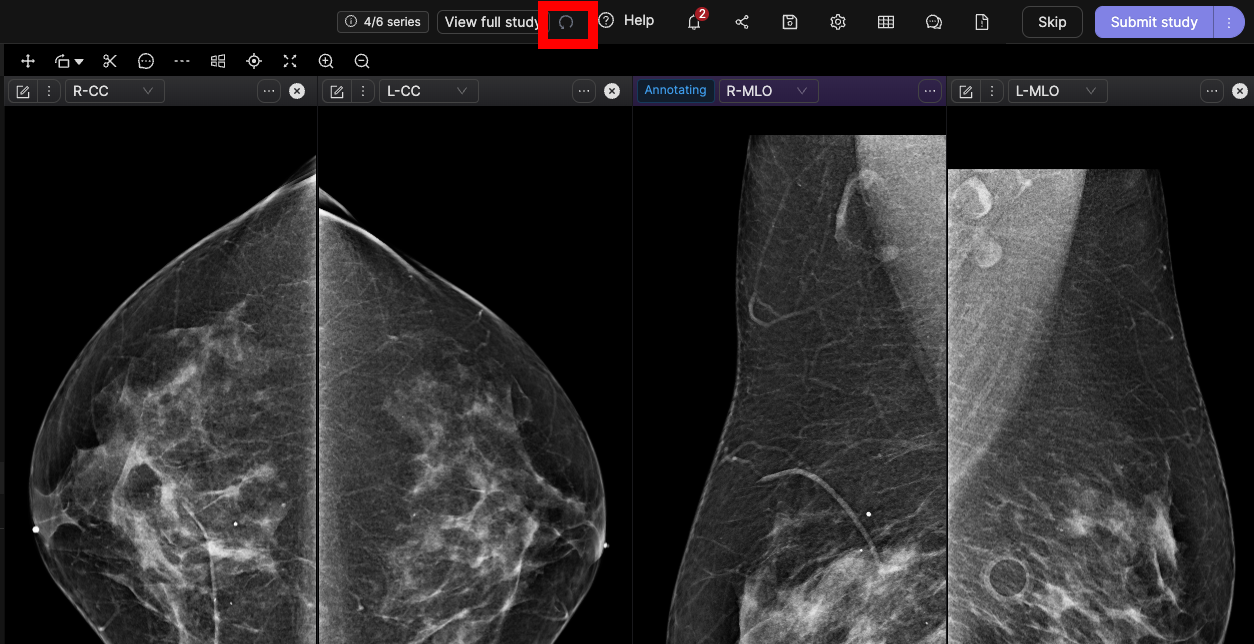
The 'Editor switch' button (  ) enables you to select any series being displayed to be annotated without having to return to the task management system.
***
### View full study
The Label Editor displays how many series are in part of the study currently being viewed. The **View full study** button allows you to view all series belonging to a study side-by-side.
You can toggle the **View full study** button. When you toggle that button it turns into the **Hide full study** button.
***
### Rotate the label editor
Click the *Rotate toolbar* icon at the top of the label editor to bring up a pop-up enabling you to rotate the label editor by using the slider, as shown below.
Click the *Rotate 90 degrees* icon to rotate the pop-up in increments of 90 degrees.
***
## Tools
### Distance measurement
The distance measurement tool can be used to measure real-world distances between any two points on an image. It uses the 'Pixel spacing' parameter - contained in an entity's [metadata](#metadata) - to accurately convert pixels into real-world distances that are displayed in millimeters.
For accurate measurements in mammography, the '[EstimatedRadiographicMagFactor](https://dicom.innolitics.com/ciods/digital-x-ray-image/dx-positioning/00181114)' needs to be contained within an entity's [metadata](#metadata). It is used as a scale factor to adjust the distance measurement and provide accurate results. The absence of the 'EstimatedRadiographicMagFactor' can result in errors when measuring distances in mammography.
The [Polyline Ontology](/platform-documentation/Annotate/annotate-ontologies/annotate-ontologies#objects) displays the total length of the line in millimeters, rather than simply the distance between two points.
Enable the distance measurement functionality by clicking the
) enables you to select any series being displayed to be annotated without having to return to the task management system.
***
### View full study
The Label Editor displays how many series are in part of the study currently being viewed. The **View full study** button allows you to view all series belonging to a study side-by-side.
You can toggle the **View full study** button. When you toggle that button it turns into the **Hide full study** button.
***
### Rotate the label editor
Click the *Rotate toolbar* icon at the top of the label editor to bring up a pop-up enabling you to rotate the label editor by using the slider, as shown below.
Click the *Rotate 90 degrees* icon to rotate the pop-up in increments of 90 degrees.
***
## Tools
### Distance measurement
The distance measurement tool can be used to measure real-world distances between any two points on an image. It uses the 'Pixel spacing' parameter - contained in an entity's [metadata](#metadata) - to accurately convert pixels into real-world distances that are displayed in millimeters.
For accurate measurements in mammography, the '[EstimatedRadiographicMagFactor](https://dicom.innolitics.com/ciods/digital-x-ray-image/dx-positioning/00181114)' needs to be contained within an entity's [metadata](#metadata). It is used as a scale factor to adjust the distance measurement and provide accurate results. The absence of the 'EstimatedRadiographicMagFactor' can result in errors when measuring distances in mammography.
The [Polyline Ontology](/platform-documentation/Annotate/annotate-ontologies/annotate-ontologies#objects) displays the total length of the line in millimeters, rather than simply the distance between two points.
Enable the distance measurement functionality by clicking the  button on the floating toolbar, or by pressing alt + m on your keyboard.
To delete existing measurements the distance measurement functionality has to be enabled. Erase measurements by selecting a measurement and pressing backspace or del on your keyboard.
***
### Distance export
Encord supports copying measured distances using the [polyline annotation type](#polyline), separate from using the [measurement tool](#distance-measurement) as detailed above.
1. Create a [polyline](#polyline) annotation.
2. Select the newly created [polyline](#polyline) and click the three dots on the *Quick toolbar* to copy the distance to your clipboard.
***
### Measure angles
Polygon and polyline angles can be displayed in the label editor to provide useful insights into your labels.
1. Open the label editor *Settings* by clicking
button on the floating toolbar, or by pressing alt + m on your keyboard.
To delete existing measurements the distance measurement functionality has to be enabled. Erase measurements by selecting a measurement and pressing backspace or del on your keyboard.
***
### Distance export
Encord supports copying measured distances using the [polyline annotation type](#polyline), separate from using the [measurement tool](#distance-measurement) as detailed above.
1. Create a [polyline](#polyline) annotation.
2. Select the newly created [polyline](#polyline) and click the three dots on the *Quick toolbar* to copy the distance to your clipboard.
***
### Measure angles
Polygon and polyline angles can be displayed in the label editor to provide useful insights into your labels.
1. Open the label editor *Settings* by clicking  on the [editor header](/platform-documentation/Annotate/annotate-label-editor#editor-header).
2. Navigate to the *Drawing settings* section and enable the **Show polyshape angles** toggle. Click back on to the slice to display the angles.
3. Draw a polygon or polyline as you usually would.
Enabling the toggle will display angles for any existing polyshapes.
***
## Annotation types
Objects are annotated using bounding boxes, polygons, polylines, keypoints or primitives. Slices are annotated using classifications. Instantiating objects or classifications in the DICOM editor generates a *UUID* that uniquely identifies that instance across a range of slices (i.e., in the spatial dimension).
The identifier is sometimes called a "track," with numerical IDs supplementing *UUIDs* for objects for visual aid.
Object instances can be assigned with static and dynamic attributes (i.e., spatial classifications that may change through the volume) as defined in the specified ontology. Static classifications define the global properties of an object (e.g., the surgical tool has three forks) whereas dynamic attributes change during the volume (e.g., the brain has a tumour present from slices 0 to 100 but none from frame 101 to 150).
Supported annotation types & corresponding features are listed in the table below. You can read more about the listed automation features here.
| **Annotation type** | **Dynamic attribute** | **Automated tracking** | **Interpolation** | **Import predictions** | **Model training & inference** |
| ---------------------- | --------------------- | ---------------------- | ----------------- | ---------------------- | ------------------------------ |
| Bounding box | ✅ | ✅ | ✅ | ✅ | ✅ |
| Rotatable bounding box | ✅ | ✅ | ✅ | ✅ | Coming soon |
| Polygon | ✅ | Coming soon | ✅ | ✅ | ✅ |
| Polyline | ✅ | ✅ | ✅ | ✅ | Coming Soon |
| Keypoint | ✅ | ✅ | ✅ | ✅ | ✅ |
| Bitmask | ✅ | N/A | ✅ | ✅ | N/A |
| Object primitive | N/A | ✅ | N/A | ✅ | N/A |
| Frame classification | N/A | N/A | N/A | ✅ | ✅ |
***
### Bounding box
Creating a bounding box requires an Ontology with a bounding box annotation type. Instantiate a new bounding box instance by clicking on the specified class in the 'Classes' menu, or by using the specified hotkey (e.g., 1, 2, 3).
Instantiating existing bounding box instances (i.e., bounding boxes that should keep the same identifier in preceding or succeeding slices) can be done by clicking on the *Highlight* icon for the specified object or using the assigned hotkey (e.g., q, w, e).
Bounding boxes can be copy/pasted between slices using cmd (MacOS)/ctrl (Windows) + c to copy the object to the clipboard and cmd/ctrl + v to paste it on the desired slice. See this visual illustration.
Bounding box instances can be assigned with static and [dynamic attributes](/platform-documentation/Annotate/annotate-label-editor/annotate-videos#dynamic-attributes) should they be defined in your Ontology.
* Highlight an object by clicking on it in the DICOM editor canvas or by clicking on the *Plus* icon or start/end slice in the range overview for the specified bounding box.
* Assign classifications by clicking on the relevant buttons or using the set hotkeys (for example q, u).
#### Interpolation
Interpolation is run via the *Automated labeling* drawer. Click the *Automated labeling* button to open the drawer. Select *Interpolation* from the drop-down menu, select the desired objects to interpolate, set the interpolation range (i.e., the range of slices) and click the *Run interpolation* button. You need a minimum two labels of an instance to run interpolation.
Learn how to use interpolation for DICOM using the video tutorial below.
on the [editor header](/platform-documentation/Annotate/annotate-label-editor#editor-header).
2. Navigate to the *Drawing settings* section and enable the **Show polyshape angles** toggle. Click back on to the slice to display the angles.
3. Draw a polygon or polyline as you usually would.
Enabling the toggle will display angles for any existing polyshapes.
***
## Annotation types
Objects are annotated using bounding boxes, polygons, polylines, keypoints or primitives. Slices are annotated using classifications. Instantiating objects or classifications in the DICOM editor generates a *UUID* that uniquely identifies that instance across a range of slices (i.e., in the spatial dimension).
The identifier is sometimes called a "track," with numerical IDs supplementing *UUIDs* for objects for visual aid.
Object instances can be assigned with static and dynamic attributes (i.e., spatial classifications that may change through the volume) as defined in the specified ontology. Static classifications define the global properties of an object (e.g., the surgical tool has three forks) whereas dynamic attributes change during the volume (e.g., the brain has a tumour present from slices 0 to 100 but none from frame 101 to 150).
Supported annotation types & corresponding features are listed in the table below. You can read more about the listed automation features here.
| **Annotation type** | **Dynamic attribute** | **Automated tracking** | **Interpolation** | **Import predictions** | **Model training & inference** |
| ---------------------- | --------------------- | ---------------------- | ----------------- | ---------------------- | ------------------------------ |
| Bounding box | ✅ | ✅ | ✅ | ✅ | ✅ |
| Rotatable bounding box | ✅ | ✅ | ✅ | ✅ | Coming soon |
| Polygon | ✅ | Coming soon | ✅ | ✅ | ✅ |
| Polyline | ✅ | ✅ | ✅ | ✅ | Coming Soon |
| Keypoint | ✅ | ✅ | ✅ | ✅ | ✅ |
| Bitmask | ✅ | N/A | ✅ | ✅ | N/A |
| Object primitive | N/A | ✅ | N/A | ✅ | N/A |
| Frame classification | N/A | N/A | N/A | ✅ | ✅ |
***
### Bounding box
Creating a bounding box requires an Ontology with a bounding box annotation type. Instantiate a new bounding box instance by clicking on the specified class in the 'Classes' menu, or by using the specified hotkey (e.g., 1, 2, 3).
Instantiating existing bounding box instances (i.e., bounding boxes that should keep the same identifier in preceding or succeeding slices) can be done by clicking on the *Highlight* icon for the specified object or using the assigned hotkey (e.g., q, w, e).
Bounding boxes can be copy/pasted between slices using cmd (MacOS)/ctrl (Windows) + c to copy the object to the clipboard and cmd/ctrl + v to paste it on the desired slice. See this visual illustration.
Bounding box instances can be assigned with static and [dynamic attributes](/platform-documentation/Annotate/annotate-label-editor/annotate-videos#dynamic-attributes) should they be defined in your Ontology.
* Highlight an object by clicking on it in the DICOM editor canvas or by clicking on the *Plus* icon or start/end slice in the range overview for the specified bounding box.
* Assign classifications by clicking on the relevant buttons or using the set hotkeys (for example q, u).
#### Interpolation
Interpolation is run via the *Automated labeling* drawer. Click the *Automated labeling* button to open the drawer. Select *Interpolation* from the drop-down menu, select the desired objects to interpolate, set the interpolation range (i.e., the range of slices) and click the *Run interpolation* button. You need a minimum two labels of an instance to run interpolation.
Learn how to use interpolation for DICOM using the video tutorial below.
You can read more about interpolation here.
***
### Polygon
Creating a polygon requires an Ontology with a polygon annotation type. Enable or disable free-hand drawing mode by pressing d on your keyboard. Polygon coarseness (for polygons drawn free-hand) is set in the *Drawing settings* section of the *Settings* ().
Instantiate a new polygon instance by clicking on the specified class in the 'Classes' menu or using the specified hotkey (e.g., 1, 2, 3).
A polygon can be closed by double-clicking anywhere on the canvas. Doing so will "snap" creating an edge between the last vertex to the first vertex drawn.
You can create polygons using SAM 2, by placing vertices, or by using the polygon brush (F).
Instantiate existing polygon instances (i.e., polygons that should keep the same identifier in preceding or succeeding slices) by clicking on the *Highlight* icon for the specified object or using the assigned hotkey (e.g., q, w, e). See the keypoint documentation for visual instructions on how to instantiate existing polygons.
Polygons can be copy/pasted between slices using cmd (MacOS)/ctrl (Windows) + c to copy the object to the clipboard and cmd/ctrl + v to paste it on the desired slice.
Polygon instances can be assigned with static and [dynamic attributes](/platform-documentation/Annotate/annotate-label-editor/annotate-videos#dynamic-attributes) should they be defined in your Ontology:
* Highlight an object by clicking on it in the editor canvas or by clicking on the *Plus* icon or start/end slice in the range overview for the specified polygon.
* Assign classifications by clicking on the relevant buttons or using the set hotkeys (for example q, u).
#### Interpolation
Run polygon interpolation following the instructions for bounding box, which you can find here. Unlike other linear interpolation methods, Encord's polygon interpolation algorithm does not require a matching number of vertices between polygon objects in set keyframes. Our algorithm also allows you to draw polygons in arbitrary directions (e.g., clockwise, counterclockwise, and otherwise).
You can read more about interpolation here.
#### Editing polygons with the brush tool
You can edit existing polygons with the brush tool. This allows you to create complex shapes in a much faster way than going vertex by vertex. To use the brush tool, select an existing polygon and then click on the brush tool button. This will show the brush tool settings panel where you can choose the brush or eraser and change its size. Once you are done editing, click the "x" to go back to the label editor.
***
### Polyline
Creating a polyline requires an Ontology with a polyline annotation type. Enable or disable free-hand drawing mode by pressing d on your keyboard. Polyline coarseness (for polylines drawn free-hand) is set in the *Drawing settings* section of the *Settings* ().
Instantiate a new polyline instance by clicking on the specified class in the 'Classes' menu or using the specified hotkey (e.g., 1, 2, 3).
Polylines can be copy/pasted between slices using cmd (MacOS)/ctrl (Windows) + c to copy the object to the clipboard and cmd/ctrl + v to paste it on the desired slice.
Complete a polyline by double-clicking anywhere on the canvas.
Instantiate existing polyline instances (i.e., polylines that should keep the same identifier in preceding or succeeding slices) by clicking on the *Highlight* icon for the specified object or using the assigned hotkey (e.g., q, w, e).
Polyline instances can be assigned with static and [dynamic attributes](/platform-documentation/Annotate/annotate-label-editor/annotate-videos#dynamic-attributes) should they be defined in your Ontology:
* Highlight an object by clicking on it in the editor canvas or by clicking on the *Plus* icon or start/end frame in the range overview for the specified polyline.
* Assign a classification by clicking on the relevant buttons or using the set hotkeys (for example q, u).
***
### Keypoint
Creating a keypoint requires an Ontology with a keypoint annotation type. Instantiate a new keypoint instance by clicking on the specified class in the 'Classes' menu or using the specified hotkey (e.g., 1, 2, 3).
Instantiate existing keypoint instances (i.e., keypoints that should keep the same identifier in preceding or succeeding slices) by clicking on the *Highlight* icon for the specified object or using the assigned hotkey (e.g., q, w, e).
Keypoints can be copy/pasted between slices using cmd (MacOS)/ctrl (Windows) + c to copy the object to the clipboard and cmd/ctrl + v to paste it on the desired slice.
Keypoints instances can be assigned with static and [dynamic attributes](/platform-documentation/Annotate/annotate-label-editor/annotate-videos#dynamic-attributes) should they be defined in your Ontology:
* Highlight an object by clicking on it in the editor canvas or by clicking on the *Plus* icon or start/end frame in the range overview for the specified keypoint
* Assign Classifications by clicking on the relevant buttons or using the set hotkeys (for example q, u)
#### Interpolation
Run keypoint interpolation following the instructions for bounding box, which you can find here.
***
### Object primitive
Creating a [primitive](/platform-documentation/Annotate/annotate-ontologies/annotate-working-with-ontologies#object-primitives) (f.k.a. skeleton templates) requires an Ontology with a primitive annotation type. Use primitives to templatize shapes (example, 3D cuboids, pose estimation skeletons, rotated bounding boxes) commonly used by your annotation team.
 *Create a primitive ontology for data labeling*
To instantiate a new primitive instance, click on the specified class in the 'Classes' menu or use the specified hotkey (e.g., 1, 2, 3).
Instantiate existing primitive instances (i.e., primitives that should keep the same identifier in preceding or succeeding slices) by clicking on the *Highlight* icon for the specified object or using the assigned hotkey (e.g., q, w, e).
Primitives can be copy/pasted between slices using cmd (MacOS)/ctrl (Windows) + c to copy the object to the clipboard and cmd/ctrl + v to paste it on the desired slice.
Primitives allow you to define properties of edges defined in your template as visible, occluded, or invisible. Toggle the edge property settings for a primitive by highlighting the primitive and clicking the *Show controls* button.
Object primitive instances can be assigned with static and [dynamic attributes](/platform-documentation/Annotate/annotate-label-editor/annotate-videos#dynamic-attributes) should they be defined in your Ontology:
* Highlight an object by clicking on it in the editor canvas or by clicking on the *Plus* icon or start/end frame in the range overview for the specified primitive.
* Assign classifications by clicking on the relevant buttons or using the set hotkeys (for example q, u).
#### Interpolation
Run primitive interpolation following the instructions for bounding box, which you can find here.
***
### Segmentation masks / Bitmasks
Bitmasks allow you to create labels using a brush tool to select parts of an image. This can be useful when creating labels for vessel outlines or labeling topologically separate regions belonging to the same [frame classification](/platform-documentation/General/annotate-glossary).
When creating a bitmask, the process continues until you press the ENTER or ESC key. This allows you to easily create complex bitmask labels without interruption.
Creating a bitmask segmentation requires an [Ontology with the *Bitmask* annotation type](/platform-documentation/Annotate/annotate-ontologies/annotate-ontologies#objects).
[Existing Bitmask labels can be updated](#updating-bitmask-labels) using the [brush tool](#brush-tool), [threshold brush](#threshold-brush), and [eraser](#eraser) tools.
#### Brush tool
The brush tool is selected by clicking the brush icon or by pressing f on your keyboard while the popup is open.
When using the brush tool, the 2D brush tool is selected by default. The 2D brush tool on creates bitmasks on the slice they are drawn on. In comparison, the [3D cylinder brush](#3d-cylinder-brush) is applied to multiple slices, giving it depth in addition to width.
You can adjust the brush tool by:
* Changing the size of the brush.
* Changing between 2D and [3D cylinder brush](#3d-cylinder-brush) modes.
Click **Apply label** or press Enter to apply the Bitmask.
#### 3D cylinder brush
The 3D cylinder brush lets you apply a Bitmask in 3 dimensions, which means it is applied to multiple slices in a volume. The following two settings are available:
* The *Size* determines the diameter of the Bitmask brush.
* The *Height* determines the thickness of the 3D Bitmask, measured in number of slices.
Adjust the slider to set your desired *Size* and *Height*.
After the Bitmask is applied, click **Apply label** or press Enter to apply the Bitmask.
We recommend [enabling 3D view](#3d-volume-rendering) in one of the windows of the Label Editor when using the 3D cylinder brush. This allows you to see the Bitmask label in 3D.
1. Select the Bitmask object and select the 3D cylinder brush.
2. Create your label in the main annotation window.
3. Click *Additional controls* and enable the *Full 3D* toggle on a reconstructed view.
#### Panoptic mode
Panoptic settings allow you to determine how different bitmasks interact with one another.
* **None**: Overlapping bitmasks are allowed. The bitmask overlaps with existing bitmasks.
* **Exclude**: Areas already covered by a bitmask are excluded from the bitmask.
* **Overwrite**: Areas already covered by a bitmask are overwritten by the new bitmask.
#### Thresholding
The *Thresholding* tool enables you to set a threshold that determines the parts of the image or frame that is labeled by the Bitmask. Consequently, only the parts of the image falling within th predefined range are labeled upon selection with the *Thresholding* tool, ensuring precise and targeted labeling.
When *Thresholding* is enabled, a mask covering the parts of the image that fall above the set threshold appears on the slice. This allows you to preview which parts of the image are labeled when a Bitmask label is applied. The mask color can be changed by clicking the circle icon.
The eyedropper tool enables you to pick a color or intensity value directly from the image.
Three different kinds of threshold can be selected using a dropdown:
* **Intensity**: Only pixels within the set intensity value range are labeled.
* **RGB**: Only pixels within the set [red, green, and blue](https://en.wikipedia.org/wiki/RGB_color_model) range are labeled. The range for each color can be set separately.
* **HSV**: Only pixels within the set [hue, saturation, and value](https://learn.leighcotnoir.com/artspeak/elements-color/hue-value-saturation/) range are labeled.
When your label is ready, click **Apply label**, or press Enter.
#### Polygon mode
*Polygon mode* lets you draw bitmasks the same way you draw [polygons](#polygon).
To draw a bitmask using *Polygon mode* :
1. Select *Polygon mode* in the bitmask pop up.
2. Click the editor canvas to start drawing your bitmask.
3. Draw your shape by clicking each time you want to create a vertex.
4. Click the first vertex to complete the shape.
Double-clicking while drawing your bitmask completes the shape by drawing a straight line between the first and last vertices.
#### Eraser
The *Eraser* tool allows you to erase parts, or the entirety of your Bitmask selection, if the **Apply label** button has not been clicked yet.
To select the threshold brush, click the eraser icon, or hit h on your keyboard while the popup is open.
#### Combine bitmasks on an image/frame
Combining bitmasks on an image or frame allows you to label objects that are split/separated in the image/video frame.
When creating a bitmask, the process continues until you press the ENTER or ESC key. This allows you to easily create complex bitmask labels without interruption.
**To combine two or more bitmasks on an image / video frame:**
1. Hold SHIFT.
2. Click the bitmasks you want to combine in the Label Editor workspace.
3. Right-click (on Mac press Cmd).
A menu appears.
4. Select **Combine bitmasks into**.
The bitmasks are now a single bitmask.
#### Bitmask overlap management
It is possible to prevent a Bitmask label from being overlapped by subsequent Bitmasks after the label is created. Use the toggle in the *Labels* section of the Label Editor to set the overlap behavior.
Choose between the following settings:
*Create a primitive ontology for data labeling*
To instantiate a new primitive instance, click on the specified class in the 'Classes' menu or use the specified hotkey (e.g., 1, 2, 3).
Instantiate existing primitive instances (i.e., primitives that should keep the same identifier in preceding or succeeding slices) by clicking on the *Highlight* icon for the specified object or using the assigned hotkey (e.g., q, w, e).
Primitives can be copy/pasted between slices using cmd (MacOS)/ctrl (Windows) + c to copy the object to the clipboard and cmd/ctrl + v to paste it on the desired slice.
Primitives allow you to define properties of edges defined in your template as visible, occluded, or invisible. Toggle the edge property settings for a primitive by highlighting the primitive and clicking the *Show controls* button.
Object primitive instances can be assigned with static and [dynamic attributes](/platform-documentation/Annotate/annotate-label-editor/annotate-videos#dynamic-attributes) should they be defined in your Ontology:
* Highlight an object by clicking on it in the editor canvas or by clicking on the *Plus* icon or start/end frame in the range overview for the specified primitive.
* Assign classifications by clicking on the relevant buttons or using the set hotkeys (for example q, u).
#### Interpolation
Run primitive interpolation following the instructions for bounding box, which you can find here.
***
### Segmentation masks / Bitmasks
Bitmasks allow you to create labels using a brush tool to select parts of an image. This can be useful when creating labels for vessel outlines or labeling topologically separate regions belonging to the same [frame classification](/platform-documentation/General/annotate-glossary).
When creating a bitmask, the process continues until you press the ENTER or ESC key. This allows you to easily create complex bitmask labels without interruption.
Creating a bitmask segmentation requires an [Ontology with the *Bitmask* annotation type](/platform-documentation/Annotate/annotate-ontologies/annotate-ontologies#objects).
[Existing Bitmask labels can be updated](#updating-bitmask-labels) using the [brush tool](#brush-tool), [threshold brush](#threshold-brush), and [eraser](#eraser) tools.
#### Brush tool
The brush tool is selected by clicking the brush icon or by pressing f on your keyboard while the popup is open.
When using the brush tool, the 2D brush tool is selected by default. The 2D brush tool on creates bitmasks on the slice they are drawn on. In comparison, the [3D cylinder brush](#3d-cylinder-brush) is applied to multiple slices, giving it depth in addition to width.
You can adjust the brush tool by:
* Changing the size of the brush.
* Changing between 2D and [3D cylinder brush](#3d-cylinder-brush) modes.
Click **Apply label** or press Enter to apply the Bitmask.
#### 3D cylinder brush
The 3D cylinder brush lets you apply a Bitmask in 3 dimensions, which means it is applied to multiple slices in a volume. The following two settings are available:
* The *Size* determines the diameter of the Bitmask brush.
* The *Height* determines the thickness of the 3D Bitmask, measured in number of slices.
Adjust the slider to set your desired *Size* and *Height*.
After the Bitmask is applied, click **Apply label** or press Enter to apply the Bitmask.
We recommend [enabling 3D view](#3d-volume-rendering) in one of the windows of the Label Editor when using the 3D cylinder brush. This allows you to see the Bitmask label in 3D.
1. Select the Bitmask object and select the 3D cylinder brush.
2. Create your label in the main annotation window.
3. Click *Additional controls* and enable the *Full 3D* toggle on a reconstructed view.
#### Panoptic mode
Panoptic settings allow you to determine how different bitmasks interact with one another.
* **None**: Overlapping bitmasks are allowed. The bitmask overlaps with existing bitmasks.
* **Exclude**: Areas already covered by a bitmask are excluded from the bitmask.
* **Overwrite**: Areas already covered by a bitmask are overwritten by the new bitmask.
#### Thresholding
The *Thresholding* tool enables you to set a threshold that determines the parts of the image or frame that is labeled by the Bitmask. Consequently, only the parts of the image falling within th predefined range are labeled upon selection with the *Thresholding* tool, ensuring precise and targeted labeling.
When *Thresholding* is enabled, a mask covering the parts of the image that fall above the set threshold appears on the slice. This allows you to preview which parts of the image are labeled when a Bitmask label is applied. The mask color can be changed by clicking the circle icon.
The eyedropper tool enables you to pick a color or intensity value directly from the image.
Three different kinds of threshold can be selected using a dropdown:
* **Intensity**: Only pixels within the set intensity value range are labeled.
* **RGB**: Only pixels within the set [red, green, and blue](https://en.wikipedia.org/wiki/RGB_color_model) range are labeled. The range for each color can be set separately.
* **HSV**: Only pixels within the set [hue, saturation, and value](https://learn.leighcotnoir.com/artspeak/elements-color/hue-value-saturation/) range are labeled.
When your label is ready, click **Apply label**, or press Enter.
#### Polygon mode
*Polygon mode* lets you draw bitmasks the same way you draw [polygons](#polygon).
To draw a bitmask using *Polygon mode* :
1. Select *Polygon mode* in the bitmask pop up.
2. Click the editor canvas to start drawing your bitmask.
3. Draw your shape by clicking each time you want to create a vertex.
4. Click the first vertex to complete the shape.
Double-clicking while drawing your bitmask completes the shape by drawing a straight line between the first and last vertices.
#### Eraser
The *Eraser* tool allows you to erase parts, or the entirety of your Bitmask selection, if the **Apply label** button has not been clicked yet.
To select the threshold brush, click the eraser icon, or hit h on your keyboard while the popup is open.
#### Combine bitmasks on an image/frame
Combining bitmasks on an image or frame allows you to label objects that are split/separated in the image/video frame.
When creating a bitmask, the process continues until you press the ENTER or ESC key. This allows you to easily create complex bitmask labels without interruption.
**To combine two or more bitmasks on an image / video frame:**
1. Hold SHIFT.
2. Click the bitmasks you want to combine in the Label Editor workspace.
3. Right-click (on Mac press Cmd).
A menu appears.
4. Select **Combine bitmasks into**.
The bitmasks are now a single bitmask.
#### Bitmask overlap management
It is possible to prevent a Bitmask label from being overlapped by subsequent Bitmasks after the label is created. Use the toggle in the *Labels* section of the Label Editor to set the overlap behavior.
Choose between the following settings:
 * **Can be drawn over** - If the Bitmask is drawn over, any part of the image beneath the existing Bitmask that falls within the specified threshold range is included in the next label.
 * **Cannot be drawn over** - No part of the image covered by this Bitmask is included in any other Bitmask labels.
 * **Must be drawn over** - If the Bitmask is drawn over, any part of the Bitmask label is included in the new Bitmask, regardless of threshold values set.
#### Updating Bitmask labels
To update a Bitmask label:
1. Click the Bitmask label you would like to edit.
2. Select either the [brush](#brush-tool), [threshold brush](#threshold-brush), or [eraser](#eraser) tool and make your changes.
3. Press Enter or click the **Update label** button in the Bitmask popup.
#### Moving Bitmasks
Bitmask labels can be moved to another location after being created.
1. Click the Bitmask label you want to move.
2. Click and drag the Bitmask to the desired location.
3. Release the Bitmask to confirm the new location.
* **Must be drawn over** - If the Bitmask is drawn over, any part of the Bitmask label is included in the new Bitmask, regardless of threshold values set.
#### Updating Bitmask labels
To update a Bitmask label:
1. Click the Bitmask label you would like to edit.
2. Select either the [brush](#brush-tool), [threshold brush](#threshold-brush), or [eraser](#eraser) tool and make your changes.
3. Press Enter or click the **Update label** button in the Bitmask popup.
#### Moving Bitmasks
Bitmask labels can be moved to another location after being created.
1. Click the Bitmask label you want to move.
2. Click and drag the Bitmask to the desired location.
3. Release the Bitmask to confirm the new location.
 ***
## Automation
### Interpolation
Encord's interpolation feature uses a proprietary linear interpolation algorithm that runs without using a representational model or matching pixel information in neighboring frames.
Our interpolation algorithm has been built with pragmatic usage in mind. For example, unlike other linear interpolation methods, Encord's interpolation algorithm does not require a matching number of vertices between objects in set keyframes. Our algorithm also allows you to draw object vertices in arbitrary directions (e.g., clockwise, counterclockwise, and otherwise).
You can read more about interpolation here.
***
### Import model predictions
Encord's [Python SDK](/sdk-documentation/getting-started-sdk/installation-sdk) allow you to import model predictions programmatically. Importing model predictions helps to pre-annotate your data to save annotation costs.
***
## DICOM editor settings
The Label Editor has several DICOM specific settings.
* **MRP layout**: Enable or disable reconstructed [MPR views](#multiplanar-reconstruction-mpr) for DICOM volumes.
* **Mammography layout**: Select how mammography files are displayed in the editor.
* **Cache DICOM files locally**: Choose whether to cache DICOM files locally.
* **Display DICOM crosshairs**: Shows crosshairs on all windows in the editor when [crosshair navigation](#crosshair-navigation) is enabled.
* **Native resolution rendering**: Displays DICOM files at their original quality and size. We recommend this setting for mammography files.
***
## Automation
### Interpolation
Encord's interpolation feature uses a proprietary linear interpolation algorithm that runs without using a representational model or matching pixel information in neighboring frames.
Our interpolation algorithm has been built with pragmatic usage in mind. For example, unlike other linear interpolation methods, Encord's interpolation algorithm does not require a matching number of vertices between objects in set keyframes. Our algorithm also allows you to draw object vertices in arbitrary directions (e.g., clockwise, counterclockwise, and otherwise).
You can read more about interpolation here.
***
### Import model predictions
Encord's [Python SDK](/sdk-documentation/getting-started-sdk/installation-sdk) allow you to import model predictions programmatically. Importing model predictions helps to pre-annotate your data to save annotation costs.
***
## DICOM editor settings
The Label Editor has several DICOM specific settings.
* **MRP layout**: Enable or disable reconstructed [MPR views](#multiplanar-reconstruction-mpr) for DICOM volumes.
* **Mammography layout**: Select how mammography files are displayed in the editor.
* **Cache DICOM files locally**: Choose whether to cache DICOM files locally.
* **Display DICOM crosshairs**: Shows crosshairs on all windows in the editor when [crosshair navigation](#crosshair-navigation) is enabled.
* **Native resolution rendering**: Displays DICOM files at their original quality and size. We recommend this setting for mammography files.