> ## Documentation Index
> Fetch the complete documentation index at: https://docs.encord.com/llms.txt
> Use this file to discover all available pages before exploring further.
# Videos & Image Sequences
The following video goes through the basics of annotating videos in the Label Editor.
***
## Navigation
Play/pause the video by clicking the *play/pause* button or by pressing Space. Skip through frames in the video with the Left and Right arrow keys or the forward and backward buttons. The number of frames skipped is determined by the specified *Frameskip interval*. *Frameskip intervals* can be set using the predefined values or customized by entering a value in the *New* input and clicking the **+** icon.
Control video playback speeds with the playback speed drop-down. *1x* is the set playback speed in the below example.
Navigate through the video by scrubbing through or clicking anywhere on the progress bar.
Navigate to a particular frame or timestamp by clicking the *compass* icon. Replace the value(s) with the desired target and click *Go*.
## Annotation Types
Objects are annotated using bounding boxes, polygons, polylines, keypoints or primitives. Frames are annotated using classifications. Instantiating objects or classifications in the video editor generates a *UUID* that uniquely identifies that instance across a range of frames (i.e., in the temporal dimension). The identifier is sometimes called a "track," with numerical IDs supplementing *UUIDs* for objects for visual aid.
Supported annotation types & corresponding features are listed in the table below. You can read more about the listed automation features here.
Instances of all annotation types can be copied ( Ctrl + C / Cmd + C ), and pasted at the location of the mouse cursor on a different frame by pressing ( Ctrl + V / Cmd + V ).
Since it is the instance that is being copied and not simply the shape, it is not possible >to paste the instance on to the same frame.
| **Annotation type** | **Dynamic attribute** | **Automated tracking** | **Interpolation** | **Import predictions** | **Model training & inference** |
| ---------------------- | --------------------- | ---------------------- | ----------------- | ---------------------- | ------------------------------ |
| Bounding box | ✅ | ✅ | ✅ | ✅ | ✅ |
| Rotatable bounding box | ✅ | ✅ | ✅ | ✅ | Coming soon |
| Polygon | ✅ | Coming soon | ✅ | ✅ | ✅ |
| Polyline | ✅ | ✅ | ✅ | ✅ | Coming Soon |
| Keypoint | ✅ | ✅ | ✅ | ✅ | ✅ |
| Bitmask | ✅ | N/A | ✅ | ✅ | N/A |
| Object primitive | N/A | ✅ | N/A | ✅ | N/A |
| Frame classification | N/A | N/A | N/A | ✅ | ✅ |
***
### Bounding box
Creating a bounding box requires an [Ontology](/platform-documentation/Annotate/annotate-ontologies/annotate-ontologies) with a bounding box annotation type. Instantiate a new bounding box instance by clicking on the specified class in the 'Classes' menu, or by using the specified hotkey (for example: 1, 2, 3).
Instantiating existing bounding box instances (i.e., bounding boxes that should keep the same identifier in preceding or succeeding frames) can be done by clicking on the *Highlight* icon for the specified object or using the assigned hotkey (e.g., q, w, e).
Bounding boxes can be copy/pasted between frames using cmd (MacOS)/ctrl (Windows) + C to copy the object to the clipboard, and cmd/ctrl + v to paste it at the location of the mouse cursor on the desired frame.
Bounding box instances can be assigned with static and dynamic attributes should they be defined in your [Ontology](/platform-documentation/Annotate/annotate-ontologies/annotate-ontologies):
* Highlight an object by clicking on it in the editor canvas or by clicking on the *Plus* icon or start/end frame in the range overview for the specified bounding box
* Assign a classifications by clicking on the relevant buttons or using the set hotkeys (for example q, u).
#### Tracking
Run automated object tracking by highlighting an object and clicking shift + t on your keyboard.
Object tracking can also be run by selecting the option *Track from this frame* in the object menu. The number of predicted frames is set to *30* by default. The number of predicted frames can be changed in the 'Settings' drawer in the *Single object tracking settings* drop-down.
Click the *Automated labeling* button to open the 'Automated labeling' drawer to run multiple object tracking.
You can read more about automated object tracking here.
#### Interpolation
Interpolation is run via the 'Automated labeling' drawer. Click the *Automated labeling* button to open the drawer. Select *Interpolation* from the drop-down menu, select the desired objects to interpolate, set the interpolation range (i.e., the range of frames) and click the *Run interpolation* button. Please note that you need a minimum two labels of an instance to run interpolation.
You can read more about interpolation here.
### Rotating box
Traditional bounding boxes are great for annotating objects that appear in horizontal or vertical orientation, however, their accuracy may be limited when it comes to annotating objects at an angle. In such cases, use rotatable boxes to
produce more accurate annotations.
Creating a rotatable bounding box requires an [Ontology](/platform-documentation/Annotate/annotate-ontologies/annotate-ontologies) with a rotatable box annotation type. Rotatable box labels can be assigned with static classifications should they be defined in your ontology.
Instantiate a new rotatable box label by clicking on the specified class in the 'Classes' menu or using the specified hotkey. Resize rotatable boxes like normal bounding boxes, and then grab the rotation handle to adjust the position until you're satisfied with the annotation's accuracy, as below.
Rotatable bounding boxes can be copy/pasted between frames using cmd (MacOS)/ctrl (Windows) + C to copy the object to the clipboard, and cmd/ctrl + v to paste it at the location of the mouse cursor on the desired frame.
***
### Polygon
Creating a polygon requires an [Ontology](/platform-documentation/Annotate/annotate-ontologies/annotate-ontologies) with a polygon annotation type. Enable or disable free-hand drawing mode by pressing d on your keyboard. Polygon coarseness for polygons drawn free-hand is set in the 'Settings' drawer in the *Drawing settings* drop-down. Instantiate a new polygon instance by clicking on the specified class in the 'Classes' menu or using the specified hotkey (e.g., 1, 2, 3).
A polygon can be closed by double-clicking anywhere on the canvas. Doing so will "snap" creating an edge between the last vertex to the first vertex drawn.
Instantiate existing polygon instances (i.e., polygons that should keep the same identifier in preceding or succeeding frames) by clicking on the *Highlight* icon for the specified object or using the assigned hotkey (e.g., q, w, e). See the bounding box [documentation](/platform-documentation/Annotate/annotate-label-editor/annotate-videos#bounding-box) for visual instructions on how to instantiate existing polygons.
You can create polygons using SAM 2, by placing vertices, or by using the polygon brush (F).
Polygons can be copy/pasted between frames using cmd (MacOS)/ctrl (Windows) + C to copy the object to the clipboard and cmd/ctrl + V to paste it at the location of the mouse cursor on the desired frame.
Polygon instances can be assigned with static and dynamic attributes should they be defined in your [Ontology](/platform-documentation/Annotate/annotate-ontologies/annotate-ontologies):
* Highlight an object by clicking on it in the editor canvas or by clicking on the *Plus* icon or start/end frame in the range overview for the specified polygon.
* Assign classifications by clicking on the relevant buttons or using the set hotkeys (for example q,
u).
See the [bounding box documentation](#bounding-box) for visual instructions on how to assign classifications.
#### Interpolation
Run polygon interpolation following the instructions for bounding box, which you can find here. Unlike other linear interpolation methods, Encord's polygon interpolation algorithm does not require a matching number of vertices between polygon objects in set keyframes. Our algorithm also allows you to draw polygons in arbitrary directions (e.g., clockwise, counterclockwise, and otherwise).
#### Editing polygons with the brush tool
You can edit existing polygons with the brush tool. This allows you to create complex shapes in a much faster way than going vertex by vertex. To use the brush tool, select an existing polygon and then click on the brush tool button. This will show the brush tool settings panel where you can choose brush or eraser and change its size. Once you are done editing, click the "x" to go back to the label editor. Use the scissors tool if you'd like to remove vertices.
### Polyline
Creating a polyline requires an [Ontology](/platform-documentation/Annotate/annotate-ontologies/annotate-ontologies) with a polyline annotation type. Enable or disable free-hand drawing mode by pressing d on your keyboard. Polyline coarseness for polylines drawn free-hand is set in the 'Settings' drawer in the *Drawing settings* drop-down.
Instantiate a new polyline instance by clicking on the specified class in the 'Classes' menu or using the specified hotkey (e.g., 1, 2, 3).
Polylines can be copy/pasted between frames using cmd (MacOS)/ctrl (Windows) + C to copy the object to the clipboard and cmd/ctrl + V to paste it at the location of the mouse cursor on the desired frame.
Complete a polyline by double-clicking anywhere on the canvas.
Instantiate existing polyline instances (i.e., polylines that should keep the same identifier in preceding or succeeding frames) by clicking on the *Highlight* icon for the specified object or using the assigned hotkey (e.g., q, w, e). See the [documentation](/platform-documentation/Annotate/annotate-label-editor/annotate-videos#bounding-box) for visual instructions on how to instantiate existing polylines.
Polyline instances can be assigned with static and dynamic attributes should they be defined in your [Ontology](/platform-documentation/Annotate/annotate-ontologies/annotate-ontologies):
* Highlight an object by clicking on it in the editor canvas or by clicking on the *Plus* icon or start/end frame in the range overview for the specified polyline.
* Assign a classification by clicking on the relevant buttons or using the set hotkeys (for example q, u).
***
### Keypoint
Creating a keypoint requires an [Ontology](/platform-documentation/Annotate/annotate-ontologies/annotate-ontologies) with a keypoint annotation type. Instantiate a new keypoint instance by clicking on the specified class in the 'Classes' menu or using the specified hotkey (e.g., 1, 2, 3).
Instantiate existing keypoint instances (i.e., keypoints that should keep the same identifier in preceding or succeeding frames) by clicking on the *Highlight* icon for the specified object or using the assigned hotkey (e.g., q,
w, e). See the bounding box [documentation](#bounding-box) for visual instructions on how to instantiate existing keypoints.
Keypoints can be copy/pasted between frames using cmd (MacOS)/ctrl (Windows) + C to copy the object to the clipboard and cmd/ctrl + V to paste it at the location of the mouse cursor on the desired frame.
Keypoint instances can be assigned static and dynamic attributes should they be defined in your [Ontology](/platform-documentation/Annotate/annotate-ontologies/annotate-ontologies):
* Highlight an object by clicking on it in the editor canvas or by clicking on the *Plus* icon or start/end frame in
the range overview for the specified keypoint.
* Assign classifications by clicking on the relevant buttons or using the set hotkeys (for example q,
u).
See the bounding box [documentation](#bounding-box) for visual instructions on how to assign classifications.
#### Automated tracking
Run automated keypoint tracking following the instructions for bounding box, which you can find here.
#### Interpolation
Run keypoint interpolation following the instructions for bounding box, which you can find here.
***
### Primitives
Creating a primitive (f.k.a. skeleton templates) requires an [Ontology](/platform-documentation/Annotate/annotate-ontologies/annotate-ontologies) with a primitive annotation type. Use primitives to templatize shapes (e.g., 3D cuboids, pose estimation skeletons ) commonly used by your annotation team.
Instantiate a new primitive instance by clicking on the specified class in the 'Classes' menu or using the specified hotkey (e.g., 1, 2, 3).
Instantiate existing primitive instances (i.e., primitives that should keep the same identifier in preceding or succeeding frames) by clicking on the *Highlight* icon for the specified object or using the assigned hotkey (e.g., q, w, e). See the [bounding box documentation](#bounding-box) for visual instructions on how to instantiate existing primitives.
Primitives can be copy/pasted between frames using cmd (MacOS)/ctrl (Windows) + C to copy the object to the clipboard and cmd/ctrl + V to paste it at the location of the mouse cursor on the desired frame.
Primitives allow you to define properties of edges defined in your template as visible, occluded, or invisible. Toggle the edge property settings for a primitive by highlighting the primitive and clicking the *Show controls* button.
Primitive instances can be assigned with static and dynamic attributes should they be defined in your [Ontology](/platform-documentation/Annotate/annotate-ontologies/annotate-ontologies):
* Highlight an object by clicking on it in the editor canvas or by clicking on the *Plus* icon or start/end frame in the range overview for the specified primitive.
* Assign classifications by clicking on the relevant buttons or using the set hotkeys (for example q, u)
See the bounding box documentation for visual instructions on how to assign classifications.
#### Automated tracking
Run SAM 2 tracking following the instructions for bounding box, which you can find here.
#### Interpolation
Run primitive interpolation following the instructions for bounding box, which you can find here.
***
### Segmentation masks / Bitmasks
Bitmasks allows you to create labels using a brush tool to select parts of an image. This can be useful when creating labels for vessel outlines, or labeling topologically separate regions. Bitmasks can be copy/pasted between frames using cmd (MacOS)/ctrl (Windows) + C to copy the object to the clipboard and cmd/ctrl + V to paste it at the location of the mouse cursor on the desired frame.
When creating a bitmask, the process continues until you press the ENTER or ESC key. This allows you to easily create complex bitmask labels without interruption.
Creating a bitmask segmentation requires an Ontology with the *Bitmask* annotation type.
[Existing Bitmask labels can be updated](#updating-bitmask-labels) using the [brush tool](#brush-tool), [threshold brush](#threshold-brush), and [eraser](#eraser) tools.
#### Brush tool
When selecting the bitmask annotation type, the brush tool is selected by default. Adjust the size of the bitmask brush tool using the slider in the bitmask popup.
The brush tool is selected using the f hotkey when the bitmask popup is open.
When your label is ready, click **Apply label**, or press Enter.
#### Panoptic mode
Panoptic settings allow you to determine how different bitmasks interact with one another.
* **None**: Overlapping bitmasks are allowed. The bitmask overlaps with existing bitmasks.
* **Exclude**: Areas already covered by a bitmask are excluded from the bitmask.
* **Overwrite**: Areas already covered by a bitmask are overwritten by the new bitmask.
#### Thresholding
The *Thresholding* tool enables you to set a threshold that determines the parts of the image or frame that is labeled by the Bitmask. Consequently, only the parts of the image falling within th predefined range are labeled upon selection with the *Thresholding* tool, ensuring precise and targeted labeling.
When *Thresholding* is enabled, a mask covering the parts of the image that fall above the set threshold appears on the slice. This allows you to preview which parts of the image are labeled when a Bitmask label is applied. The mask color can be changed by clicking the circle icon.
The eyedropper tool enables you to pick a color or intensity value directly from the image.
Three different kinds of threshold can be selected using a dropdown:
* **Intensity**: Only pixels within the set intensity value range are labeled.
* **RGB**: Only pixels within the set [red, green, and blue](https://en.wikipedia.org/wiki/RGB_color_model) range are labeled. The range for each color can be set separately.
* **HSV**: Only pixels within the set [hue, saturation, and value](https://learn.leighcotnoir.com/artspeak/elements-color/hue-value-saturation/) range are labeled.
When your label is ready, click **Apply label**, or press Enter.
#### Eraser
The *Eraser* tool allows you to erase parts, or the entirety of your Bitmask selection if the **Apply label** button has not been clicked yet.
To select the threshold brush, click the eraser icon, or press h on your keyboard while the popup is open.
#### Combine bitmasks on an image/frame
Combining bitmasks on an image or frame allows you to label objects that are split/separated in the image/video frame.
When creating a bitmask, the process continues until you press the ENTER or ESC key. This allows you to easily create complex bitmask labels without interruption.
**To combine two or more bitmasks on an image / video frame:**
1. Hold SHIFT.
2. Click the bitmasks you want to combine in the Label Editor workspace.
3. Right-click (on Mac press Cmd).
A menu appears.
4. Select **Combine bitmasks into**.
The bitmasks are now a single bitmask.
#### Bitmask overlap management
It is possible to prevent a Bitmask label from being overlapped by subsequent Bitmasks after the label is created. Use the toggle in the *Labels* section of the Label Editor to set the overlap behavior.
Choose between the following settings:
 * **Can be drawn over** - If the Bitmask is drawn over, any part of the image beneath the existing Bitmask that falls within the specified threshold range is included in the next label.
 * **Cannot be drawn over** - No part of the image covered by this Bitmask is included in any other Bitmask labels.
 * **Must be drawn over** - If the Bitmask is drawn over, any part of the Bitmask label is included in the new Bitmask, regardless of threshold values set.
The **Must be drawn over** setting for *Bitmask overlap* is only available to select customers. Contact [support@encord.com](mailto:support@encord.com) for more information.
#### Updating bitmask labels
To update a bitmask label:
1. Click the bitmask label you want to edit.
2. Select either the [brush](#brush-tool), [threshold brush](#threshold-brush), or [eraser](#eraser) tool and make your changes.
3. Press Enter or click the **Update label** button in the bitmask popup.
#### Moving bitmasks
Bitmask labels can be moved to another location after being created.
1. Click the bitmask label you want to move.
2. Click and drag the bitmask to the desired location.
3. Release the bitmask to confirm the new location.
* **Must be drawn over** - If the Bitmask is drawn over, any part of the Bitmask label is included in the new Bitmask, regardless of threshold values set.
The **Must be drawn over** setting for *Bitmask overlap* is only available to select customers. Contact [support@encord.com](mailto:support@encord.com) for more information.
#### Updating bitmask labels
To update a bitmask label:
1. Click the bitmask label you want to edit.
2. Select either the [brush](#brush-tool), [threshold brush](#threshold-brush), or [eraser](#eraser) tool and make your changes.
3. Press Enter or click the **Update label** button in the bitmask popup.
#### Moving bitmasks
Bitmask labels can be moved to another location after being created.
1. Click the bitmask label you want to move.
2. Click and drag the bitmask to the desired location.
3. Release the bitmask to confirm the new location.
 ***
### Frame classification
Creating frame classification(s) requires an [Ontology](/platform-documentation/Annotate/annotate-ontologies/annotate-ontologies) with a classification annotation type. Frame-level classifications consider the frame as a whole, not the objects' localization. Instantiate a frame-level classification instance by clicking on the specified class in the 'Classes' menu or using the specified hotkey (for example: 1, 2, 3).
Set the desired start and end frame by clicking the **Set start to current** and **Set end to current** buttons or using the set hotkeys c and v, respectively. Click the **This frame** button or the x hotkey to set the slider to only the current frame (e.g., frame 100). Add additional ranges by clicking the *Add range* button or pressing the n hotkey to add a frame range (e.g., if a car enters and leaves the frame throughout a video). Click the *Save* button or the m hotkey to save the instance. Use the **This frame & save** button or the z hotkey to classify and save the results for a single frame quickly.
***
### Dynamic attributes
Encord supports dynamic attributes for all object annotation types (i.e., bounding box, polygon, polyline, keypoint, and primitives).
Highlight the desired object to assign dynamic attributes. Dynamic attributes are recognized by the *Dynamic* tag next to the given feature in the ontology. Dynamic attributes are only applied in the frames specifically indicated but can be edited in ranges if they span multiple frames.
#### Using dynamic attributes
The video tutorial goes through the basics of working with Dynamic Attributes in the Label Editor.
***
### Frame classification
Creating frame classification(s) requires an [Ontology](/platform-documentation/Annotate/annotate-ontologies/annotate-ontologies) with a classification annotation type. Frame-level classifications consider the frame as a whole, not the objects' localization. Instantiate a frame-level classification instance by clicking on the specified class in the 'Classes' menu or using the specified hotkey (for example: 1, 2, 3).
Set the desired start and end frame by clicking the **Set start to current** and **Set end to current** buttons or using the set hotkeys c and v, respectively. Click the **This frame** button or the x hotkey to set the slider to only the current frame (e.g., frame 100). Add additional ranges by clicking the *Add range* button or pressing the n hotkey to add a frame range (e.g., if a car enters and leaves the frame throughout a video). Click the *Save* button or the m hotkey to save the instance. Use the **This frame & save** button or the z hotkey to classify and save the results for a single frame quickly.
***
### Dynamic attributes
Encord supports dynamic attributes for all object annotation types (i.e., bounding box, polygon, polyline, keypoint, and primitives).
Highlight the desired object to assign dynamic attributes. Dynamic attributes are recognized by the *Dynamic* tag next to the given feature in the ontology. Dynamic attributes are only applied in the frames specifically indicated but can be edited in ranges if they span multiple frames.
#### Using dynamic attributes
The video tutorial goes through the basics of working with Dynamic Attributes in the Label Editor.
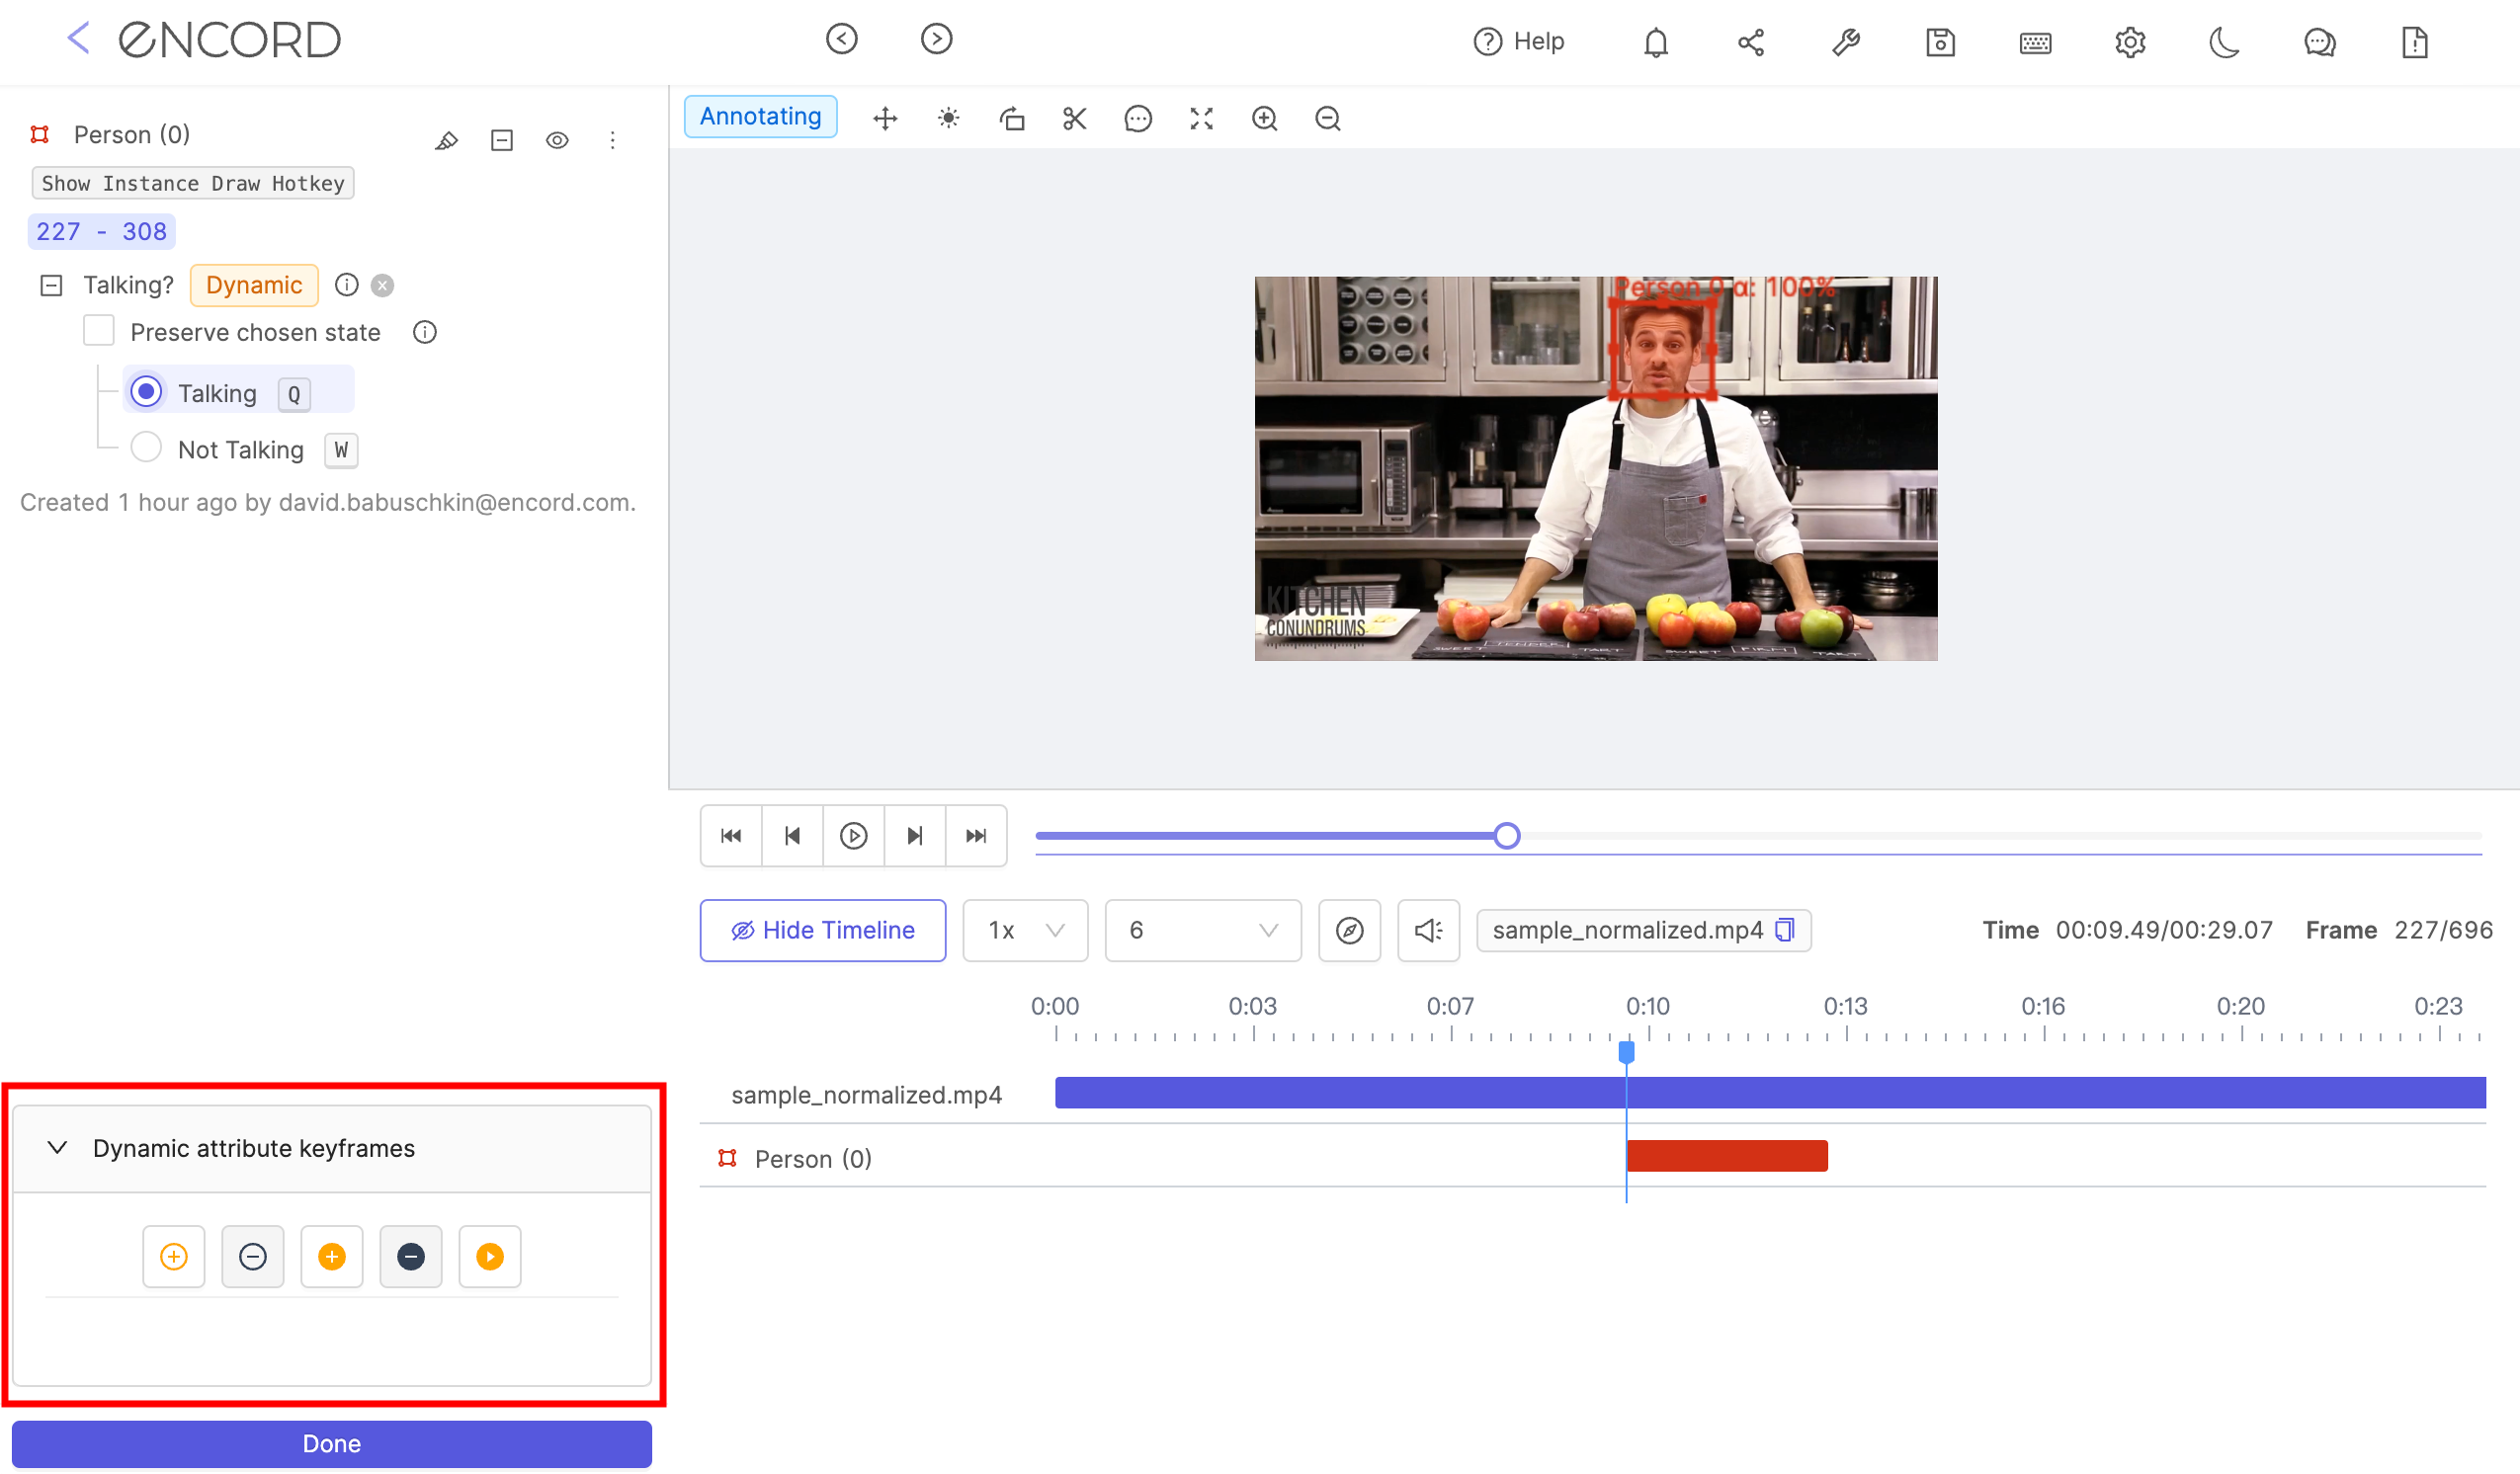
Keyframe-based attribute propagation allows you to mark frames in which dynamic attributes change value as *keyframes*, and then bulk apply attributes between the *keyframes*. This saves time when applying dynamic attribute to object instances across many frames.
#### Bulk apply dynamic attributes
You can efficiently apply dynamic attributes in bulk to save time and effort. This is accomplished by identifying frames where the attribute changes value as "keyframes," and then applying attribute values between these keyframes.
1. Apply object labels to **all** relevant frames.
2. Add the [dynamic attribute](/platform-documentation/Annotate/annotate-ontologies/annotate-ontologies#dynamic-attributes) to the label in the first frame that the object appears in.
3. Navigate to the point of the video or image sequence where the dynamic attribute changes value, and apply the attribute to the object here.
4. Use the **+** icon, or the keyboard shortcut Shift + L to set *keyframes* on frames where the attribute changes value.
5. Use the *Play* icon, or the keyboard shortcut Shift + P to apply attribute values to all frames following a *keyframe*, matching the value set in the *keyframe*.
All frames in between keyframes have to be labeled for attribute propagation to work.
You can also add or remove *keypoints* manually:
* Use the  icon, or the keyboard shortcut Shift + A to add a *keypoint* to a frame.
* Use the
icon, or the keyboard shortcut Shift + A to add a *keypoint* to a frame.
* Use the  icon, or the keyboard shortcut Shift + S to remove a *keypoint* from a frame.
#### Frame labels tab
The *Frame labels* tab shows all instances with a label in the current frame. It is empty when there are no labels in a frame.
***
### Zoom and Sort By
Zooming in on the timeline reveals finer time intervals, enabling precise identification of when object instances and classifications occur in the video. Conversely, zooming out provides a broader view of larger time segments.
You have the option to sort object instances and classifications either alphabetically or by their creation order. By default, the most recently created classes are displayed at the top.
### Selecting Objects and Instances
One or more objects and instances can be selected using the timeline. Simply click an object or instance on the timeline to select it. To select multiple objects or instances, click while holding down the Shift key.
Alternatively select an object or instance by right-clicking and choosing **Select**.
### Moving Objects and Instances
Once objects and instances have been selected they can be moved to the top or the bottom of the timeline to suit your needs.
1. Select the instances and objects you want to move.
2. Right-click your selection.
3. Hover on *Move* when moving a single object or instance, and *Move all* when moving multiple objects or instances.
4. Select *To top* or *To bottom* depending on whether you want to move the object(s) and instance(s) to the top or the bottom of the timeline.
### Merging Instances on the Timeline
Multiple instances of the same object can be merged into a single instance of your choice, provided they don't appear on the same frame.
1. Select the instances you want to merge.
Hold SHIFT to select multiple instances.
2. Right-click your selection.
3. Hover on *Merge into*.
4. Select the instance you want to merge your selection into.
***
### Fill Range to the Playhead
You can quickly snap the boundary of a selected classification range to the current playhead (the visual marker on the timeline) position using the **Fill to playhead** action. This is useful when you want to extend a range to an exact point without manually dragging the timeline handle.
Position the playhead at the desired boundary point, select the classification range, then press `Alt+V` (Windows/Linux) or `Option+V` (Mac) to extend the nearest range edge to the playhead. You can also click **Fill to playhead** in the **Available Actions** panel in the left sidebar.
The action automatically determines which edge to move:
* If the playhead is **past the end** of the range, the end boundary extends to the playhead.
* If the playhead is **before the start** of the range, the start boundary extends to the playhead.
* If the playhead is **inside** the range, the action does nothing — it only ever extends a range outward, never trims it.
**Fill to playhead** is only available for editable ranges. The action and hotkey have no effect on read-only or locked ranges.
Use **Fill to playhead** together with the other range-editing shortcuts for fast, keyboard-driven timeline work:
| Action | Windows/Linux | Mac |
| ------------------------------- | ----------------- | -------------------- |
| Fill selected range to playhead | `Alt+V` | `Option+V` |
| Expand range right | `Alt+Right` | `Option+Right` |
| Shrink range right | `Alt+Left` | `Option+Left` |
| Expand range left | `Alt+Shift+Left` | `Option+Shift+Left` |
| Shrink range left | `Alt+Shift+Right` | `Option+Shift+Right` |
### Editing Exact Classification Frame Ranges
When you select a classification in the left sidebar while the Label Editor is in edit mode, the frame range bounds display as editable **Range start** and **Range end** input fields instead of static text chips. This lets you type an exact frame number or timestamp to adjust a classification's range boundary directly, without needing to drag the timeline.
Editable range inputs are only available when the Label Editor is in edit mode, the classification is selected, and the label is not read-only. When these conditions are not met, the range bounds display as static text chips as before.
***
## Linking Objects
Object instances are linked using *Relation* attributes, which are set up in the Ontology. See our [documentation on *Relation* attributes](/platform-documentation/Annotate/annotate-ontologies/annotate-ontologies#relation-attributes) to learn more.
1. Create both instance labels. In this example a chicken and its wing have been labeled using bounding boxes.
2. Click the *Edit classifications* button for the object with the *Relation* attribute. In the example this object is the wing, as seen below.
icon, or the keyboard shortcut Shift + S to remove a *keypoint* from a frame.
#### Frame labels tab
The *Frame labels* tab shows all instances with a label in the current frame. It is empty when there are no labels in a frame.
***
### Zoom and Sort By
Zooming in on the timeline reveals finer time intervals, enabling precise identification of when object instances and classifications occur in the video. Conversely, zooming out provides a broader view of larger time segments.
You have the option to sort object instances and classifications either alphabetically or by their creation order. By default, the most recently created classes are displayed at the top.
### Selecting Objects and Instances
One or more objects and instances can be selected using the timeline. Simply click an object or instance on the timeline to select it. To select multiple objects or instances, click while holding down the Shift key.
Alternatively select an object or instance by right-clicking and choosing **Select**.
### Moving Objects and Instances
Once objects and instances have been selected they can be moved to the top or the bottom of the timeline to suit your needs.
1. Select the instances and objects you want to move.
2. Right-click your selection.
3. Hover on *Move* when moving a single object or instance, and *Move all* when moving multiple objects or instances.
4. Select *To top* or *To bottom* depending on whether you want to move the object(s) and instance(s) to the top or the bottom of the timeline.
### Merging Instances on the Timeline
Multiple instances of the same object can be merged into a single instance of your choice, provided they don't appear on the same frame.
1. Select the instances you want to merge.
Hold SHIFT to select multiple instances.
2. Right-click your selection.
3. Hover on *Merge into*.
4. Select the instance you want to merge your selection into.
***
### Fill Range to the Playhead
You can quickly snap the boundary of a selected classification range to the current playhead (the visual marker on the timeline) position using the **Fill to playhead** action. This is useful when you want to extend a range to an exact point without manually dragging the timeline handle.
Position the playhead at the desired boundary point, select the classification range, then press `Alt+V` (Windows/Linux) or `Option+V` (Mac) to extend the nearest range edge to the playhead. You can also click **Fill to playhead** in the **Available Actions** panel in the left sidebar.
The action automatically determines which edge to move:
* If the playhead is **past the end** of the range, the end boundary extends to the playhead.
* If the playhead is **before the start** of the range, the start boundary extends to the playhead.
* If the playhead is **inside** the range, the action does nothing — it only ever extends a range outward, never trims it.
**Fill to playhead** is only available for editable ranges. The action and hotkey have no effect on read-only or locked ranges.
Use **Fill to playhead** together with the other range-editing shortcuts for fast, keyboard-driven timeline work:
| Action | Windows/Linux | Mac |
| ------------------------------- | ----------------- | -------------------- |
| Fill selected range to playhead | `Alt+V` | `Option+V` |
| Expand range right | `Alt+Right` | `Option+Right` |
| Shrink range right | `Alt+Left` | `Option+Left` |
| Expand range left | `Alt+Shift+Left` | `Option+Shift+Left` |
| Shrink range left | `Alt+Shift+Right` | `Option+Shift+Right` |
### Editing Exact Classification Frame Ranges
When you select a classification in the left sidebar while the Label Editor is in edit mode, the frame range bounds display as editable **Range start** and **Range end** input fields instead of static text chips. This lets you type an exact frame number or timestamp to adjust a classification's range boundary directly, without needing to drag the timeline.
Editable range inputs are only available when the Label Editor is in edit mode, the classification is selected, and the label is not read-only. When these conditions are not met, the range bounds display as static text chips as before.
***
## Linking Objects
Object instances are linked using *Relation* attributes, which are set up in the Ontology. See our [documentation on *Relation* attributes](/platform-documentation/Annotate/annotate-ontologies/annotate-ontologies#relation-attributes) to learn more.
1. Create both instance labels. In this example a chicken and its wing have been labeled using bounding boxes.
2. Click the *Edit classifications* button for the object with the *Relation* attribute. In the example this object is the wing, as seen below.
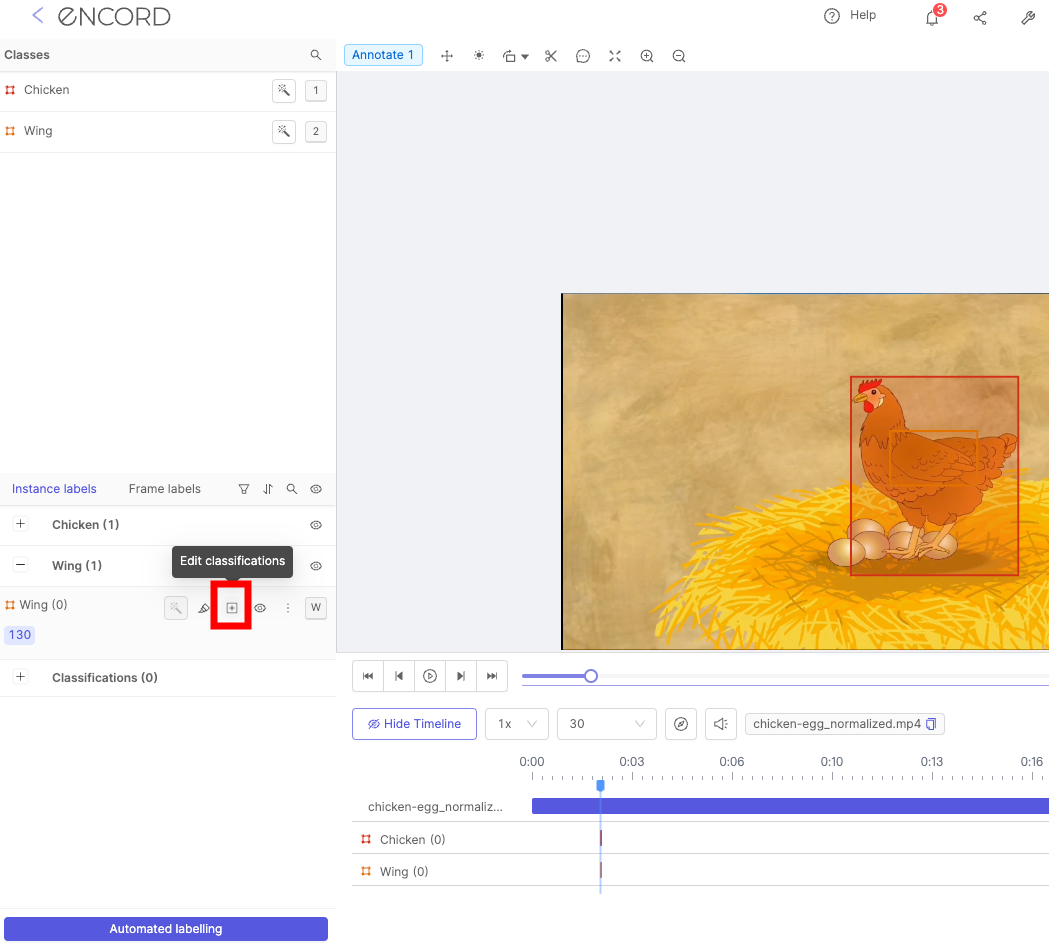 3. Click the *Set relation...* bar and select the instance you want to link the selected instance to. In our example the chicken and the wing appear on the same frame, and therefore appear under the *This frame* heading. Instances in different frames will appear under the heading *Rest*.
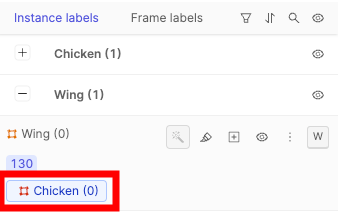
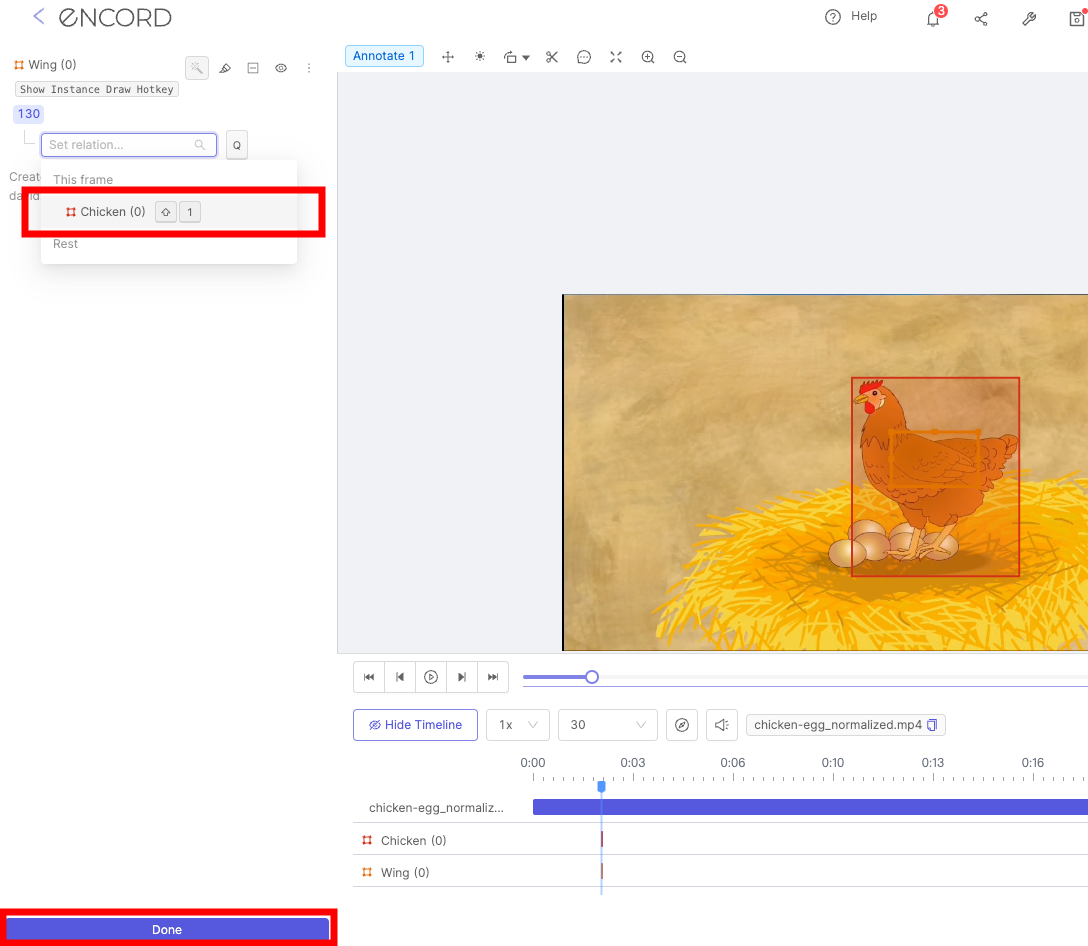 4. Click **Done**. The instances are now linked. This is shown in the *Instance labels* section with the name of the linked instance being displayed.
 ***
## Automation
Supported annotation types and available automation features are listed in the table below.
| **Annotation type** | **Dynamic attribute** | **SAM 2 TRacking** | **Interpolation** | **Import predictions** |
| ---------------------- | --------------------- | ------------------ | ----------------- | ---------------------- |
| Bounding box | ✅ | ✅ | ✅ | ✅ |
| Rotatable bounding box | ✅ | ✅ | ✅ | ✅ |
| Polygon | ✅ | ✅ | ✅ | ✅ |
| Polyline | ✅ | ❌ | ✅ | ✅ |
| Keypoint | ✅ | ❌ | ✅ | ✅ |
| Bitmask | ✅ | ✅ | ✅ | ✅ |
| Object primitive | N/A | ❌ | N/A | ✅ |
| Frame classification | N/A | N/A | N/A | ✅ |
***
### Interpolation
Encord's interpolation feature uses a proprietary linear interpolation algorithm that runs without using a representational model or matching pixel information in neighboring frames.
Our interpolation algorithm has been built with pragmatic usage in mind. For example, unlike other linear interpolation methods, Encord's interpolation algorithm does not require a matching number of vertices between objects in set keyframes. Our algorithm also allows you to draw object vertices in arbitrary directions (e.g., clockwise, counterclockwise, and otherwise).
Use our [step-by-step guide](/platform-documentation/Annotate/automated-labeling/annotate-interpolation) to learn how to use the interpolation feature, and how to improve interpolation results using [re-interpolation](/platform-documentation/Annotate/automated-labeling/annotate-interpolation#3-re-interpolate).
***
## Automation
Supported annotation types and available automation features are listed in the table below.
| **Annotation type** | **Dynamic attribute** | **SAM 2 TRacking** | **Interpolation** | **Import predictions** |
| ---------------------- | --------------------- | ------------------ | ----------------- | ---------------------- |
| Bounding box | ✅ | ✅ | ✅ | ✅ |
| Rotatable bounding box | ✅ | ✅ | ✅ | ✅ |
| Polygon | ✅ | ✅ | ✅ | ✅ |
| Polyline | ✅ | ❌ | ✅ | ✅ |
| Keypoint | ✅ | ❌ | ✅ | ✅ |
| Bitmask | ✅ | ✅ | ✅ | ✅ |
| Object primitive | N/A | ❌ | N/A | ✅ |
| Frame classification | N/A | N/A | N/A | ✅ |
***
### Interpolation
Encord's interpolation feature uses a proprietary linear interpolation algorithm that runs without using a representational model or matching pixel information in neighboring frames.
Our interpolation algorithm has been built with pragmatic usage in mind. For example, unlike other linear interpolation methods, Encord's interpolation algorithm does not require a matching number of vertices between objects in set keyframes. Our algorithm also allows you to draw object vertices in arbitrary directions (e.g., clockwise, counterclockwise, and otherwise).
Use our [step-by-step guide](/platform-documentation/Annotate/automated-labeling/annotate-interpolation) to learn how to use the interpolation feature, and how to improve interpolation results using [re-interpolation](/platform-documentation/Annotate/automated-labeling/annotate-interpolation#3-re-interpolate).