- Label using any annotation type such as bounding boxes, rotatable boxes, polygons, polylines, keypoints, and primitives.
- Create frame-level & object classifications.
- Object detection and instance segmentation.
- Reduce manual annotations with automation (e.g., importing model predictions) features.

Task Management
Before getting into the details of the label editor and making annotations, note the following about scheduling annotation work. Annotation is done in the annotation phase of the task management system. To ensure annotation work is saved properly, each labeling task must be properly assigned to an annotator, annotators must always access the task through the Queue tab in the Task Management System, and only the assigned annotator works on any given task at any given time.Annotation types
Objects are annotated using bounding boxes, polygons, polylines, keypoints or primitives. Frames are annotated using classifications. Instantiating objects or classifications in the image editor generates a UUID that uniquely identifies that label in the frame.Object labels on the 2D canvas display a dark semi-transparent background behind the label text, making them readable against busy or high-contrast image content. When you hover over an annotated object, the label text becomes bold for additional visual distinction. This applies to all annotation types: bounding boxes, rotatable boxes, polygons, polylines, keypoints, bitmasks, primitives, and 2D cuboids.
Bounding box
Watch a tutorial for drawing a bounding box
Watch a tutorial for drawing a bounding box

- Highlight an object by clicking on it in the editor canvas or by clicking on the Plus icon or start/end frame in the range overview for the specified bounding box
- Assign a classifications by clicking on the relevant buttons or using the set hotkeys (for example q, u).
Rotatable box
Watch a tutorial for drawing a rotatable bounding box
Watch a tutorial for drawing a rotatable bounding box
and you can export the labels as usual.
Polygon
Watch a tutorial for working with polygons
Watch a tutorial for working with polygons
- Highlight an object by clicking on it in the editor canvas or by clicking on the + icon or start/end frame in the range overview for the specified polygon
- Assign a classifications by clicking on the relevant buttons or using the set hotkeys (for example q, u)

Polyline
Watch a tutorial for drawing a polyline
Watch a tutorial for drawing a polyline
- Highlight an object by clicking on it in the editor canvas or by clicking on the Plus icon or start/end frame in the range overview for the specified polyline
- Assign a classification by clicking on the relevant buttons or using the set hotkeys (for example q, u)
Keypoint
Watch a tutorial for drawing a keypoint
Watch a tutorial for drawing a keypoint

hotkey (e.g., 1, 2, 3). Keypoints labels can be assigned with static classifications should they be defined in your Ontology:
- Highlight an object by clicking on it in the editor canvas or by clicking on the Plus icon or start/end frame in the range overview for the specified keypoint
- Assign classifications by clicking on the relevant buttons or using the set hotkeys (for example q, u)
Primitives

type. Use primitives to templatize shapes (e.g., 3D cuboids, pose estimation skeletons) commonly
used by your annotation team. Instantiate a new primitive label by clicking on the specified class in the ‘Classes’ menu or using the specified hotkey (e.g., 1, 2, 3). Object primitives allow you to define properties of edges defined in your template as visible, occluded, or invisible. Toggle the edge property settings for a primitive by highlighting the primitive and clicking the Show controls button. Primitive labels can be assigned with static classifications should they be defined in your Ontology:
- Highlight an object by clicking on it in the editor canvas or by clicking on the Plus icon or start/end frame in the range overview for the specified primitive
- Assign classifications by clicking on the relevant buttons or using the set hotkeys (for example q, u)
Segmentation masks / Bitmasks

Creating a bitmask segmentation requires an Ontology with the Bitmask annotation type.
Brush tool
When you select your bitmask annotation type, the brush tool is selected by default. You can adjust the size of the Bitmask brush tool using the slider in the Bitmask popup, as seen in the screenshot above. The brush tool can be selected by clicking the brush icon, or by pressing f on your keyboard while the popup is open. When your label is ready, click Apply label, or press Enter.Panoptic mode

Panoptic mode only works with bitmask annotations and is automatically applied when using manual label creation.
- None: Overlapping bitmasks are allowed. The bitmask overlaps with existing bitmasks, polygons, and SAM created labels.
- Exclude: Areas already covered by a bitmask are excluded from the bitmasks, polygons, and SAM created labels.
- Overwrite: Areas already covered by a bitmask are overwritten by the new bitmasks, polygons, and SAM created labels.
Thresholding
The Thresholding tool enables you to set a threshold that determines the parts of the image or frame that is labeled by the Bitmask. Consequently, only the parts of the image falling within th predefined range are labeled upon selection with the Thresholding tool, ensuring precise and targeted labeling.
- Intensity: Only pixels within the set intensity value range are labeled.
- RGB: Only pixels within the set red, green, and blue range are labeled. The range for each color can be set separately.
- HSV: Only pixels within the set hue, saturation, and value range are labeled.
Eraser
The Eraser tool allows you to erase parts, or the entirety of your Bitmask selection if the Apply label button has not been clicked yet. To select the threshold brush, click the eraser icon, or press h on your keyboard while the popup is open.Combine bitmasks on an image/frame
Combining bitmasks on an image or frame allows you to label objects that are split/separated in the image/video frame.When creating a bitmask, the process continues until you press the ENTER or ESC key. This allows you to easily create complex bitmask labels without interruption.
- Hold SHIFT.
- Click the bitmasks you want to combine in the Label Editor workspace.
- Right-click (on Mac press Cmd). A menu appears.
- Select Combine bitmasks into. The bitmasks are now a single bitmask.
Bitmask overlap management
It is possible to prevent a Bitmask label from being overlapped by subsequent Bitmasks after the label is created. Use the toggle in the Labels section of the Label Editor to set the overlap behavior.
- Can be drawn over - If the Bitmask is drawn over, any part of the image beneath the existing Bitmask that falls within the specified threshold range is included in the next label.
- Cannot be drawn over - No part of the image covered by this Bitmask is included in any other Bitmask labels.
- Must be drawn over - If the Bitmask is drawn over, any part of the Bitmask label is included in the new Bitmask, regardless of threshold values set.
The Must be drawn over setting for Bitmask overlap is only available to select customers. Contact support@encord.com for more information.
Updating bitmask labels
To update a bitmask label:- Click the bitmask label you want to edit.
- Select either the brush, threshold brush, or eraser tool and make your changes.
- Press Enter or click the Update label button in the bitmask popup.
Moving bitmasks
Bitmask labels can be moved to another location after being created.- Click the bitmask label you want to move.
- Click and drag the bitmask to the desired location.
- Release the bitmask to confirm the new location.

Downloading bitmasks as PNG
You can download one or more bitmask annotations as a PNG image directly from the Label Editor using the right-click context menu. Each bitmask renders in its assigned annotation color in the exported file. The Label Editor names downloaded files using the pattern:<data_title>_frame_<frame_index>_<label>.png. Special characters in the data title are replaced with underscores.
The download options only appear for bitmask-type annotations. Non-bitmask shapes do not show these options in the context menu.
- Single bitmask — Right-click a bitmask annotation and select Download bitmask as image. The filename includes the annotation name and object ID.
- Multiple bitmasks — Select multiple bitmask annotations, then right-click and select Download bitmasks as image. The editor composites all selected bitmasks into a single PNG file.
- All bitmasks on the current frame — Right-click the canvas background and select Download all bitmasks as image. This option appears only when at least one bitmask exists on the current frame. The editor composites all bitmasks on the frame into a single PNG file.
If the download fails, the editor displays an error notification.
Frame classification
Creating frame classification(s) requires an Ontology with a classification annotation type. Frame-level classifications consider the frame as a whole, not any given object’s localization. Instantiate a frame-level classification label by clicking on the specified class in the ‘Classes’ menu or using the specified hotkey (e.g., 1, 2, 3). Encord currently supports radio, checklist, and free-form text input classification types. Edit existing classification labels by clicking on the + icon for the specified label.
Linking object instances
Object instances are linked using Relation attributes, which are set up in the Ontology. See our documentation on Relation attributes to learn more.
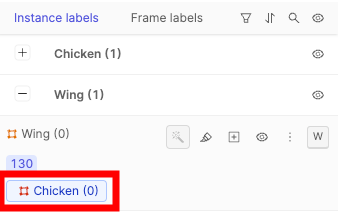
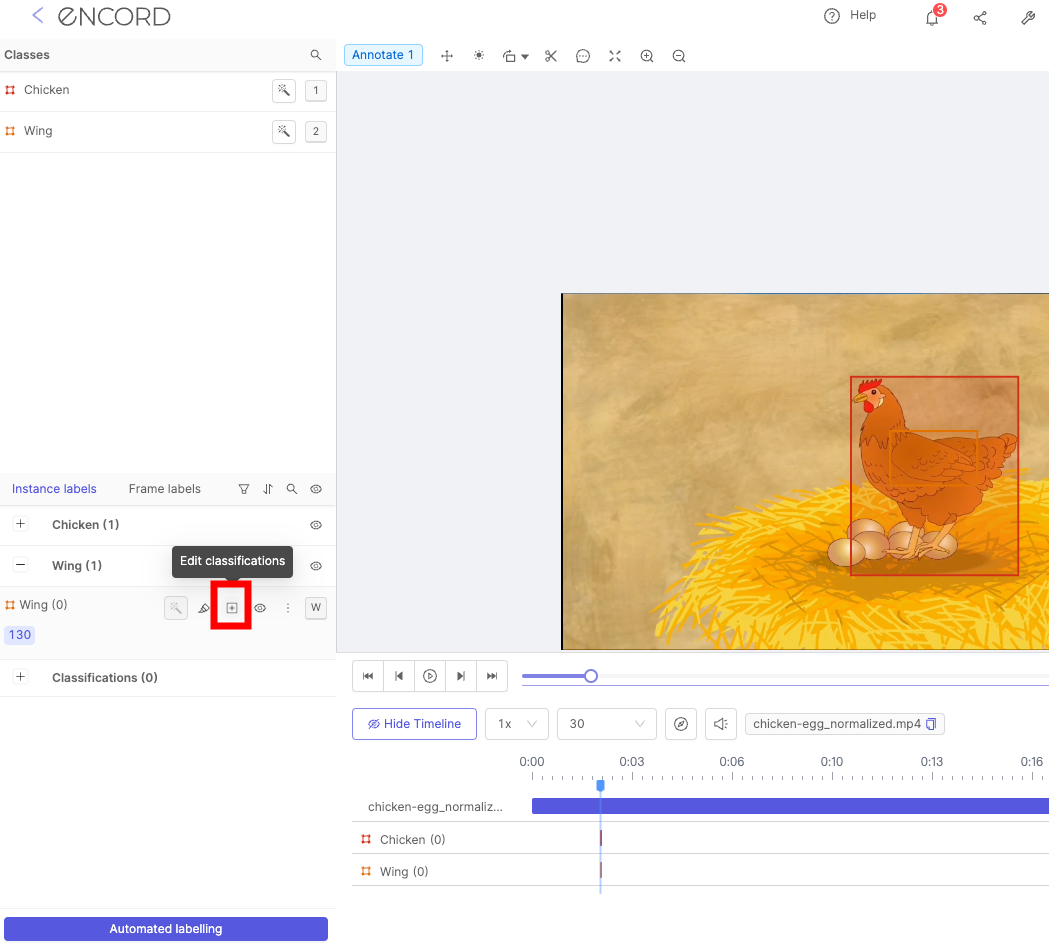
- Create both instance labels. In this example a chicken and its wing have been labeled using bounding boxes.
- Click the Edit classifications button for the object with the Relation attribute. In the example this object is the wing, as seen below.
- Click the Set relation… bar and select the instance you want to link the selected instance to. In our example the chicken and the wing appear on the same frame, and therefore appear under the This frame heading. Instances in different frames will appear under the heading Rest.
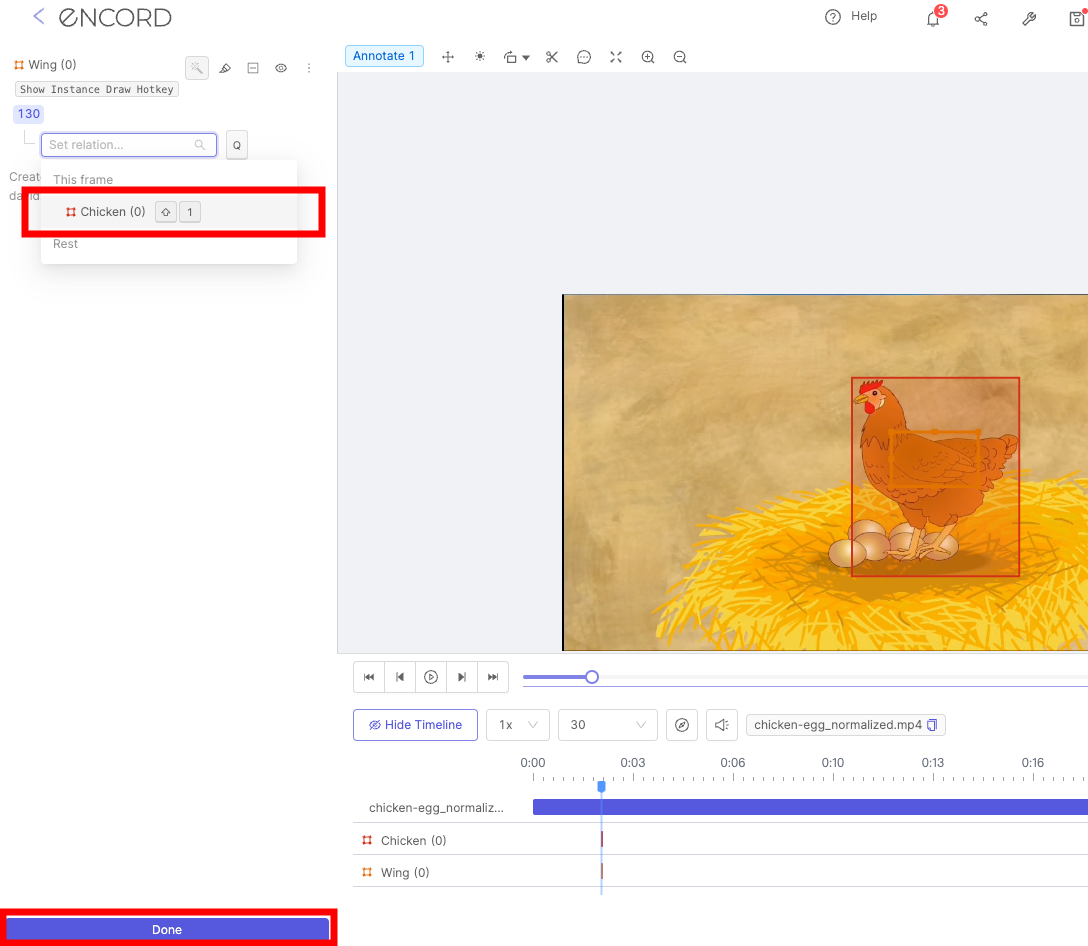
- Click Done. The instances are now linked. This is shown in the Instance labels section with the name of the linked instance being displayed.