Login
I see an error when I try to log in to the application. How can I fix this?
I see an error when I try to log in to the application. How can I fix this?
- Ensure you are using the Chrome browser, and that it is up-to-date.
- Try clearing your browser’s cache, refresh the page and try again.
- If you are still stuck, contact support@encord.com so can help you resolve this issue.
How do I reset my password?
How do I reset my password?
- Click Forgot password on the Encord Global login page or Encord US login page.

- Enter the email address you used to sign up to Encord.

- Click Reset password. An email containing a secure link for resetting your password is sent to the email address you provided.
- Open your email inbox and open the email with the subject Reset your Encord password sent by info@encord.com.
- Click the Reset my password button in the email. A new page opens in your browser.
- Enter a new password for your Encord account. Re-enter the password to confirm your new password.
- Click Submit.

I get a blank screen when trying to log in on my Windows computer. How can i fix this?
I get a blank screen when trying to log in on my Windows computer. How can i fix this?
-
Go to the Control Panel.
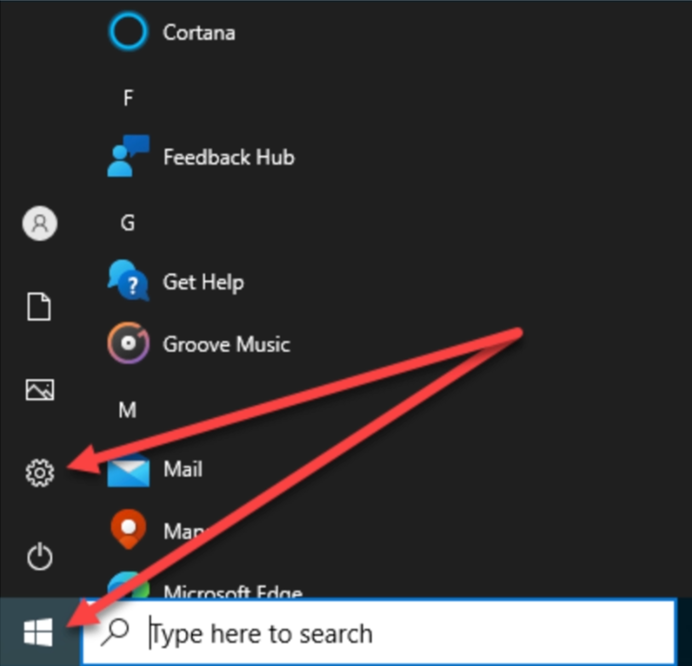
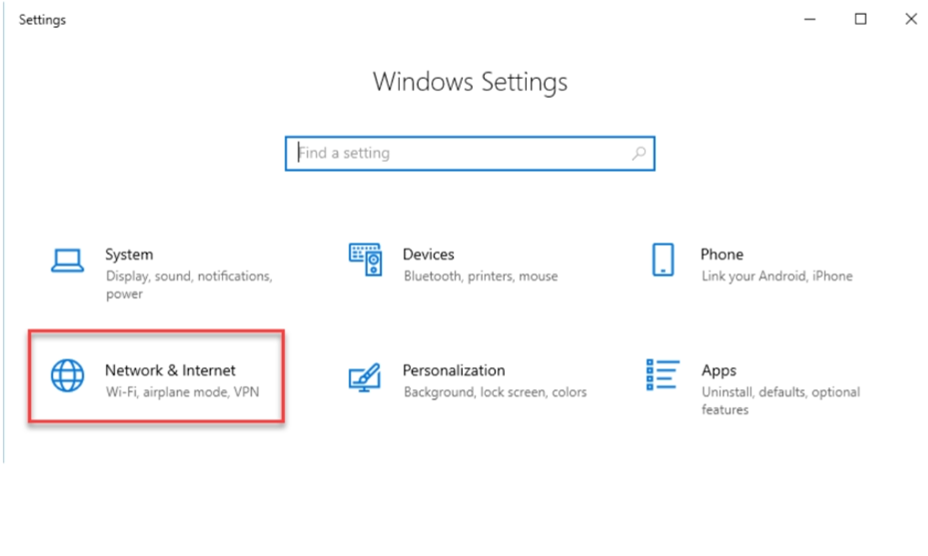
- Click Network and Internet > Network and Sharing Center > Change adapter settings.
-
Select the connection for which you want to configure Google Public DNS. For example:
- To change the settings for an Ethernet connection, right-click the Ethernet interface and select Properties.
- To change the settings for a wireless connection, right-click the Wi-Fi interface and select Properties.
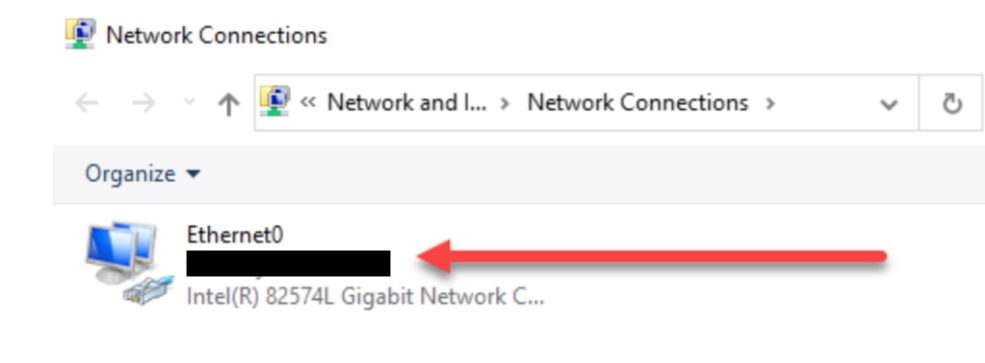
- If you are prompted for an administrator password or confirmation, type the password or provide confirmation.
- Select the Networking tab. Under This connection uses the following items, select Internet Protocol Version 4 (TCP/IPv4) then click Properties.
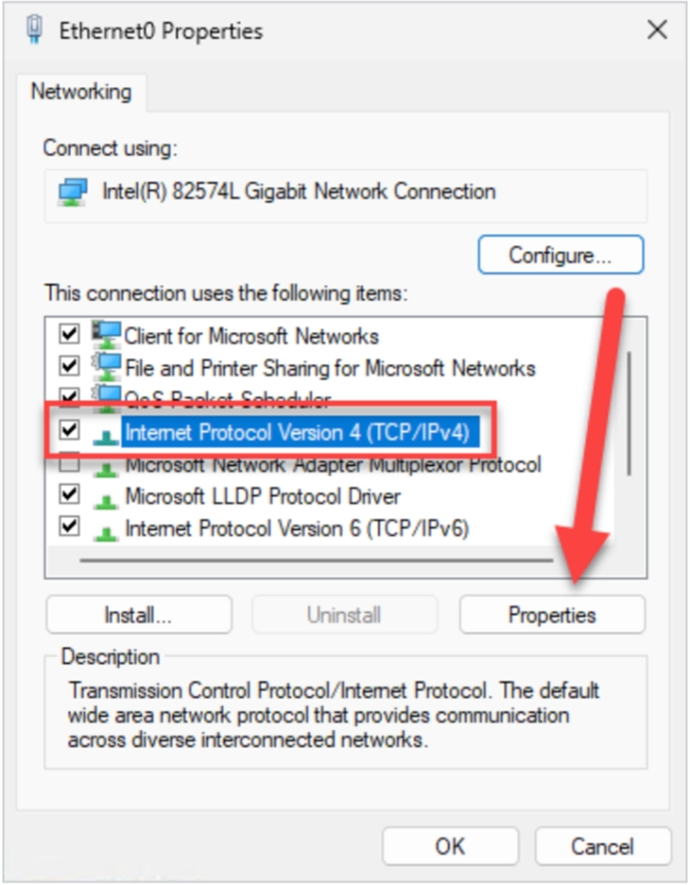
- Select Use the following DNS server addresses. If there are any IP addresses listed in the Preferred DNS server or Alternate DNS server, write them down for future reference. Replace those addresses with the IP addresses of the Google DNS servers:
- For IPv4: 8.8.8.8 and/or 8.8.4.4.
- Click OK.
-
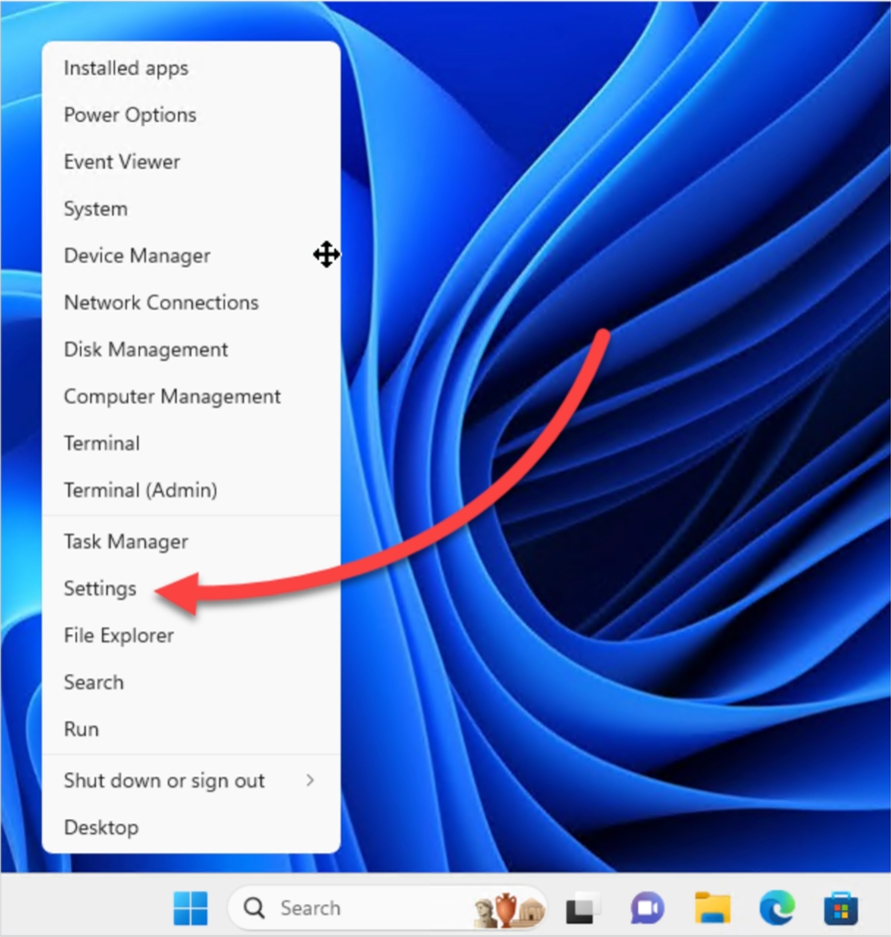
Go to Settings.
-
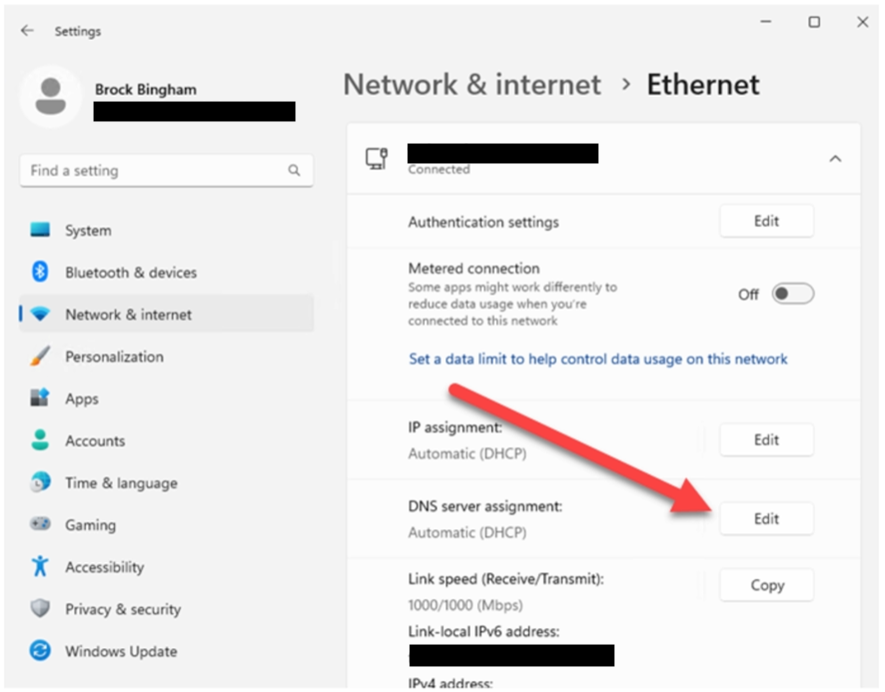
Select the connection for which you want to configure Google Public DNS. For example:
- If you are using Wi-Fi, click Wi-Fi, click Hardware properties, then click Edit next to DNS server assignment.
- If you are using an ethernet connection, click Ethernet, then click Edit next to DNS server assignment.
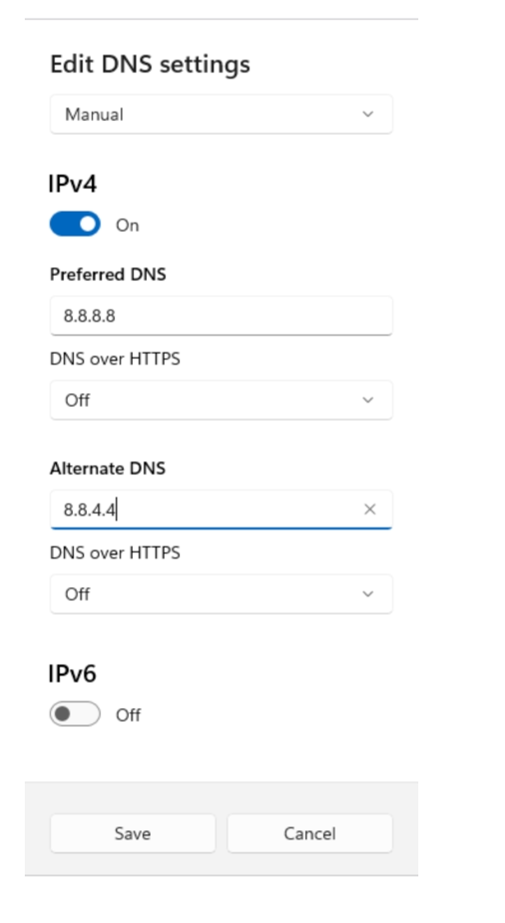
- Using the drop-down menu, select Manual, then toggle IPv4 to On. If there are any IP addresses listed in the Preferred DNS server or Alternate DNS server, write them down for future reference. Replace those addresses with the IP addresses of the Google DNS servers:
- For IPv4: 8.8.8.8 and/or 8.8.4.4.
I get a blank screen when trying to log in on my Mac computer. How can i fix this?
I get a blank screen when trying to log in on my Mac computer. How can i fix this?
-
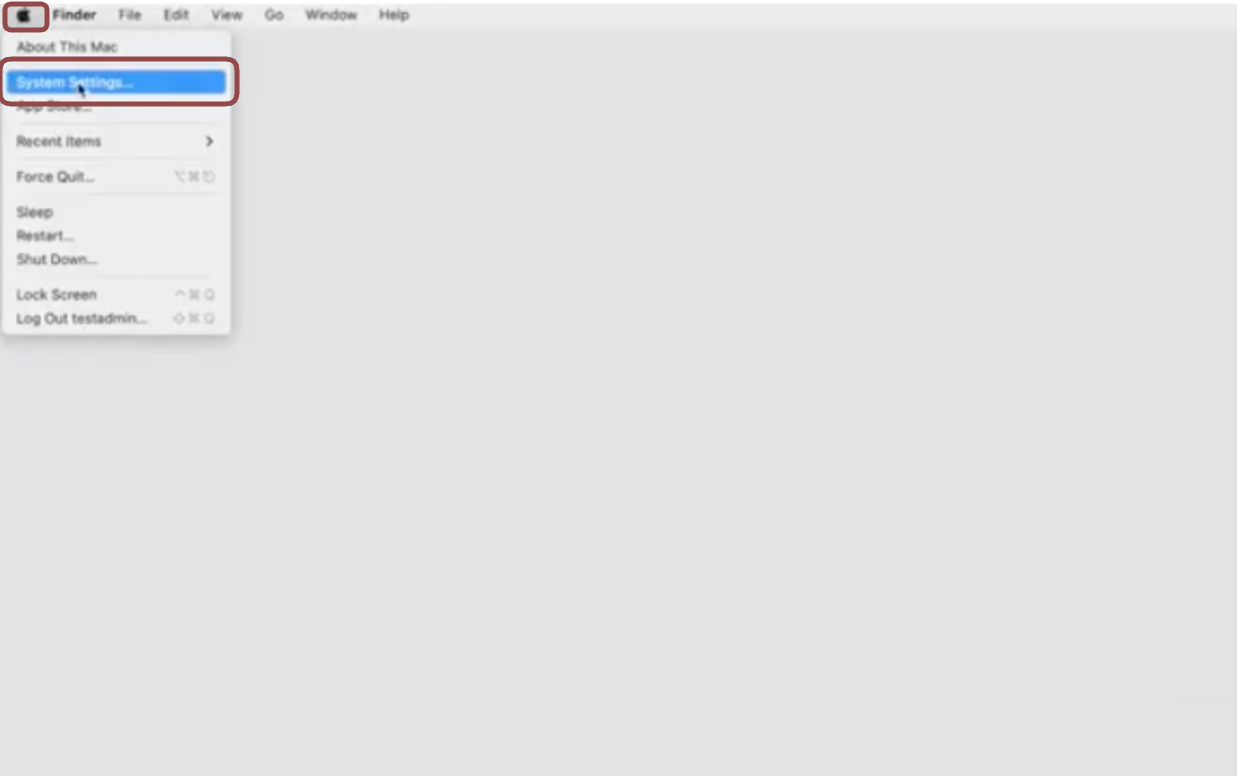
Click the Apple logo and select System Settings in the menu.
-
Click Network.
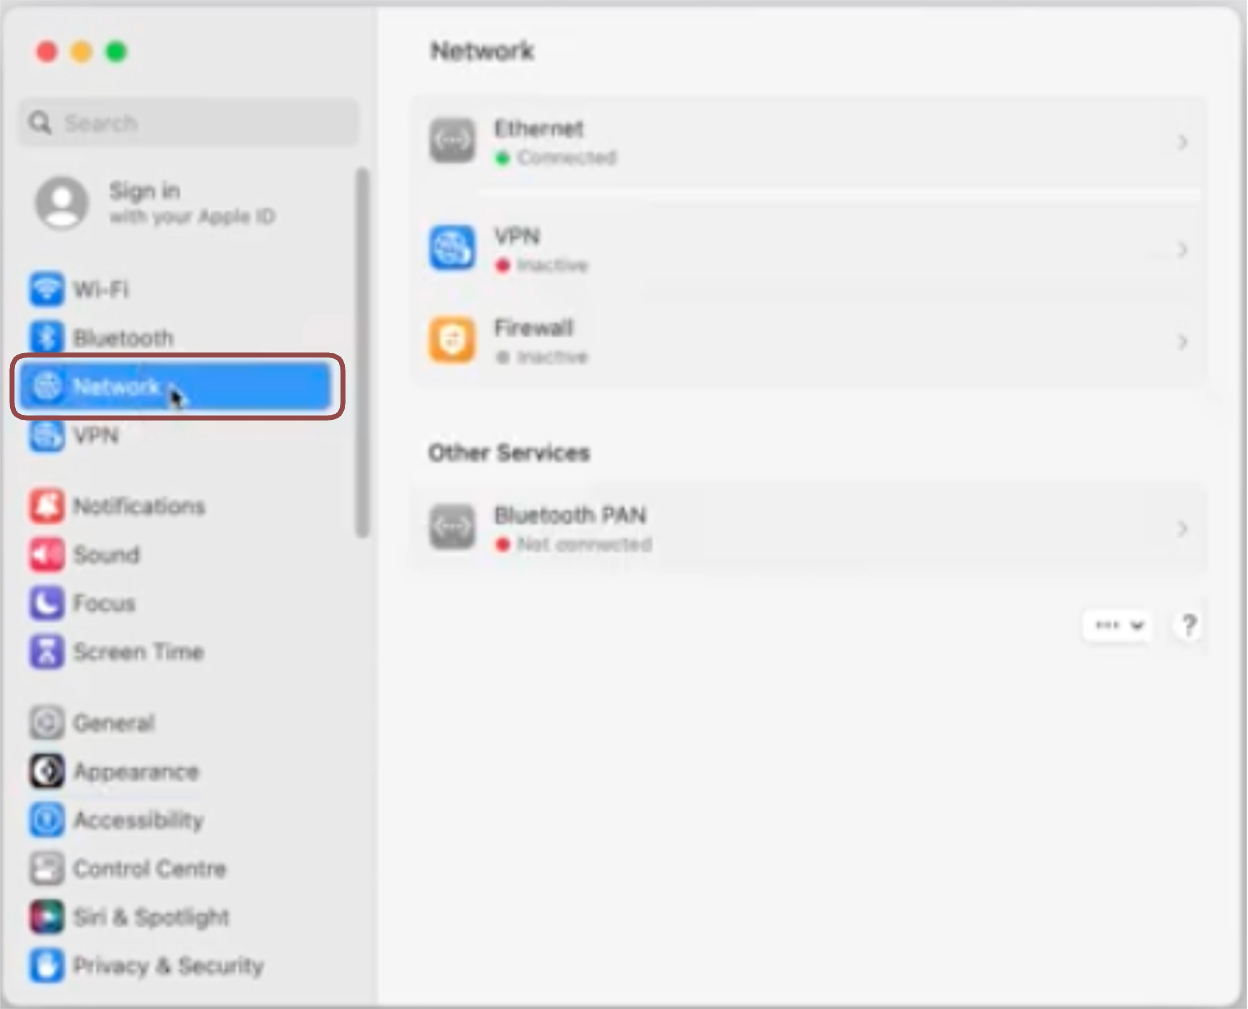
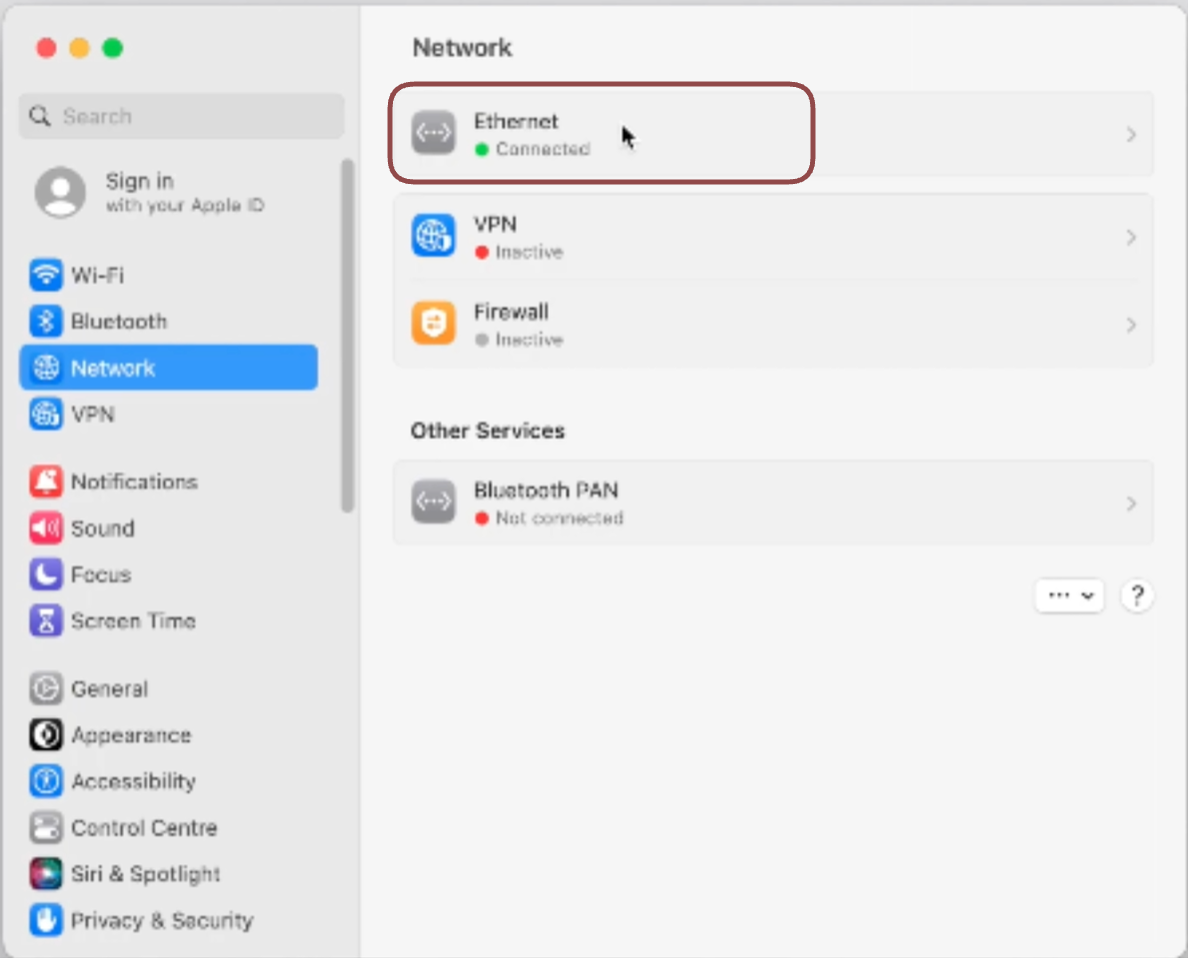
- Select the first Wi-Fi or Ethernetconnection in the list (the connection you are using).
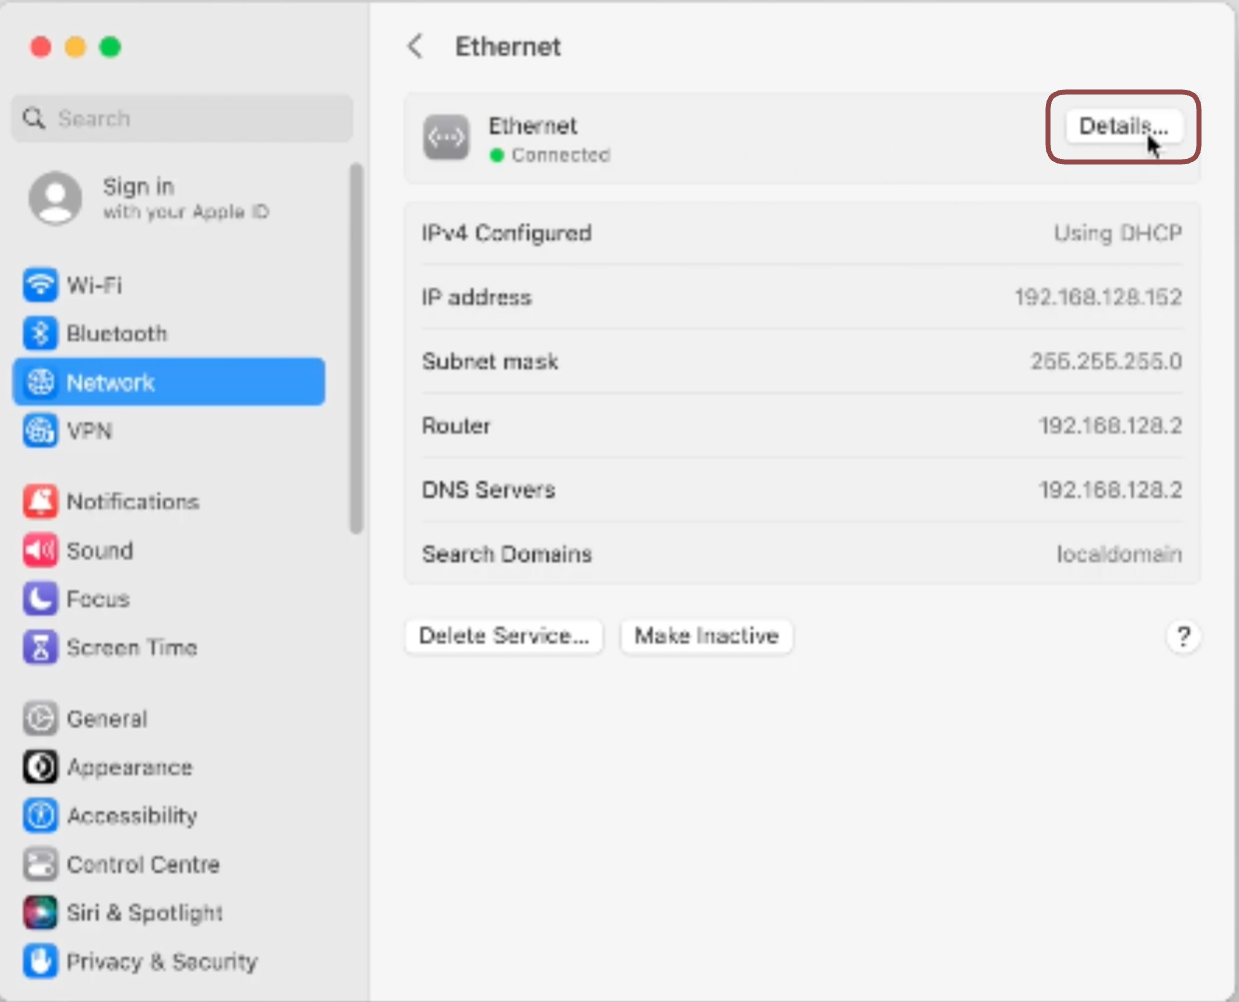
- Click the Details button.
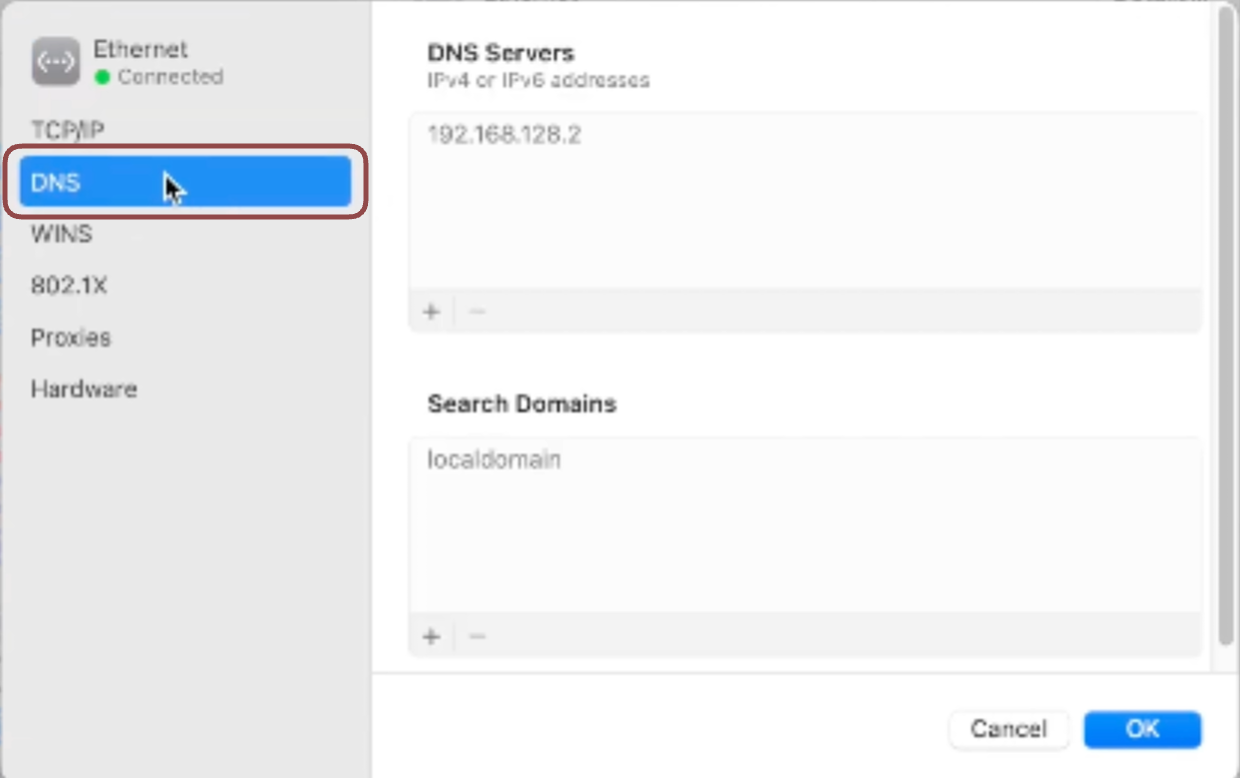
- Click DNS.
-
Click the + button in the DNS servers section.
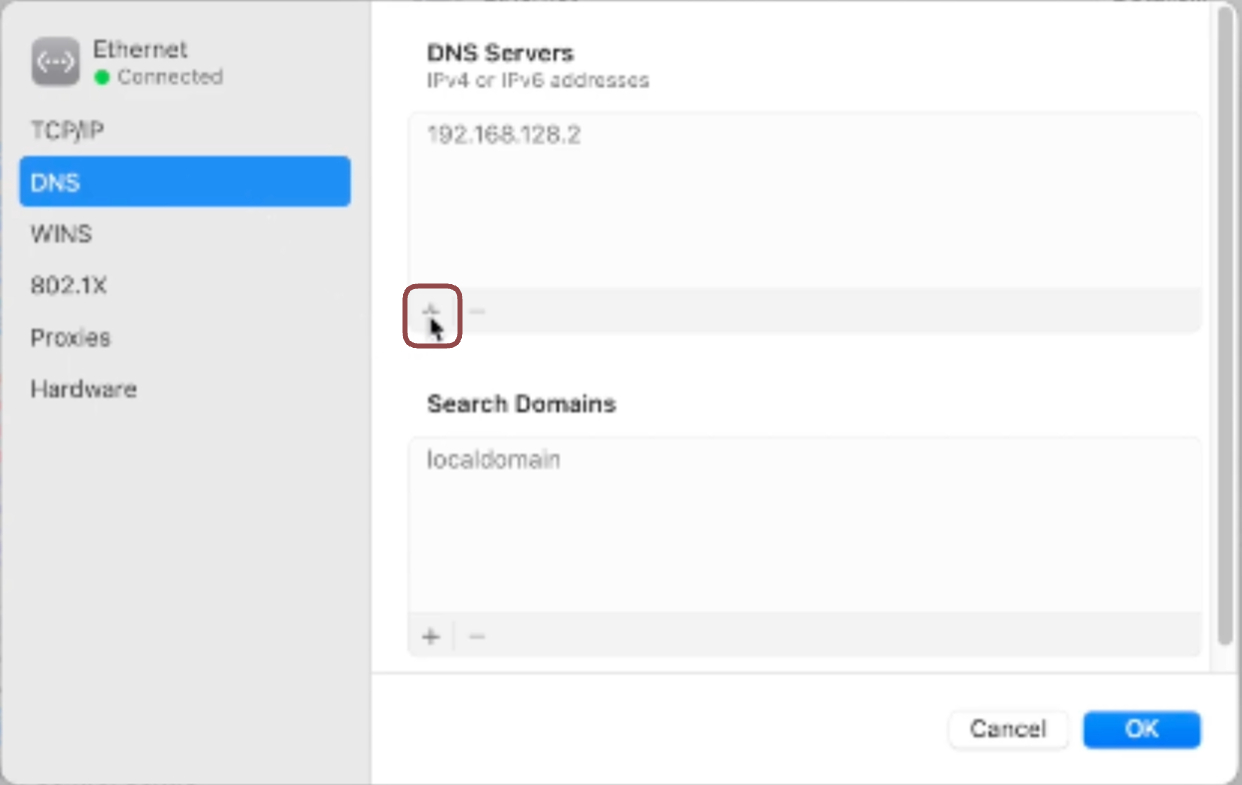
- Type 8.8.8.8 in the text field.
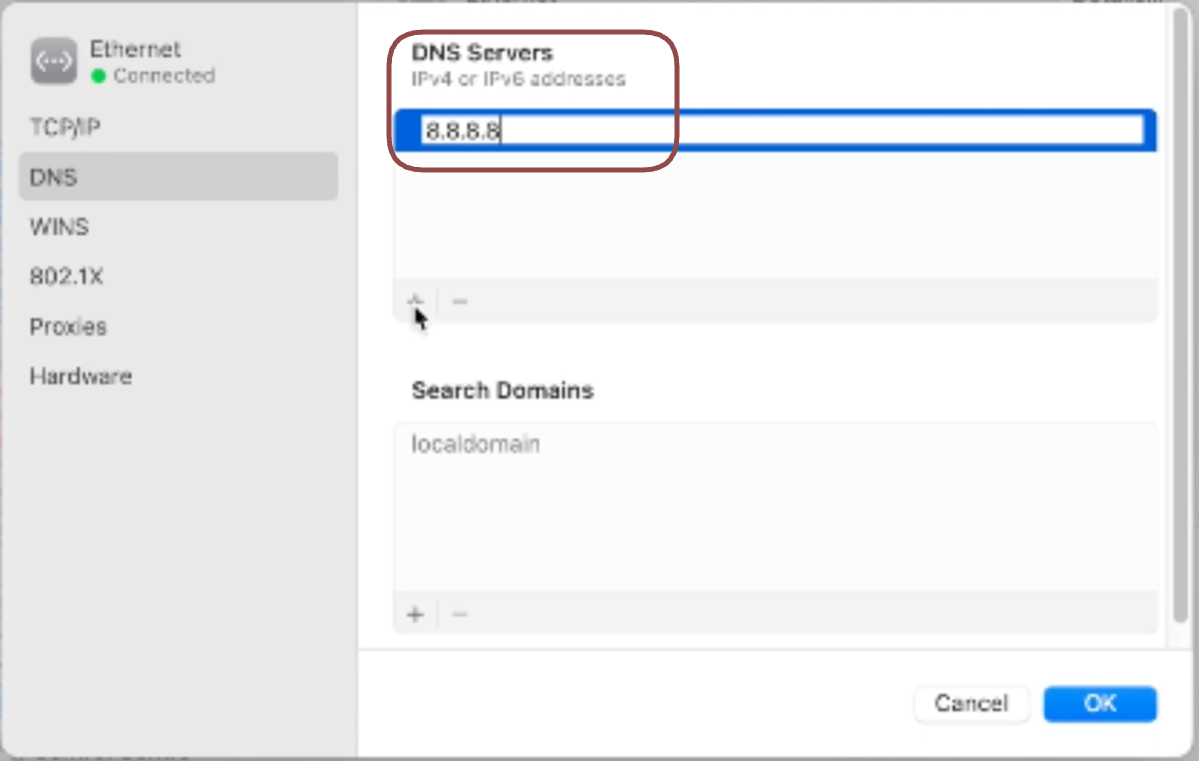
- Click the + button again.
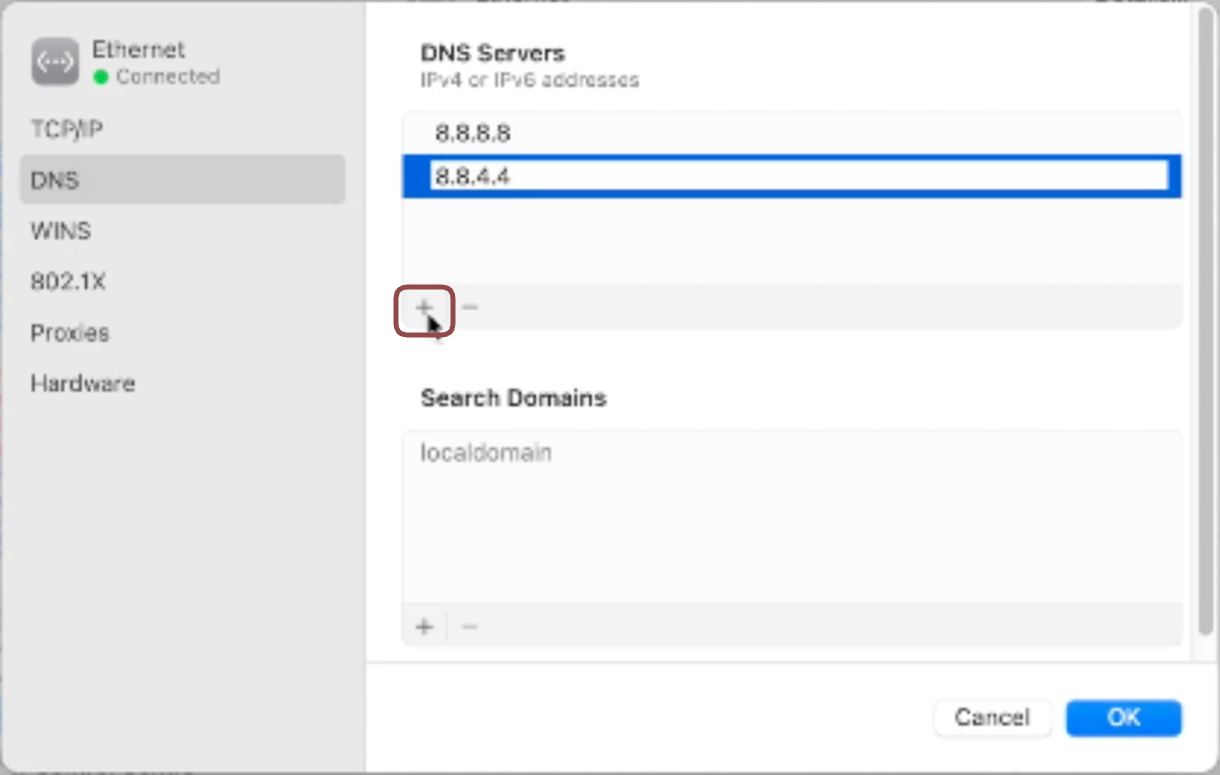
- Type 8.8.4.4 in the text field.
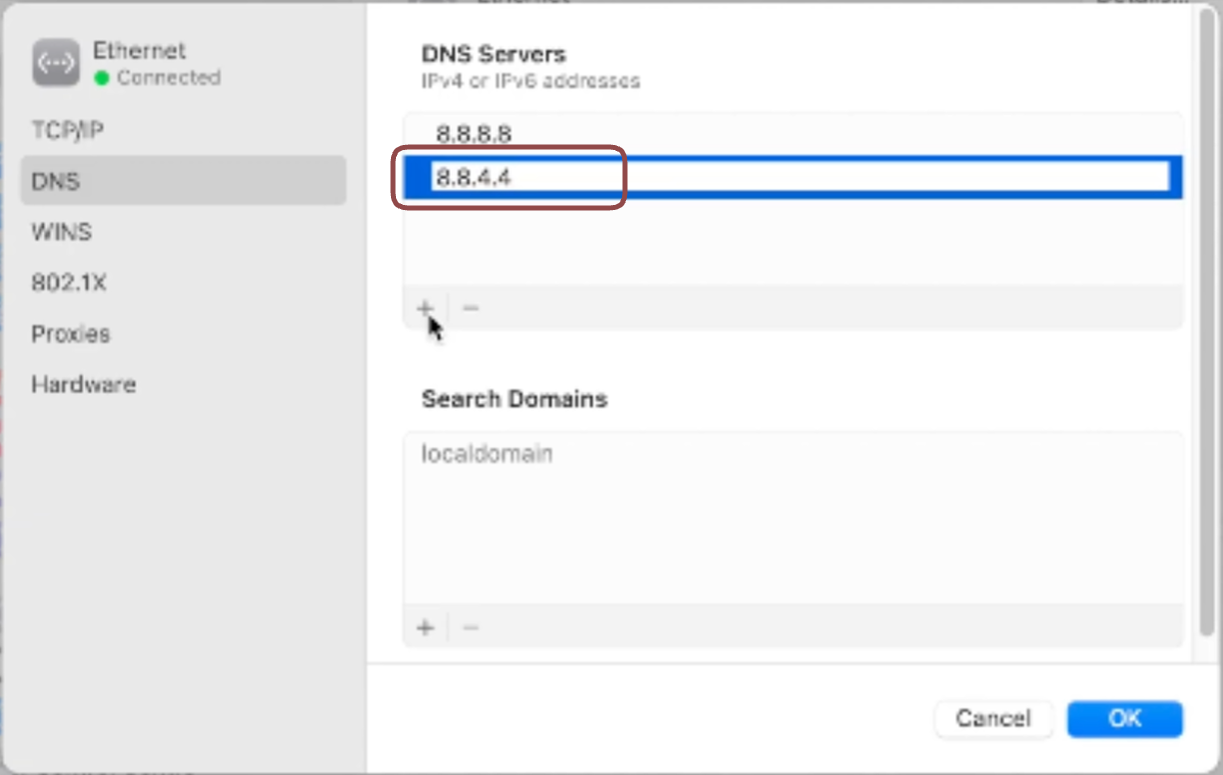
- Click OK.
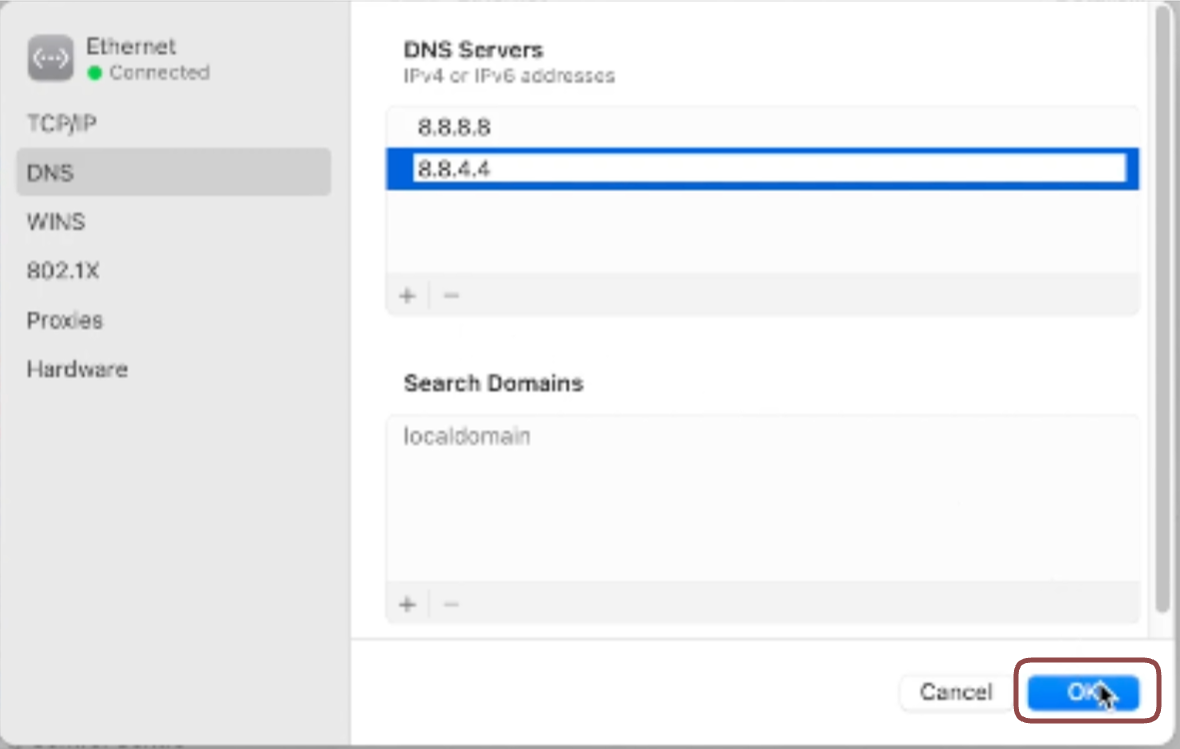
- Restart your Mac for the changes to take immediate effect.
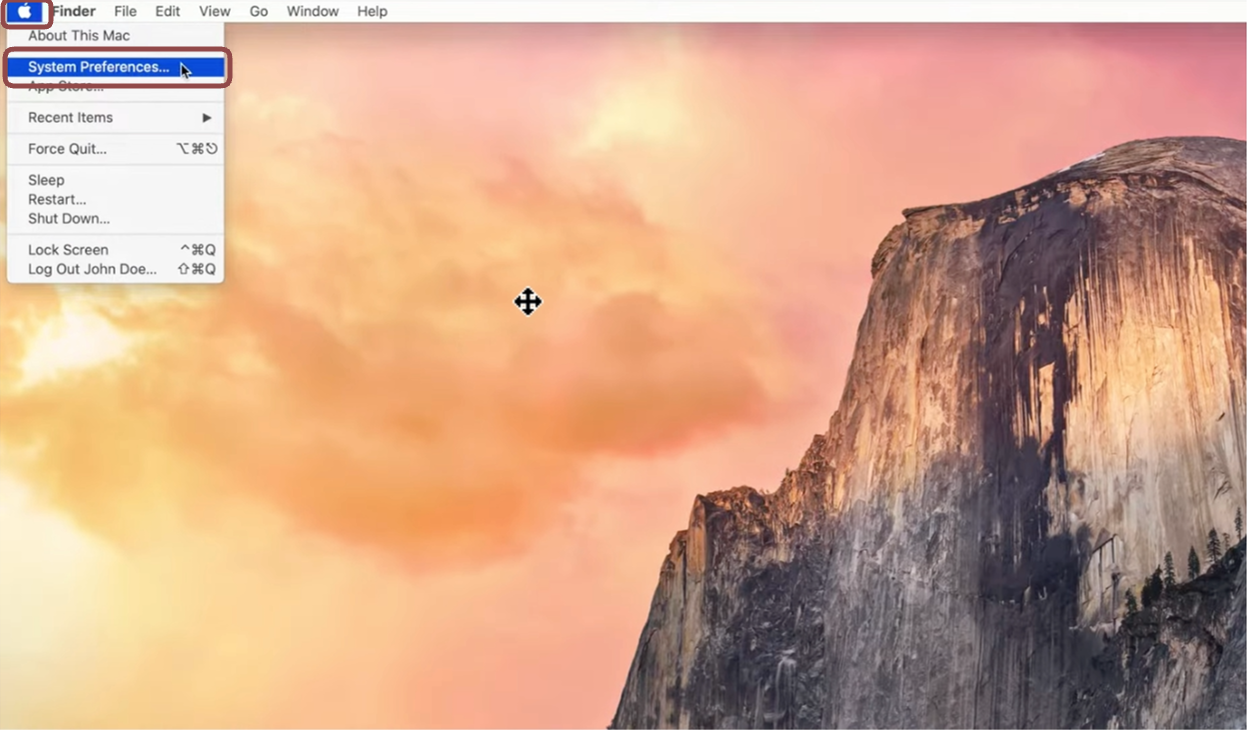
- Click the Apple logo and select System Preferences in the menu.
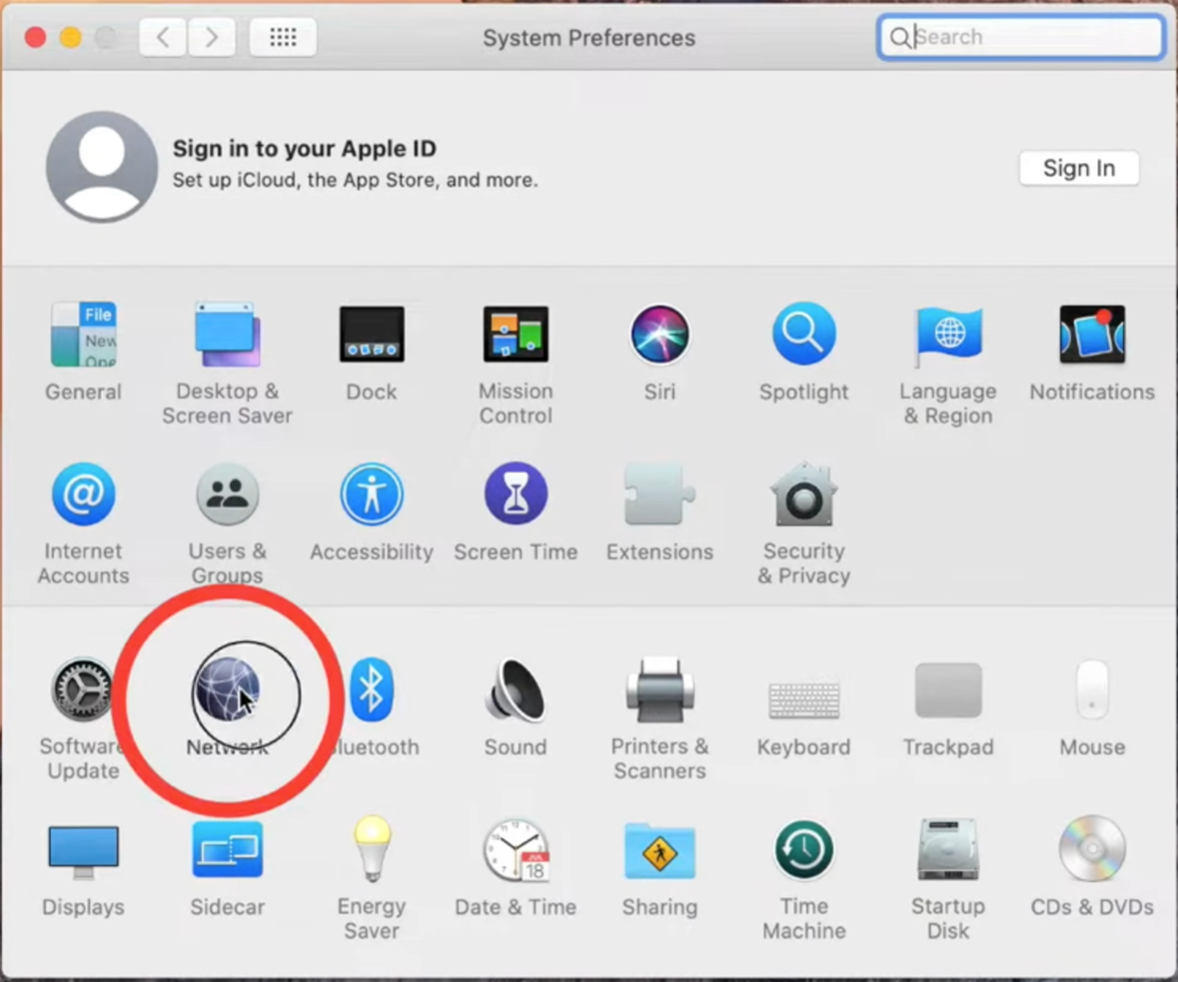
- Click Network.
- Select the first Wi-Fi or Ethernetconnection in the list (the connection you are using).
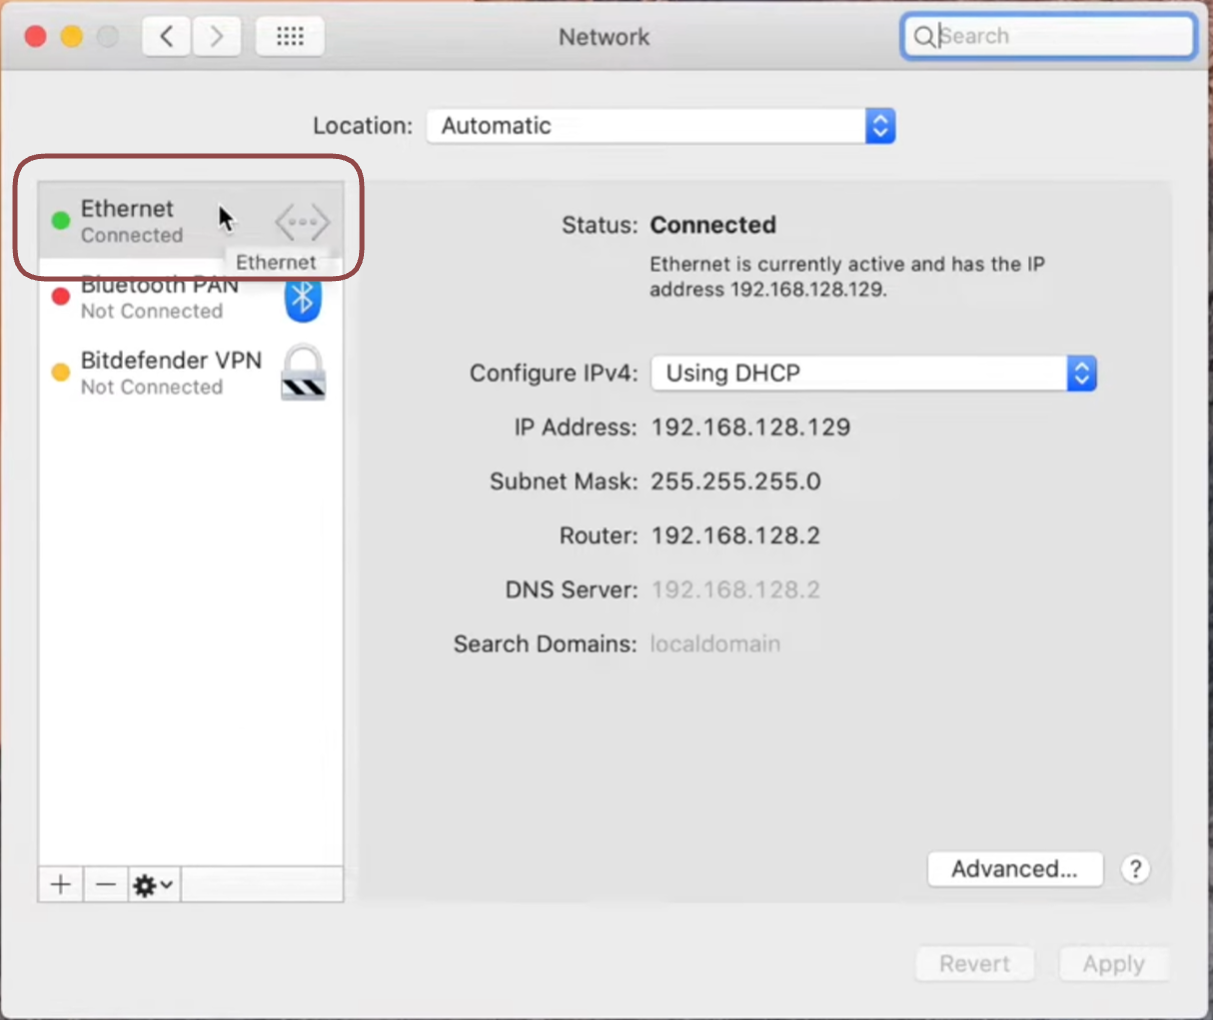
- CLick the Advanced button.
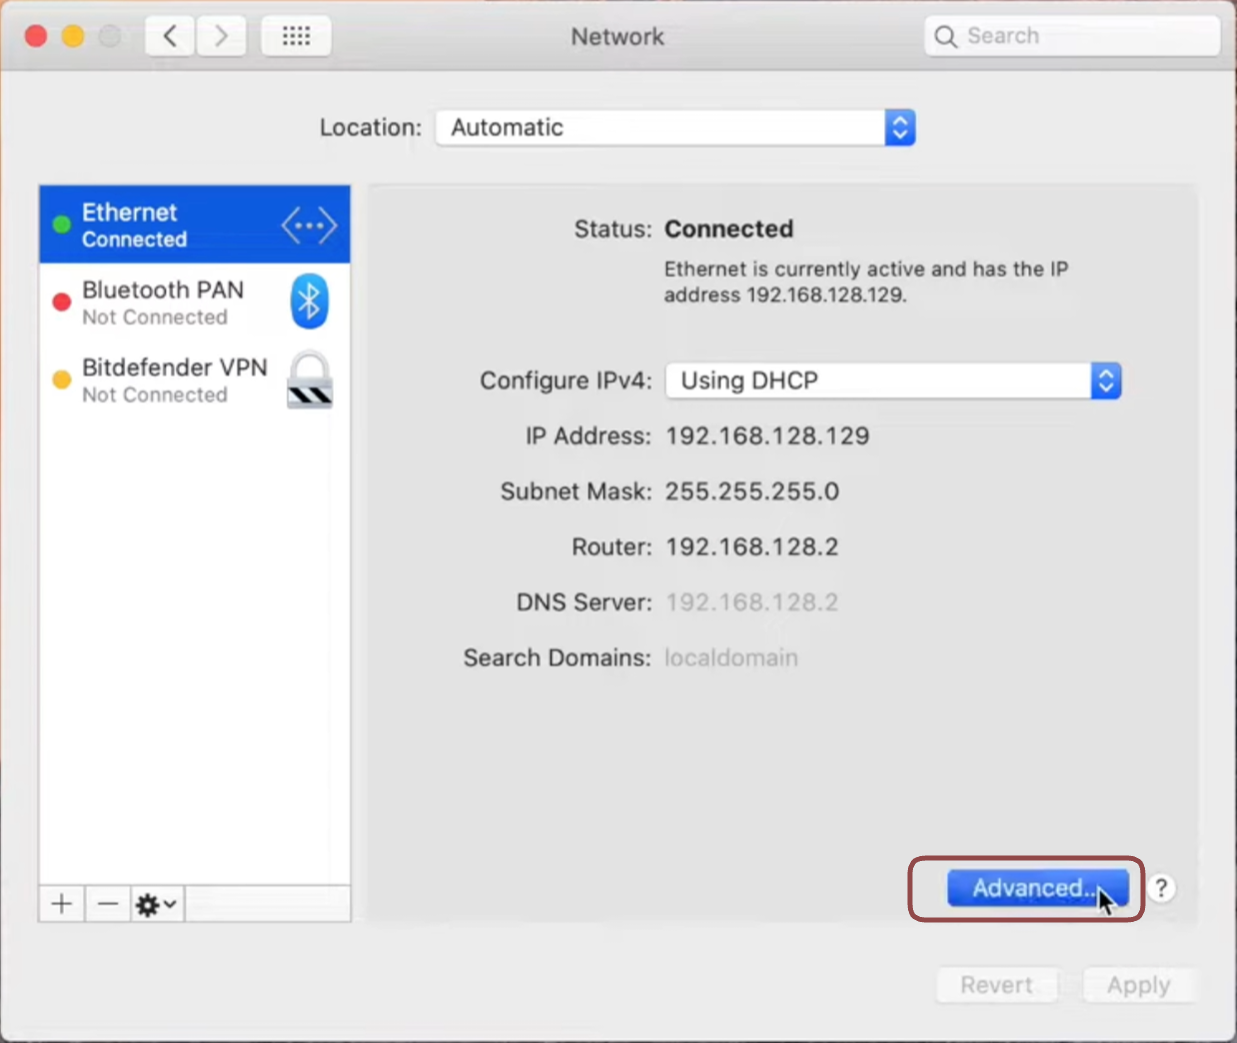
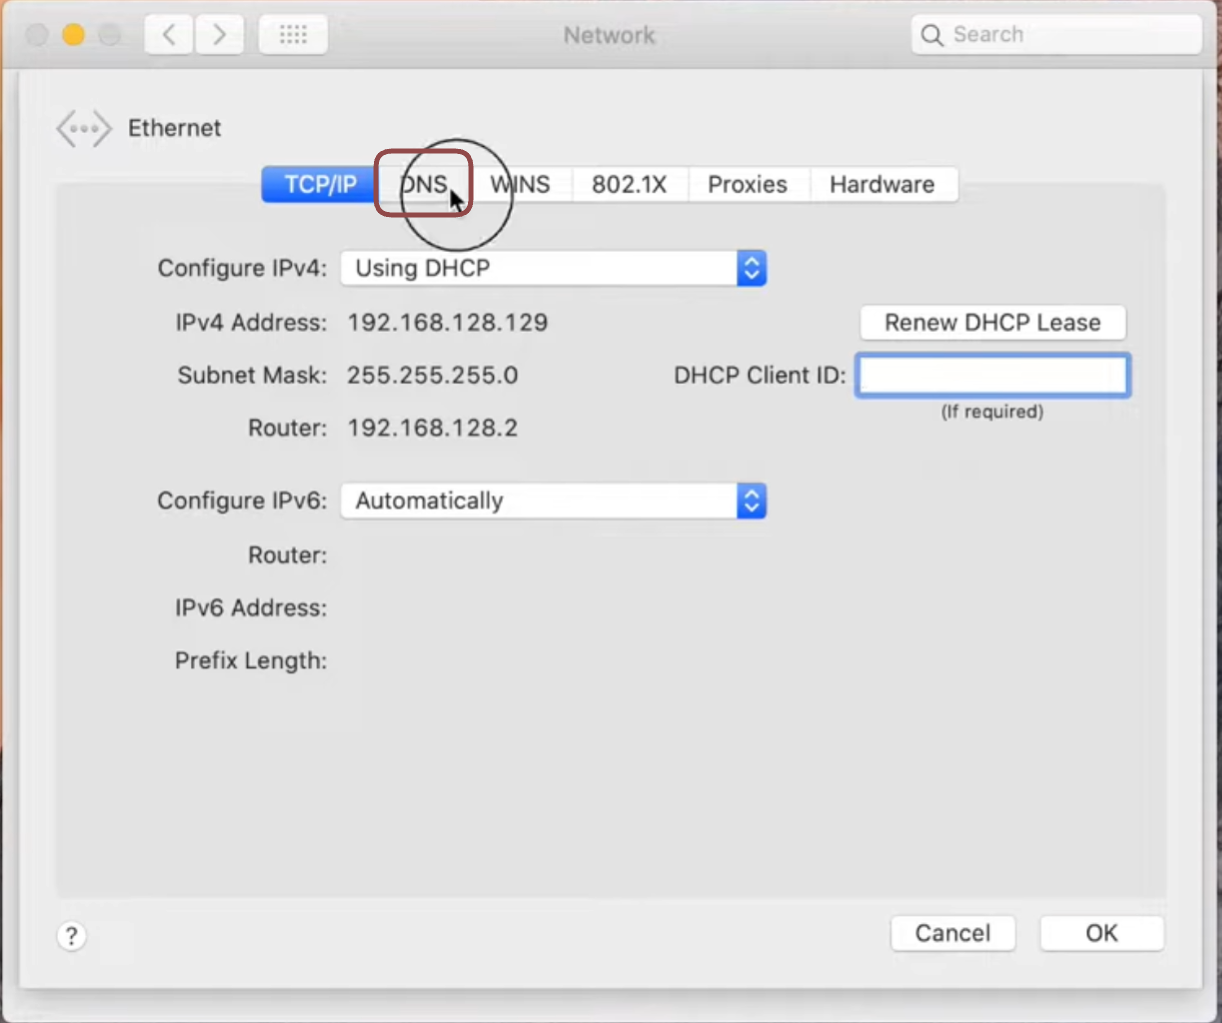
- Click the DNS tab.
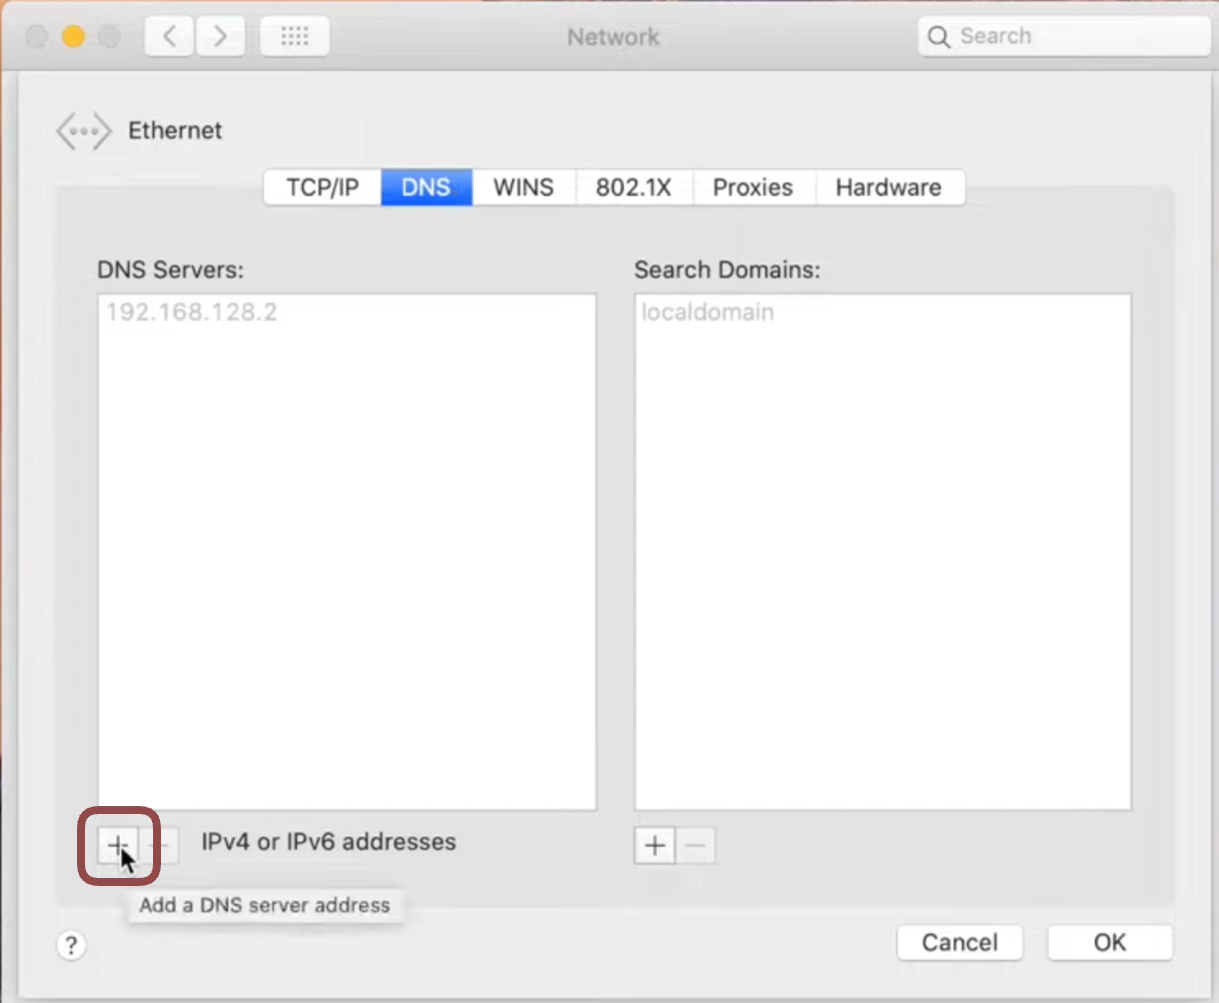
- Click the + button in the DNS servers section.
- Type 8.8.8.8 in the text field.
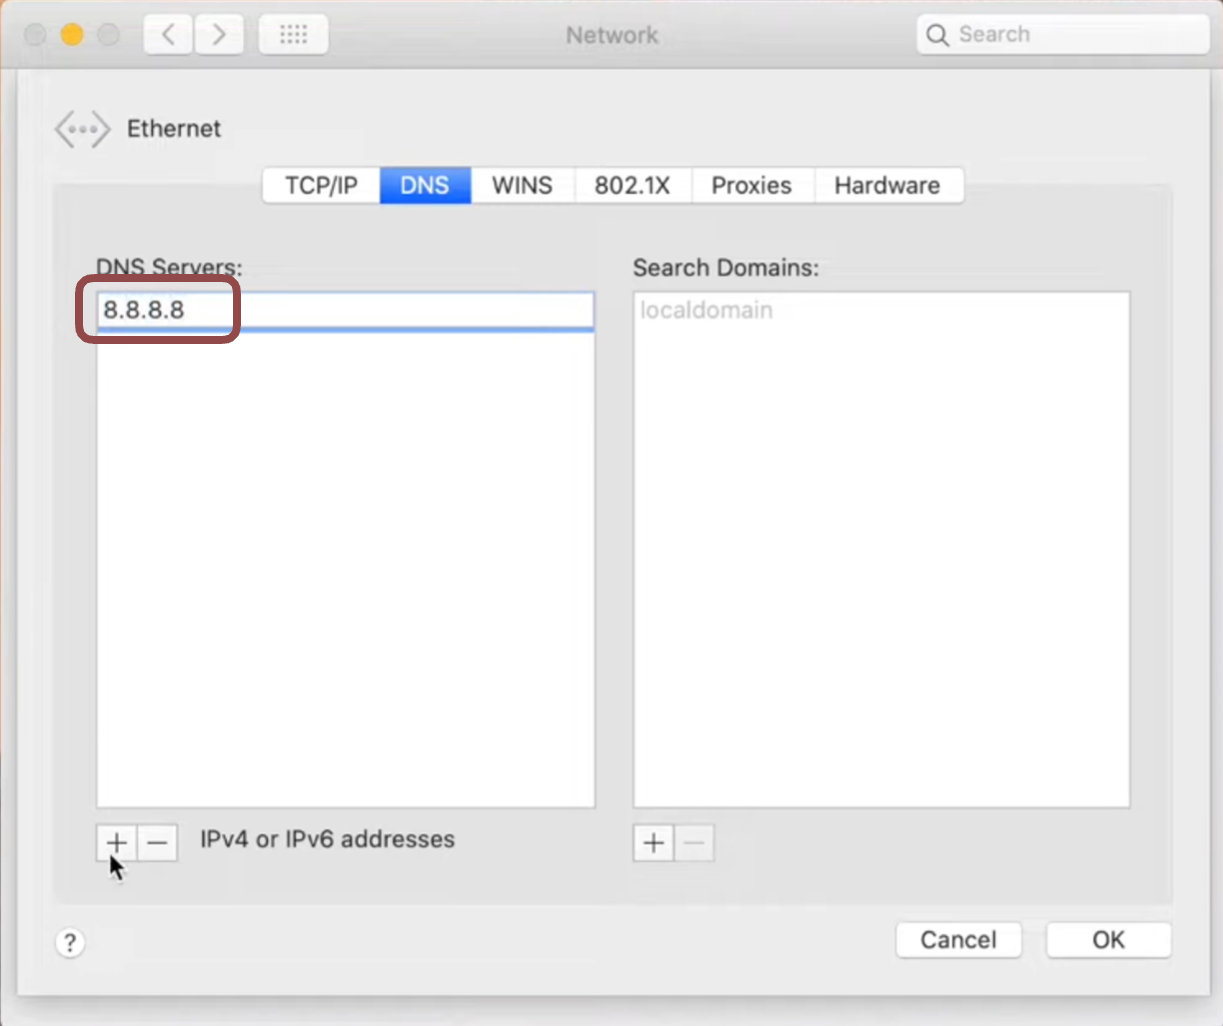
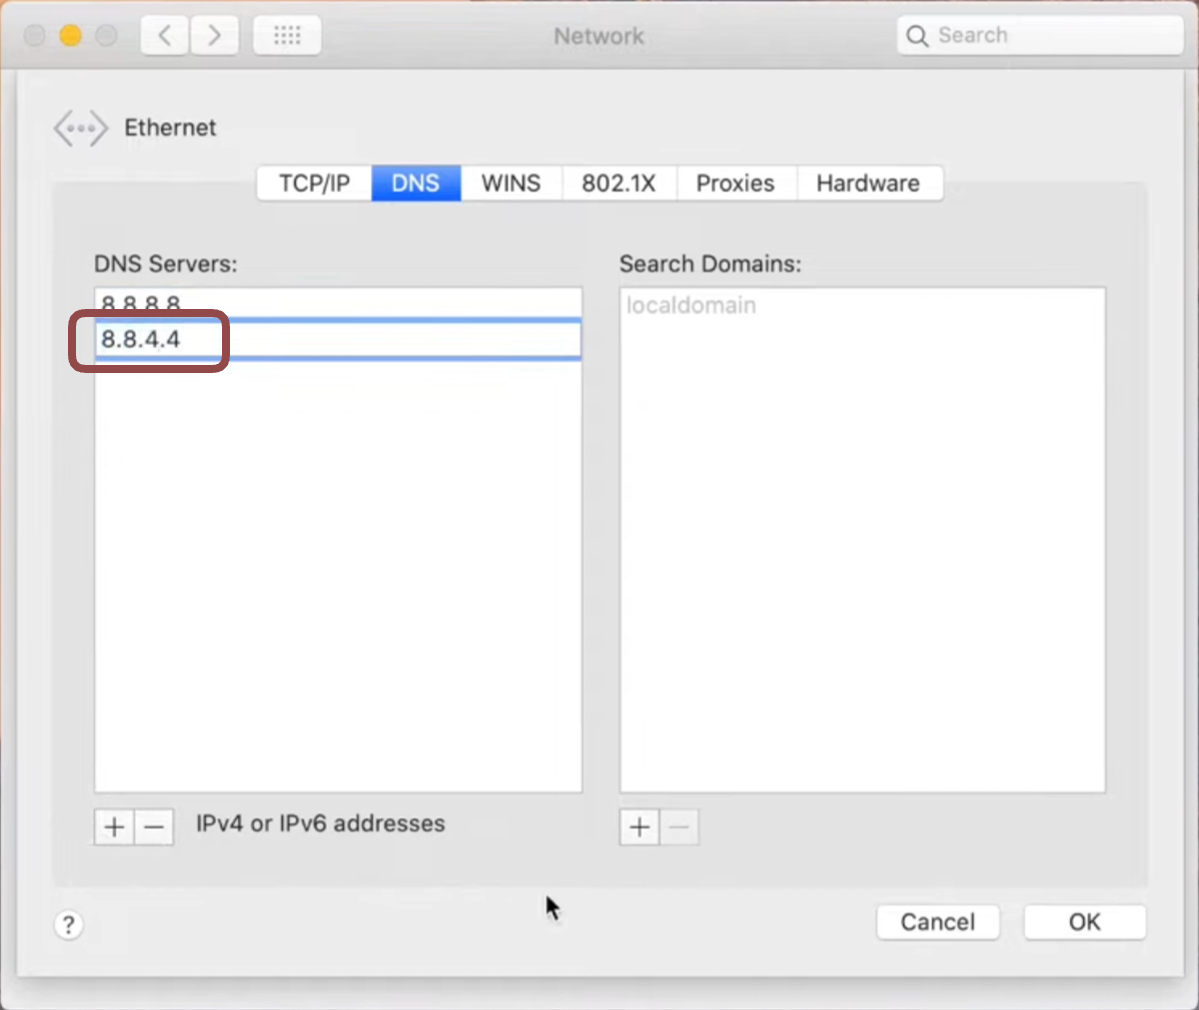
- Click the + button again.
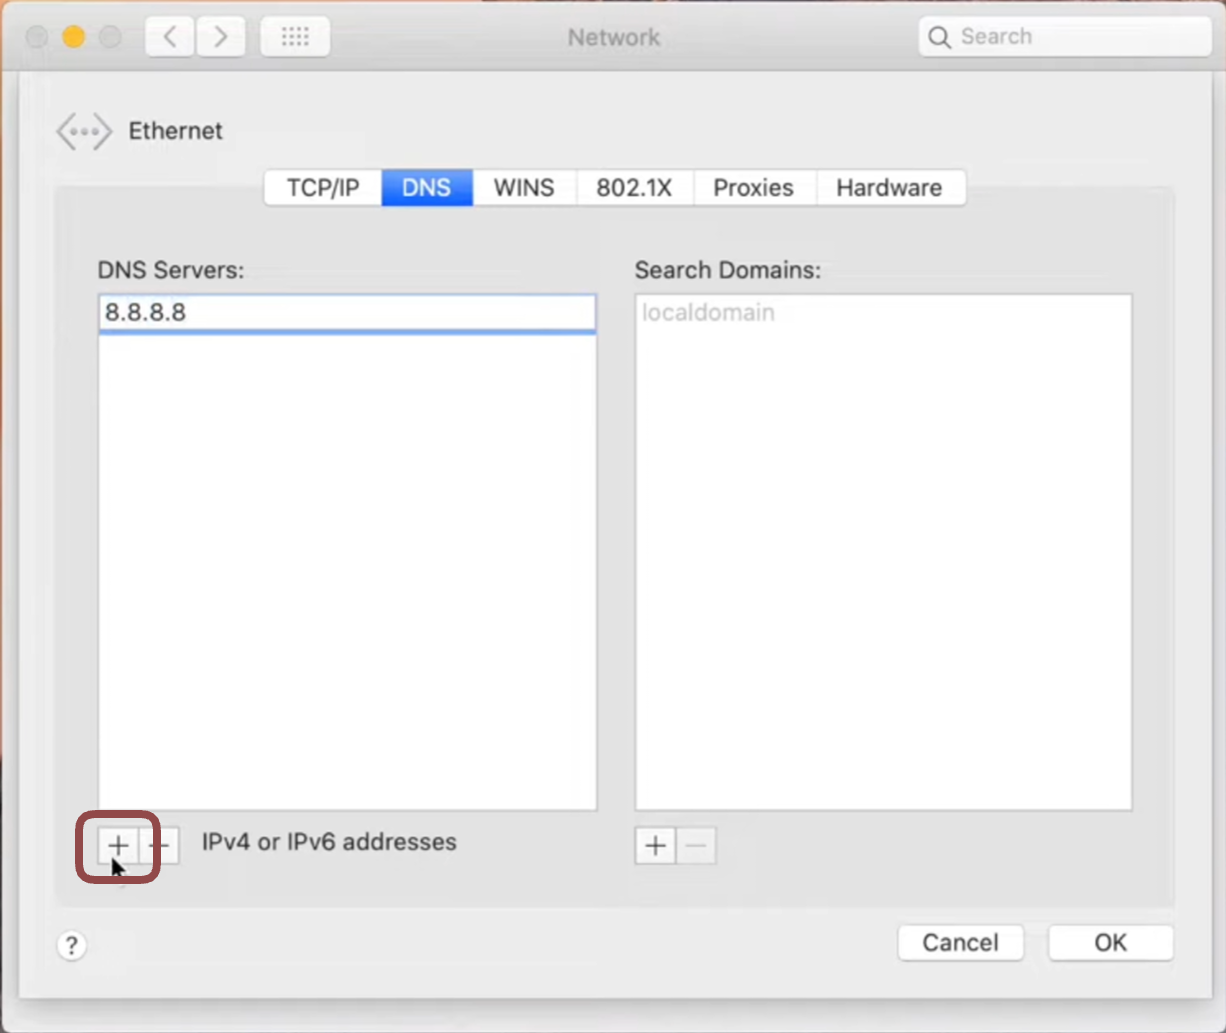
- Type 8.8.4.4 in the text field.
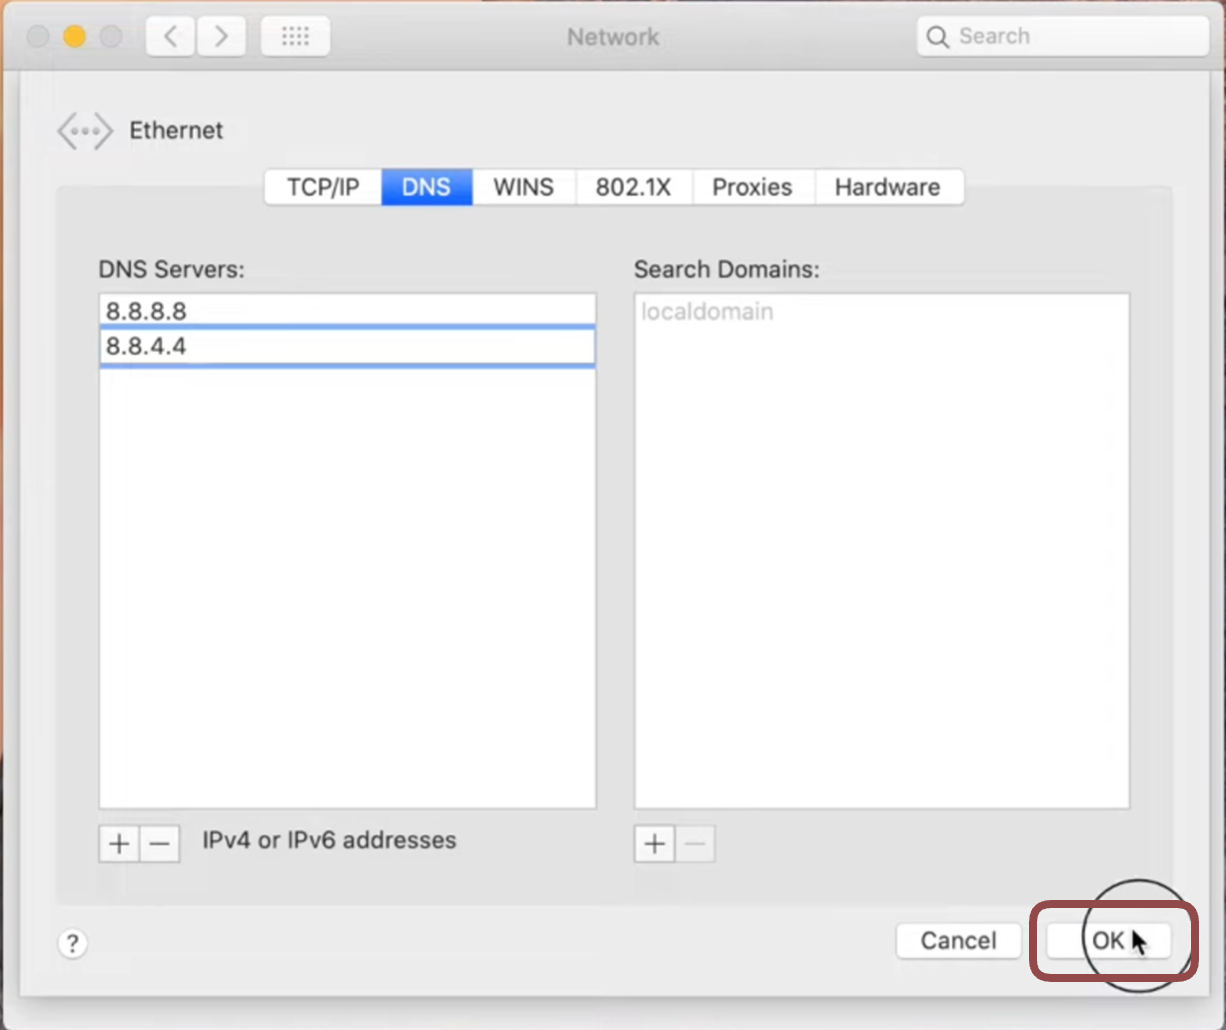
- Click OK.
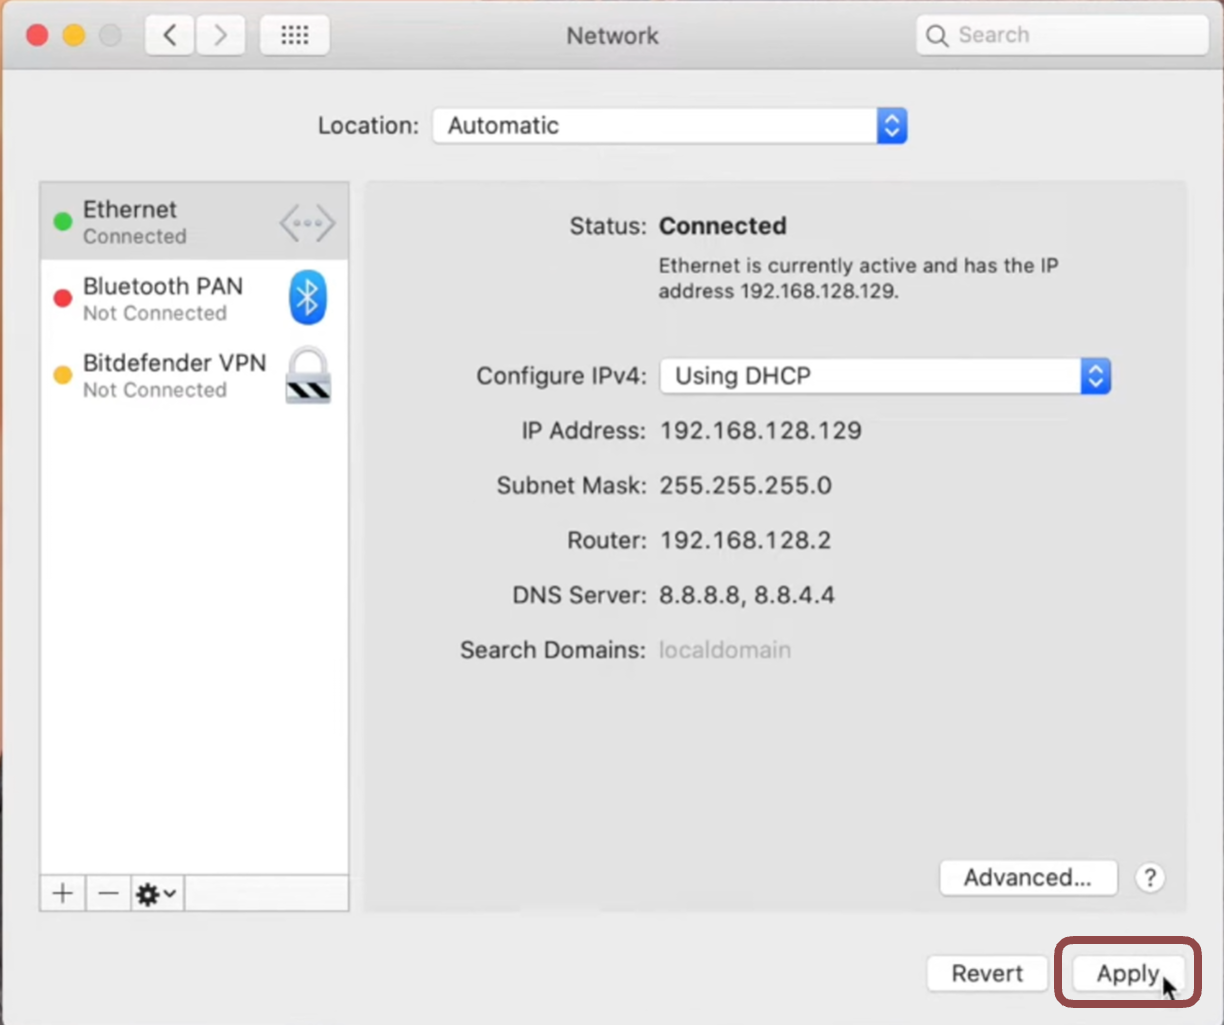
- Click Apply.
- Restart your Mac for the changes to take immediate effect.
Analytics
Can I subscribe to regular analytics Notifications?
Can I subscribe to regular analytics Notifications?
insights.To start receiving Workspace analytics emails:- Navigate to the Workspace Analytics page in the Encord app.
- Click the Subscribe button in the top-right corner of the Workspace Analytics page.
- Set the frequency at which you want to receive Workspace Analytics emails.
- Click Subscribe.

Projects
I accidentally removed all users from a Project. How can I find the Project?
I accidentally removed all users from a Project. How can I find the Project?
How do I manage teams, or create user groups?
How do I manage teams, or create user groups?
- Documentation on user groups can be found here.
- For information on how to create teams for a given Project see the Team Management section in our documentation.
What does the 'This is being edited' pop-up in the label editor mean
What does the 'This is being edited' pop-up in the label editor mean
- Two different people are editing a task at the same time.
- Or, that one individual has the task open in two different tabs, or browser windows.
Why is there a warning sign next to my Project where it's listed
Why is there a warning sign next to my Project where it's listed
⚠️ “This project has exceeded the recommended number of tasks. To avoid performance issues, you need Admin access to manage and reduce the amount of data in this project”.The diagram below illustrates the steps you should take to fix the issue.

Large audio files take a long time to load in the Label Editor. What can I do?
Large audio files take a long time to load in the Label Editor. What can I do?
Datasets
What's the difference between image groups, and image sequences?
What's the difference between image groups, and image sequences?
- Image groups can contain images of varying orientations and are best thought of as a collection of images.
- Image sequences can only contain images of the same orientation - which allows them to be treated the same way that videos are in which each input image constitutes a single frame of the resulting image sequence.
How do I upload DICOM data?
How do I upload DICOM data?
- Local files can be dragged-and-dropped when creating a new Dataset.
- Files from your private cloud are uploaded using JSON files. We do not support upload via the CSV file format.
How do I update client metadata?
How do I update client metadata?
"upsert_metadata": true flag in the upload JSON file. An example JSON file is provided here. If I have duplicate Datasets, how can I find out which one is which?
If I have duplicate Datasets, how can I find out which one is which?
- Navigate to Datasets on our platform from https://app.encord.com or https://app.us.encord.com.
- Re-name both datasets to make them distinguishable.
- Open up both cases in the editor, and see which one is which (e.g. which one is annotated and which is not).
How do I make sure my videos load quickly?
How do I make sure my videos load quickly?
- An annotator’s download speed from private cloud storage has to be at least 3-4 times the video bitrate.
- Make sure the videos have enough keyframes for smooth frame-by-frame navigation (roughly every 50 frames for high-resolution videos).
How do I re-encode videos?
How do I re-encode videos?
- Customers not using Files can re-encode videos on our platform when uploading the data to a Dataset.
- Customers using Files can re-encode videos in the Files section of the platform by right-clicking the video and selecting Re-encode.
- You are notified if we detect your files need re-encoding.
What video formats are supported?
What video formats are supported?
.mp4withH.264– We recommend using H.264 as the default codec, unless you have specific requirements that necessitate H.265. H.265 may present compatibility issues in some cases..mp4withVP9.
I am getting an error when I try to display video or DICOM files. How can I fix this?
I am getting an error when I try to display video or DICOM files. How can I fix this?
- Ensure you are using the Chrome browser.
- Turn hardware acceleration off.
- If you are still stuck, contact support@encord.com for assistance.
How do I change my identifier from email address to display name on Projects?
How do I change my identifier from email address to display name on Projects?
-
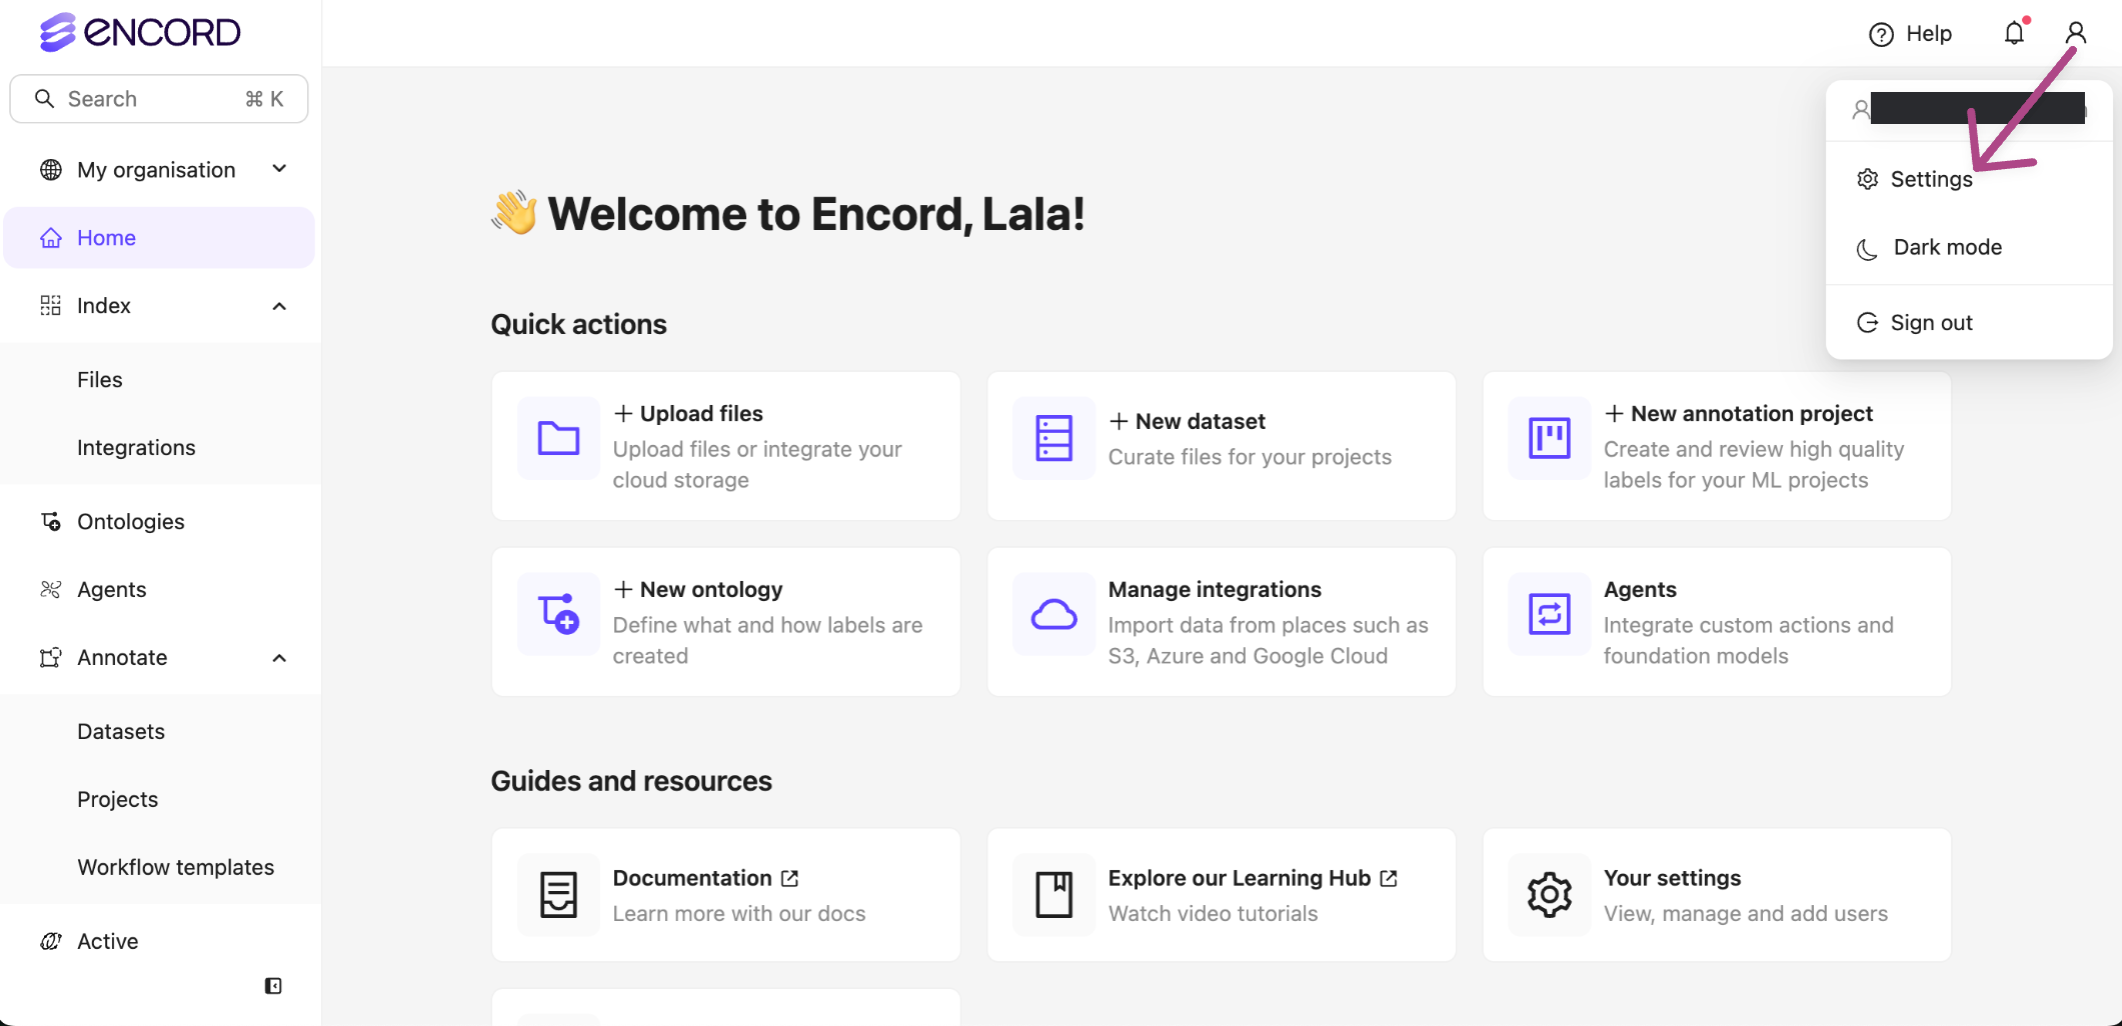
Go to User Profile > Settings.
The Settings page appears.
-
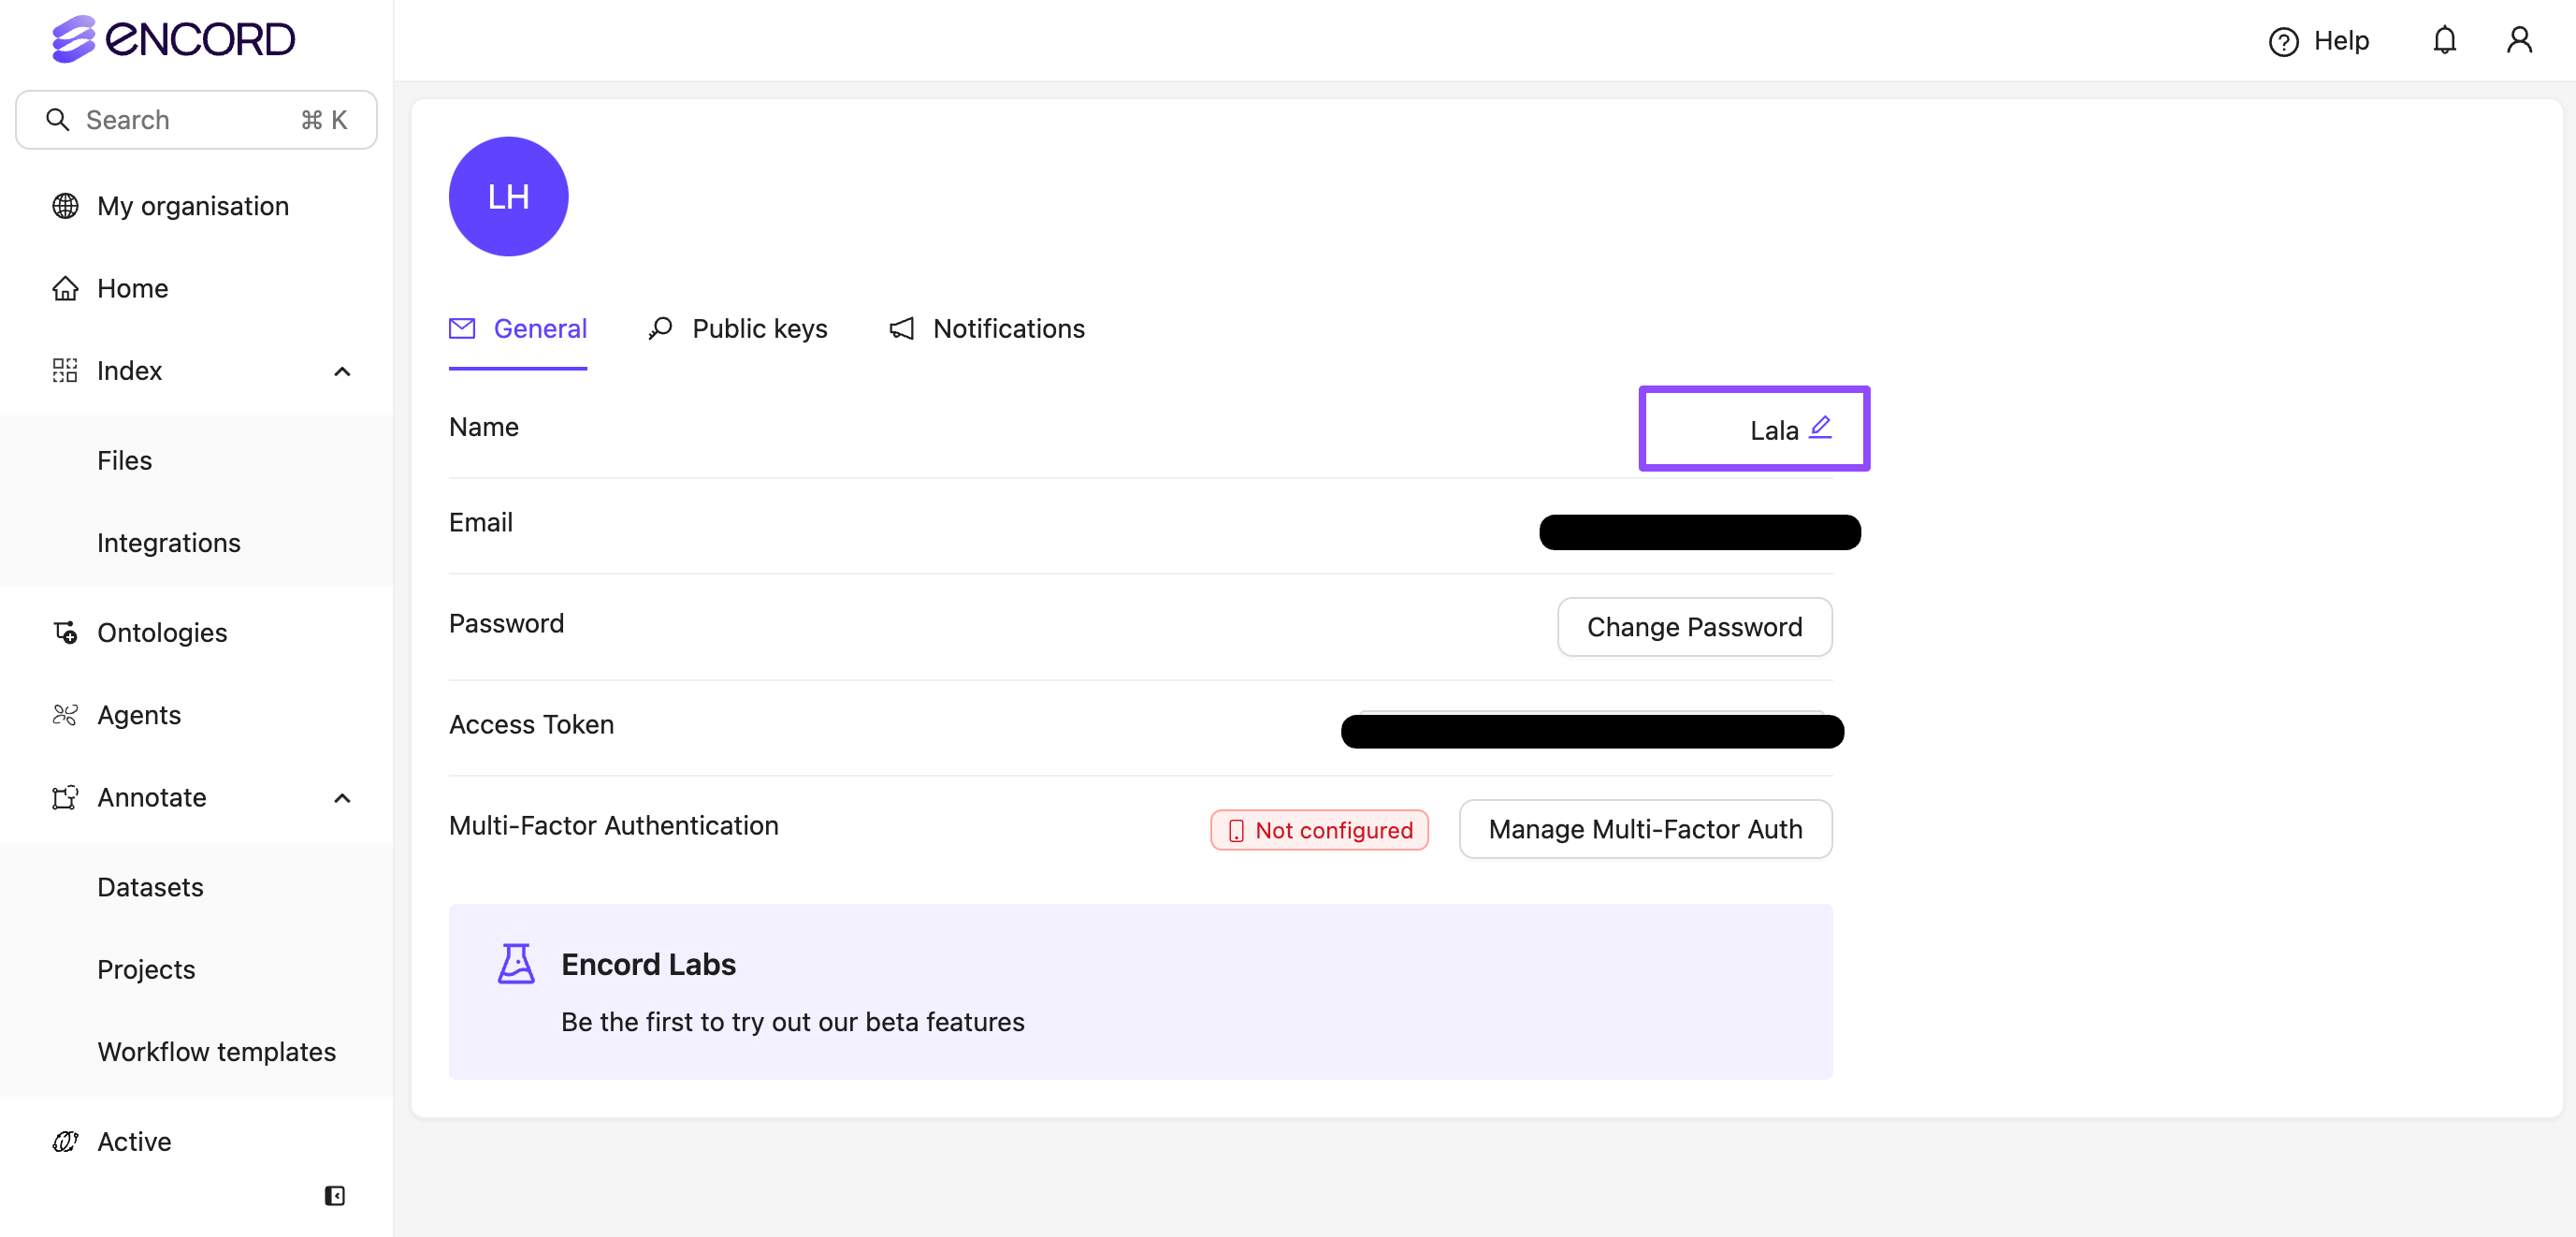
Click the Edit button in the Name row.
The Name field becomes editable.
- Provide the display name you want to use.
- Press ENTER.
Annotate
Why can't I see all classifications/annotations when reviewing?
Why can't I see all classifications/annotations when reviewing?
What is causing the error I'm seeing in the Label Editor?
What is causing the error I'm seeing in the Label Editor?
- CORS issues - when rendering an image or video from remote storage solutions (AWS S3, GCP, Azure) it is important to set up a valid Cross-Origin Request Sharing (CORS) Policy and failure to do so will result in errors when trying to load that remote content in the Encord application.
- Connectivity issues - Check that your local connection is fast and performant. We also recommend that, when configuring your remote storage, you choose a location geographically proximate to your annotators to ensure the smoothest loading experience.
- Occasionally, you might notice an error loading from remote storage if the remote storage bucket itself is newly provisioned. This is because the cloud provider sometimes provisions in any region first (to improve provisioning speed) then moves it to the requested region afterwards. If the issue is not resolver after ~1hr, contact Encord support.
Why is the Label Editor crashing, and what can I do about it?
Why is the Label Editor crashing, and what can I do about it?
The Label Editor does not appear when I try and label a task?
The Label Editor does not appear when I try and label a task?
-
Go to the Control Panel.

- Click Network and Internet > Network and Sharing Center > Change adapter settings.

-
Select the connection for which you want to configure Google Public DNS. For example:
- To change the settings for an Ethernet connection, right-click the Ethernet interface and select Properties.
- To change the settings for a wireless connection, right-click the Wi-Fi interface and select Properties.
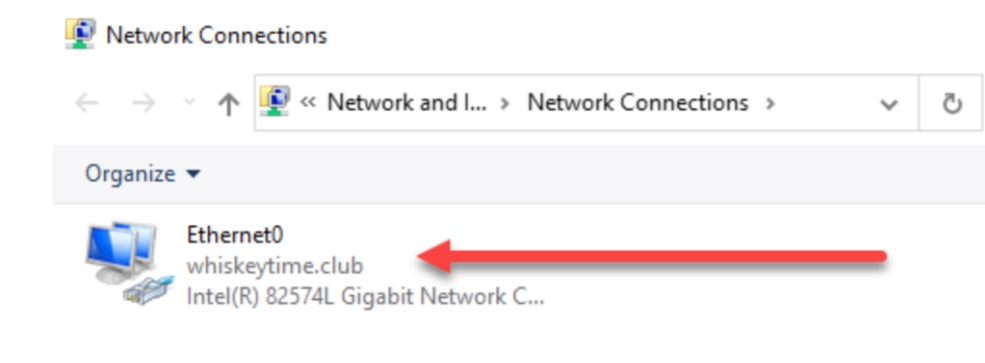
- If you are prompted for an administrator password or confirmation, type the password or provide confirmation.
- Select the Networking tab. Under This connection uses the following items, select Internet Protocol Version 4 (TCP/IPv4) then click Properties.

- Select Use the following DNS server addresses. If there are any IP addresses listed in the Preferred DNS server or Alternate DNS server, write them down for future reference. Replace those addresses with the IP addresses of the Google DNS servers:
- For IPv4: 8.8.8.8 and/or 8.8.4.4.
- Click OK.
-
Go to Settings.

-
Select the connection for which you want to configure Google Public DNS. For example:
- If you are using Wi-Fi, click Wi-Fi, click Hardware properties, then click Edit next to DNS server assignment.
- If you are using an ethernet connection, click Ethernet, then click Edit next to DNS server assignment.
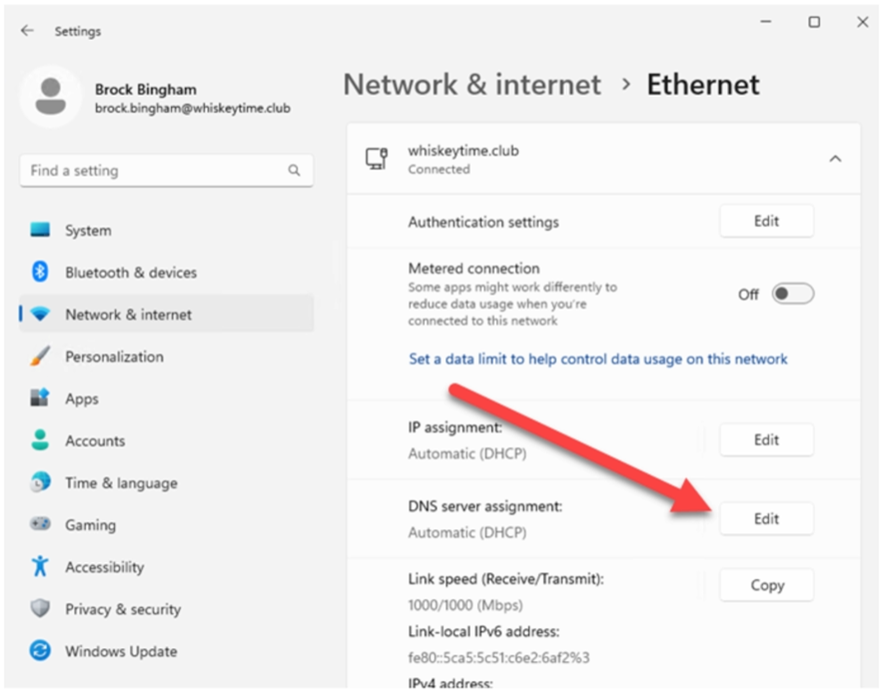
- Using the drop-down menu, select Manual, then toggle IPv4 to On. If there are any IP addresses listed in the Preferred DNS server or Alternate DNS server, write them down for future reference. Replace those addresses with the IP addresses of the Google DNS servers:
- For IPv4: 8.8.8.8 and/or 8.8.4.4.

Ontologies
Can I re-order an Ontology?
Can I re-order an Ontology?
<ontology_hash> into the user_client’s get_ontology method, perform the relevant changes, and call ontology.save() to commit the changes:Can I add images to descriptions to help my annotators create more accurate labels?
Can I add images to descriptions to help my annotators create more accurate labels?
Cloud Integrations
How do I set up an integration with Azure?
How do I set up an integration with Azure?
- By generating an account-level shared access signature (SAS).
- By using a service principal. Your user needs to be the admin of your Azure tenants for this method.
Can I use special characters in AWS S3 object names when importing data?
Can I use special characters in AWS S3 object names when importing data?
Can I set up download via internet URLs?
Can I set up download via internet URLs?
Why does my video buffer when I skip to a cached frame?
Why does my video buffer when I skip to a cached frame?
Buffering issues
How can I fix buffering issues in the editor?
How can I fix buffering issues in the editor?
Why does my video buffer when I skip to a cached frame?
Why does my video buffer when I skip to a cached frame?
API and SDK
How do I use the SDK to read, create, and update labels?
How do I use the SDK to read, create, and update labels?
How do I export metadata using Encord's SDK?
How do I export metadata using Encord's SDK?
How do I avoid hitting the timeout when using the get_project() method on the API?
How do I avoid hitting the timeout when using the get_project() method on the API?
Can I pre-select frames to label for a video using the SDK?
Can I pre-select frames to label for a video using the SDK?
Selected -> Yes.Share the ontology tree with Encord Support support@encord.com to allow us to match the import script with the feature uuid (featureNodeHash). Can I import models and model predictions?
Can I import models and model predictions?
How can I import labels via CVAT importer?
How can I import labels via CVAT importer?
What are Object Hashes?
What are Object Hashes?

