

To ensure seamless data loading in Encord, allowlist https://app.encord.com/ or https://app.us.encord.com/ in any 3rd party VPNs, firewalls, or URL isolators. This helps to prevent potential issues with opening your data in Encord.
Annotation Mode
Introductory Video Tutorials
The following video goes through the basics of annotating visual data in the Label Editor.
- A. Editor menu
- B. Quick toolbar
- C. Classes
- D. Instances and Frame labels
- E. Automated labeling
- F. Editor timeline (for videos and image sequences only)
- G. Annotation canvas: displays the media asset and provides interface for drawing and editing labels.
- H. Editor header
- I. Skip or Submit
Copy / Paste Labels & Instances
Using the copy and paste features in the Label Editor can significantly save time and effort. Here’s how you can efficiently use these features:- Copy: To copy both the label and the instance, use the keyboard shortcut CMD + C on Mac or Ctrl + C on Windows.
- Paste instance: To paste the copied instance, use CMD + V on Mac or Ctrl + V on Windows. Instances can only be pasted onto a different frame from where they were copied.
- Paste Label: To paste just the label / shape, use CMD + Shift + V on Mac or Ctrl + Shift + V on Windows. Labels can be pasted onto any frame.
- Clear Cuboid: To clear a copied 3D cuboid, use CMD + Shift + C on Mac or Ctrl + Shift + C on Windows with nothing selected.
Bulk Label Operations
Fixing incorrect labels is an important step in producing high-quality datasets. With bulk label operations, annotators can merge labels which should really be one instance, or efficiently delete multiple labels in bulk. Bulk label operations are accessed in the editor menu. Merge operations Merge one or more label objects into a single object.- Select all objects to be merged in the Select objects to be merged drop-down menu.
- Select the target object in the Select objects to be merged into field.
- Click Merge.
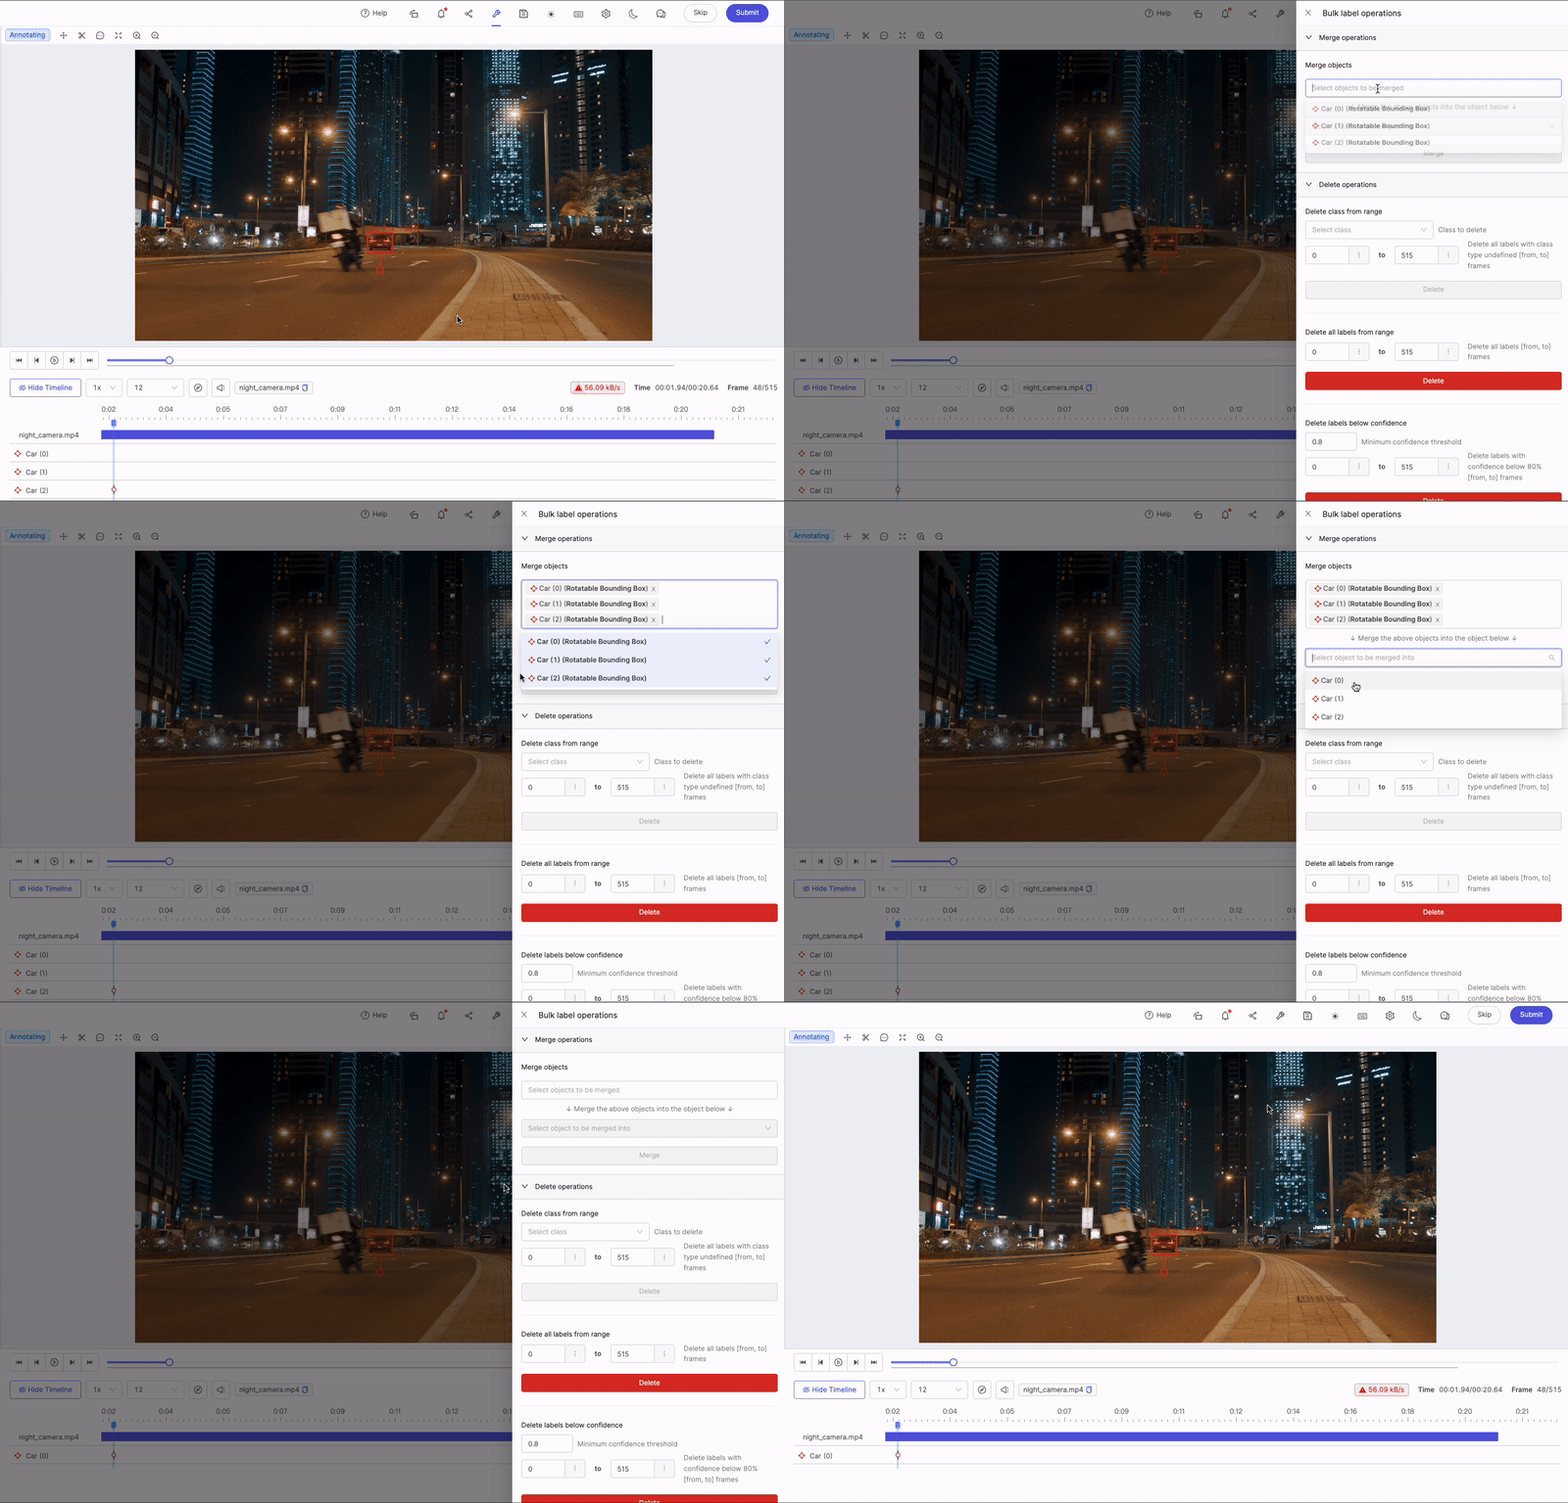
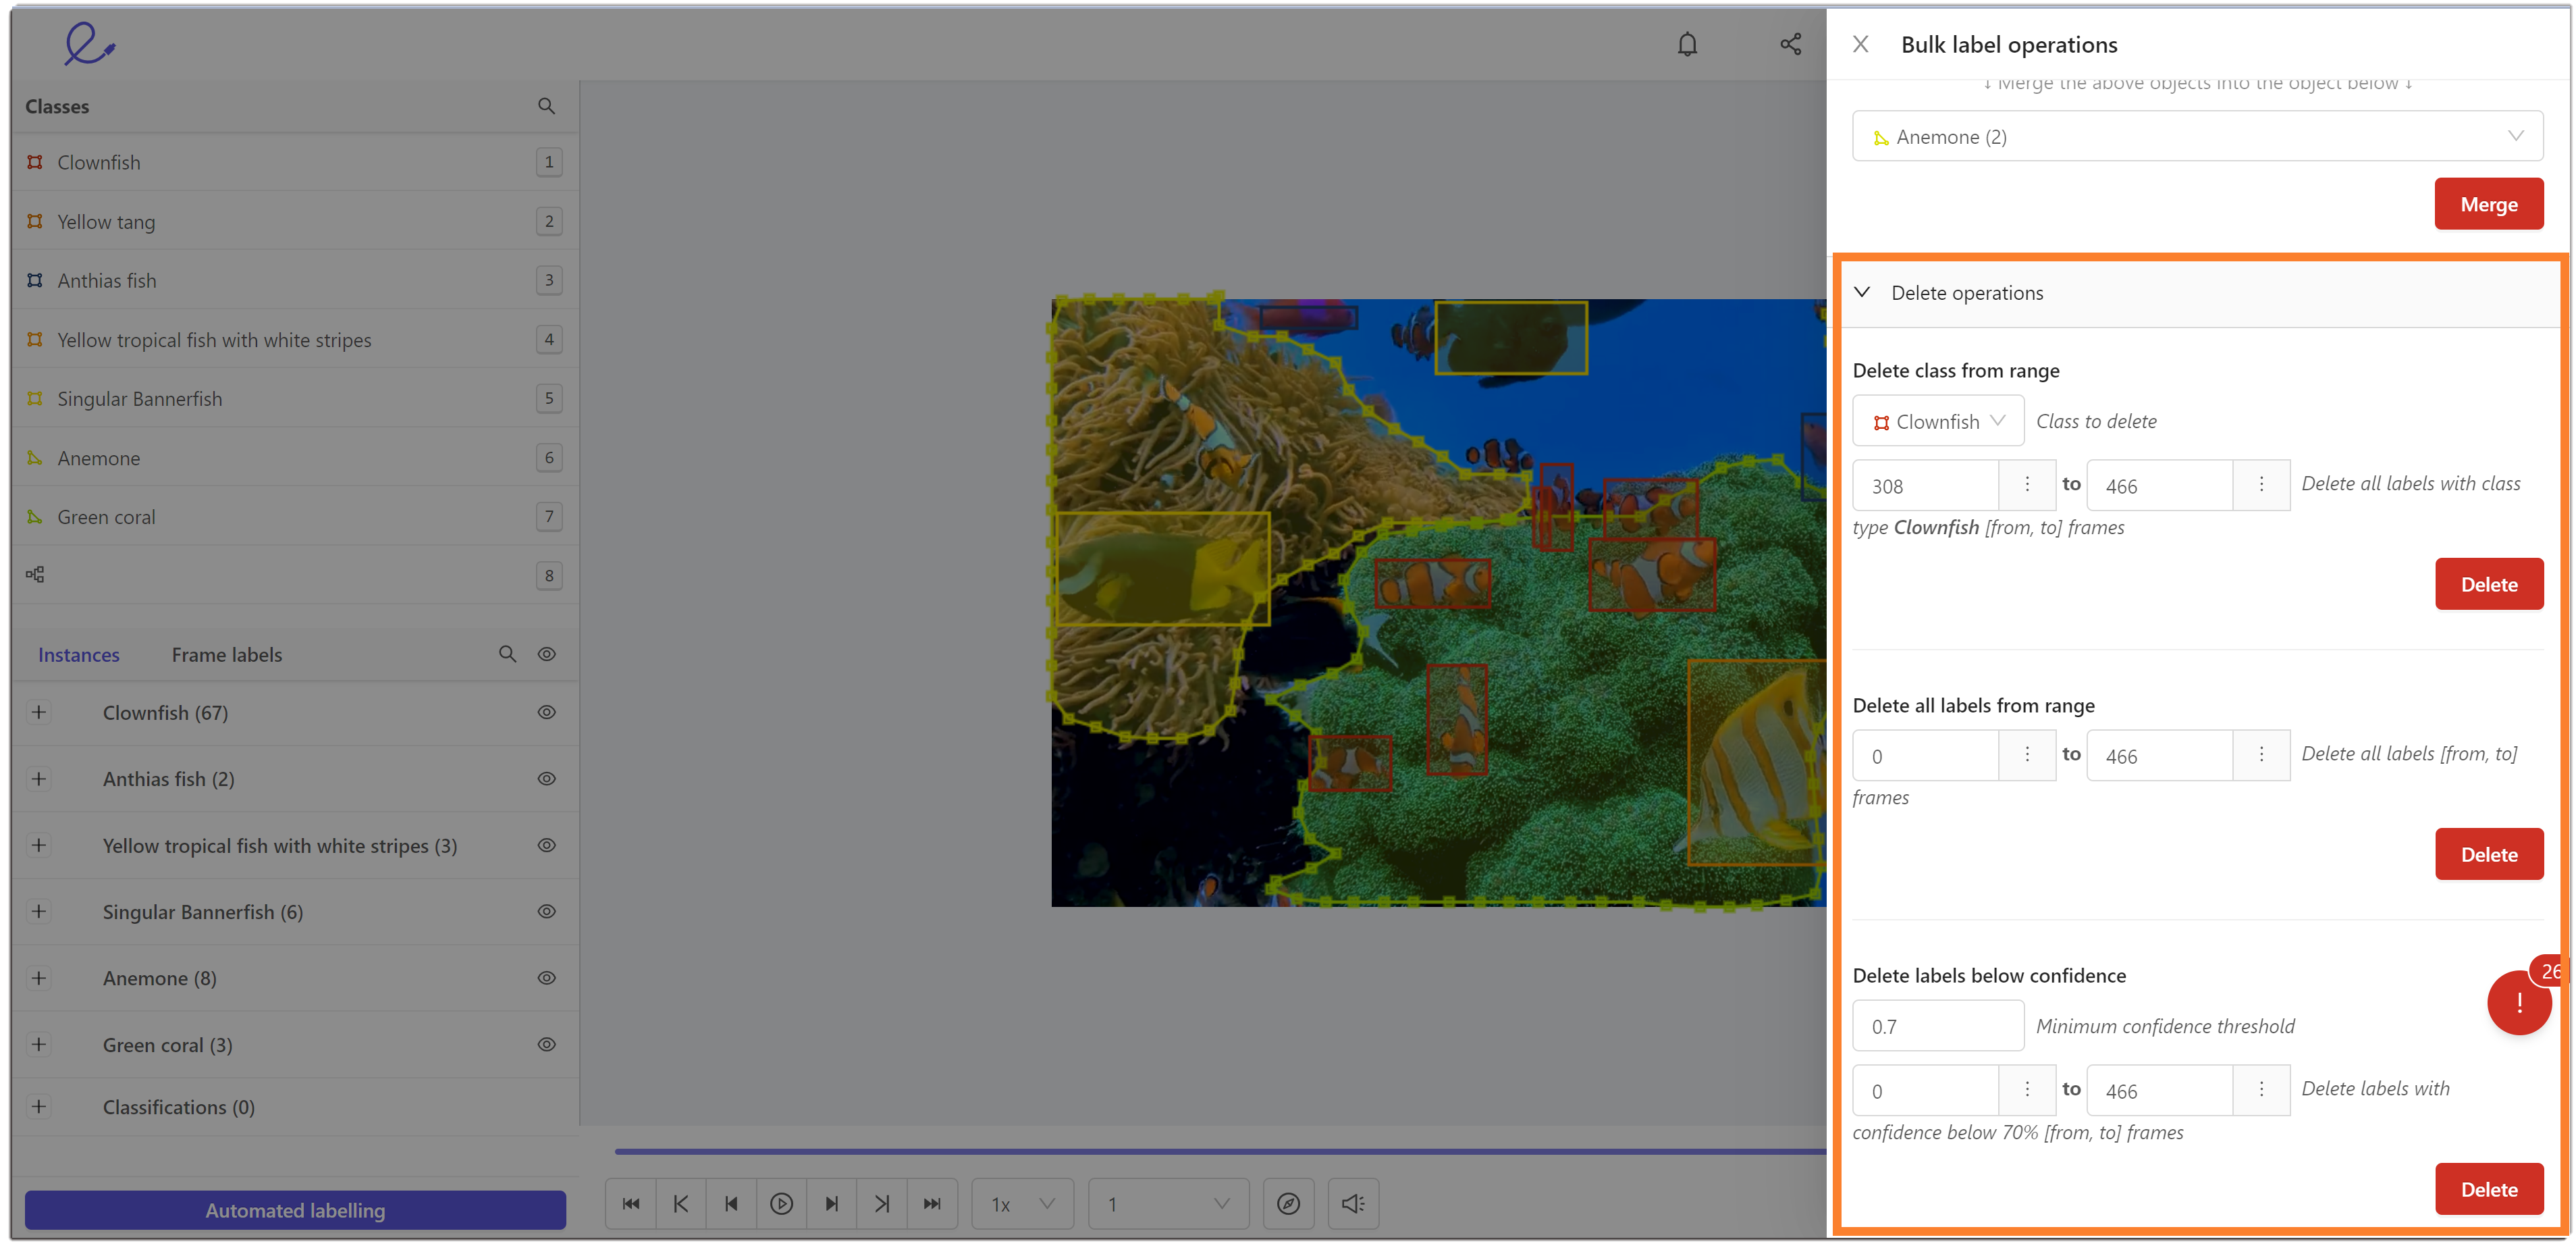
- Select a class to delete from the Select class menu.
- Specify the frame range.
- Click the Delete button.
- Navigate to the Delete all labels from range section.
- Set a range to delete labels from.
- Click Delete.
- Navigate to the Delete labels below confidence section.
- Set the minimum confidence threshold. All labels with a confidence value below this threshold are deleted.
- Specify a range of frames to delete the specified labels from.
- Click Delete.
Classes
In annotation mode, the Classes section of the Label Editor shows you the available Ontology classes, both objects and classifications. You can create a new instance by either clicking the desired class, or by using the indicated instantiation hotkeys. Learn more about Ontologies in general here or learn more about the details of Ontology structure on Encord.Instances and Frame labels
The canvas is your labeling area to annotate the instances of the Ontology classes.- An instance is a specific occurrence of a class. For example, if you have a class called “Car”, an instance of this class could be “Car(0)”, which might represent a specific black sedan. This single instance can appear in a single frame or a range of frames, and therefore, instances may contain multiple labels across frames. You can think of an instance as a unique object that belongs to a certain class.
- A frame label is a frame-specific annotation of an instance. For example, the annotation of “Car(0)” on frame 201 is a label. Labels are used to annotate instances in specific frames, providing more detailed information about the instance in the context of that frame.
Skip or Submit labels
Submit tasks Labels are applied in the Label Editor. Click the Submit button to submit your labels for review.
Skipping a task automatically creates an Issue and is therefore counted in the Issue Analytics.
- Click the Skip button to skip an annotation task.

- A dialog appears. Enter a reason for skipping the task - the reason is added as an issue to the task that annotators and reviewers can see. If no reason is entered “This task was skipped” is added by default.

Turbo mode
Turbo mode simplifies the standard annotation workflow, enabling annotators to rapidly assign or confirm attributes. Activate turbo mode and choose an instance from the top-left dropdown menu to set the instance and its relevant attributes. Enable turbo mode:- Open the editor settings.
- Use the search bar to search for Turbo mode.
- Enable the Turbo mode toggle.
- Enable Auto zoom, then enter a Zoom level percentage.
View Annotator Instructions
The Annotator instructions button is available in the top-left corner of the Label Editor if annotation instructions are provided by the Admin or Team Manager.
Confidence Score
Each instance or label is assigned a confidence score (denoted with the symbol α) that appears next to the label name. The confidence score is a measure of a machine learning model’s certainty that a given prediction is accurate. The higher the confidence score, the more certain a model is about its prediction. Manual labels are always assigned α = 100%, while label predictions created using models and automated methods such as interpolation have a confidence score below 100% (α < 100%).Labels pane
The Labels pane shows all the instantiated objects and classifications for a data unit. Objects are grouped first by class, and sorted by creation time within each class, with earlier objects on top. They are named in an “ABC (0)” format, where ABC is the Ontology class and 0 is the first instance annotation.
- A: Toggle between showing displaying all labels, or only labels in the current frame.
- B: Show / Hide details for this instance.
- C: The range of frames the instances appears on.
- D: Attributes the object has and the frames they appear on.
- E: Filter by frame range.
- F: Sort label instances.
- G: Search for an instance.
- H: Show / Hide labels.
- I: Show / Hide labels for this instance.
- J: Additional actions. Described below.
- K: Keyboard shortcut to create a label for this instance.
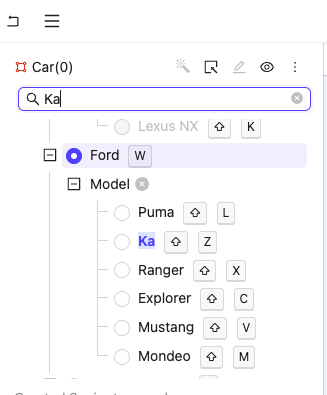
- L:Edit attributes for this instance.
- M: Add a new label for this instance.
- N: Toggle auto-annotation for SAM.


Attributes
The details pane allows you to modify attributes efficiently. For dynamic attributes, use the ‘Preserve chosen state’ feature. When this feature is toggled ‘ON’, any subsequent labels for that instance automatically inherit the same dynamic attribute value as the frame where ‘Preserve chosen state’ was enabled.Mentions and Quick Inserts
In an editable non-relation text attribute, type@ to mention an object that appears on the active frame, or type / to insert the active frame number or timestamp. Continue typing to filter the suggestions, then select the value you want to insert.
Relation text attributes do not support mentions.
Propagate Across Gaps
When you annotate objects that appear only on disjointed frame ranges (for example, an object present on frames 0–10, 20–30, and 40–50), setting a dynamic attribute value normally applies only to the contiguous sub-range containing the current playhead position. The Propagate across gaps setting extends this behavior so that the value automatically covers all later occurrences of the object.Propagate across gaps is off by default. When Limit to a single frame is also enabled, it takes precedence and Propagate across gaps has no effect.
- Open the Timeline settings menu in the video Label Editor.
- Navigate to the Dynamic attributes section.
- Enable the Propagate across gaps toggle.
Editor Timeline
The Editor Timeline is only available for videos, image sequences, PCD scenes, and audio files.
Bulk Actions
Labels and ranges can be multi selected on the timeline using Shift + click. Selected regions are shown in the left side of the editor.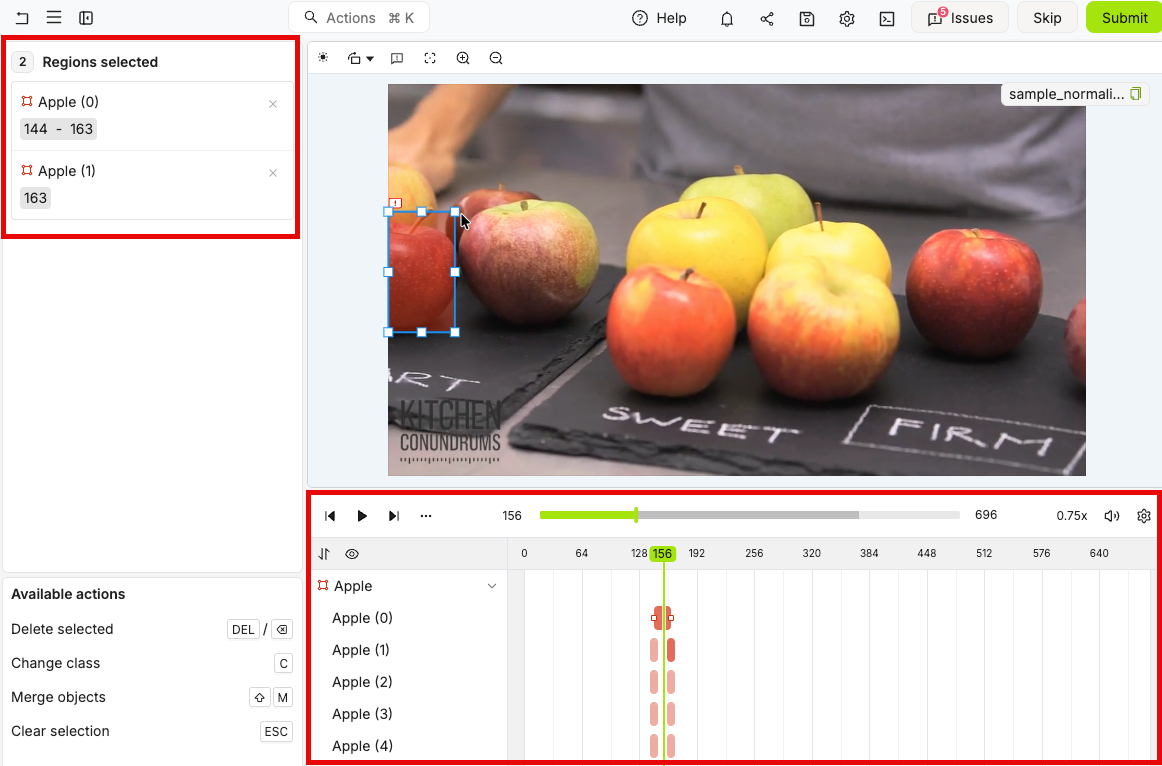
- Merge ranges: Merge the selected ranges into a single range.
- Play range(s): Selecting a range allows you to play the file for just that range. If multiple ranges are selected, the file will play for all of the selected ranges in chronological order.
- Change class: Change the class for all labels within the selected range(s).
- Change instance: Right-click selected object ranges and choose Change instance. Select a compatible object to move only those ranges into it; the source instances keep their remaining ranges, and the moved ranges take on the target’s identity and class. If all selected ranges belong to the same class, you can instead select Create New to combine them into a new instance of that class. Target objects must use the same annotation shape, and ranges that overlap cannot be combined into one instance.
Automated Labeling
Automated labeling includes several techniques to quickly create labels automatically.- Interpolation do not require set up or training, and are always available.
- SAM 2 Segmentation creates labels by clicking parts of your frame or image.
- SAM 2 tracking tracks objects across a range of frames using the [SAM 2] model.
- Click the Automated labeling button to open the Automated labeling panel.
- Select the type of automated labeling you want to use.
- Run automated labeling for the selected objects.
Edit Polygons and Polylines
Encord provides multiple tools to edit polygon and polyline labels after they have been created. See our tutorial video for an quick introduction on working with polygons in Encord.Watch a tutorial for working with polygons
Watch a tutorial for working with polygons
Move Vertex
Move Vertex
To move vertices:Click and drag a vertex to move it to a new location.
Add Vertex
Add Vertex
To add a vertex:You can add more vertices to a polygon after it has been created.
- Click the polygon you want to add a vertex to
- Click the position along the edge of the polygon you want to add a vertex. Repeat to add as many vertices as necessary.
Remove Vertex
Remove Vertex
To remove a vertex:You can remove the last vertex by pressing the Backspace key while still in draw mode.
- Click the polygon you want to remove vertices from
- Right-click a vertex to delete it
Extension Tool
Extension Tool
Use the polygon freehand tool to modify the edge of a polygon or polyline in a free-hand manner and create complex polygons.To use the freehand tool:
- Right-click the polygon you would like to edit.
- Click Edit with brush or press the J hotkey. A floating brush tool menu appears.
- Adjust the brush size to suit your needs.
- Mouse over location you would like to start editing from, and click and hold to start the edit process.
- Drag the cursor freely to draw out the new polygon edge let go of mouse to finish editing.
Eraser Tool
Eraser Tool
Use the eraser tool to remove any part of a polygon in a free-hand manner. To use the eraser tool:
- Right-click the polygon you would like to edit.
- Click Edit with brush or press the G hotkey. A floating brush tool menu appears.
- Select the eraser tool.
- Adjust the brush size to suit your needs.
- Mouse over location you would like to start editing from, and click and hold to start the edit process.
- Drag the cursor freely to draw out the new polygon edge let go of mouse to finish editing.
Merge Polygons
Merge Polygons
Merging polygons combines two polygons into a single polygonTo merge Polygons:
- Right-click the polygon you would like to edit.
- Click Merge with another polygon.
- Click the polygon you want to merge with.
Subtract Polygons
Subtract Polygons
Subtracting polygons removes the area one polygon from that of another.To subtract polygons:
- Right-click the polygon you would like to edit.
- Click Subtract another polygon.
- Click the polygon you want to subtract from your selected polygon.
Split a Polygon
Split a Polygon
Split a polygon that contains disconnected components to create a separate polygon object for each component on the displayed frame. The largest component retains the original object’s identifier, and the other components receive new identifiers in descending size order.To split a polygon:
- Right-click the polygon you want to split.
- Click Split polygon.
Polygon Brush
Polygon Brush
The Polygon brush allows you to create polygons in the same manner that bitmasks can be created with the brush tool.To create polygons with the brush:
- Click the polygon object from the left pane. The polygon tool dialog appears.
- Press
F or click the Brush icon. - Adjust the size and shape of the brush.
- Draw the polygon you need on the data unit in the Label Editor.
- Press
ENTER to complete the polygon.
Freehand Edge Touchup
Freehand Edge Touchup
Freehand edge touchup lets you refine a polygon by drawing a new edge between two vertices to adjust and close its shape.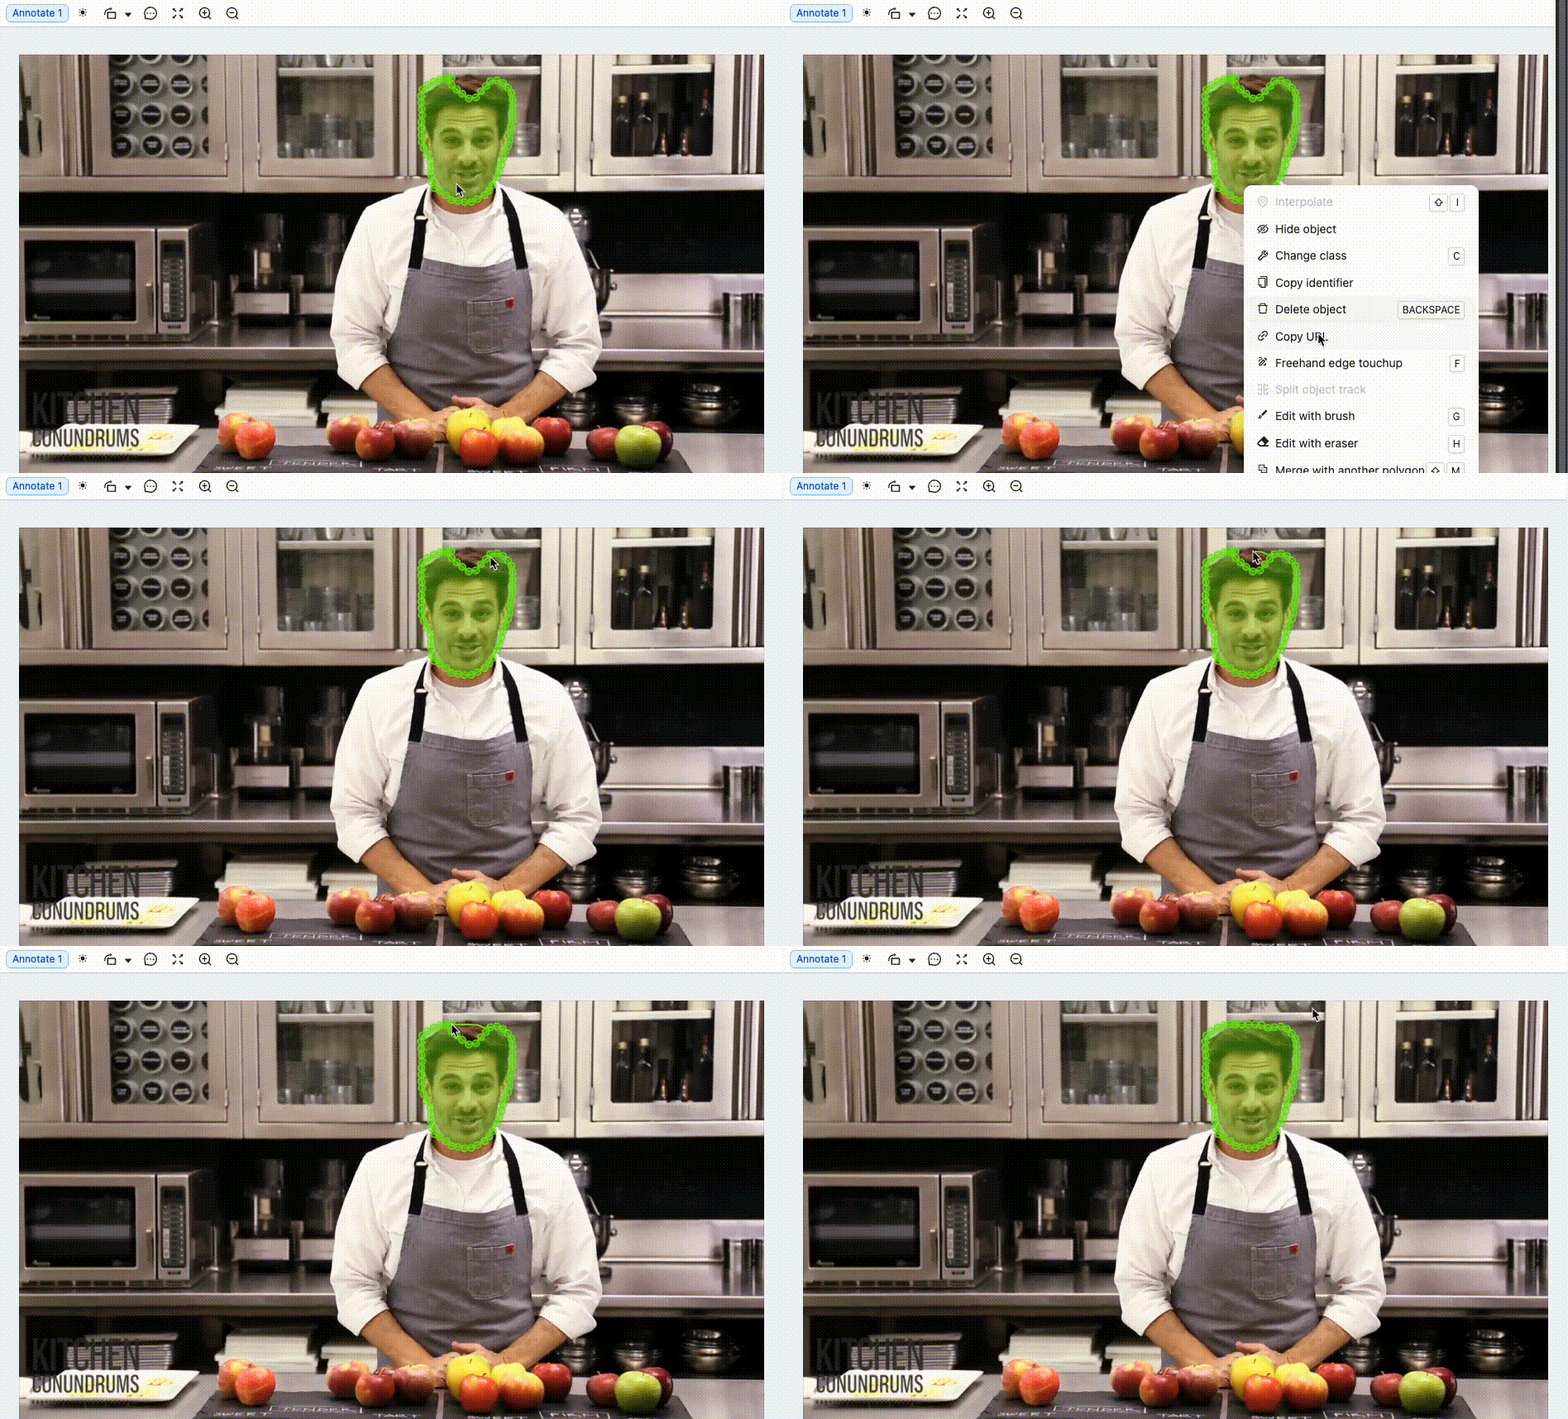 To use freehand edge touchup:
- Right-click the polygon you want to edit.
- Select Freehand edge touchup or press the F hotkey.
- Click the starting vertex for your new edge.
- Move the cursor to the target vertex where you want to close the shape.
- Click to finalize the edit.
Editor Canvas Interactions
Shape-specific interactions:
Right-click interactions:
Multi-Select Panel
When you select multiple annotations in the Label Editor, a specialized multi-select panel appears in the left sidebar. This panel provides a streamlined interface for managing multiple selected objects and classifications simultaneously.Overview
The multi-select panel displays when you have two or more annotations selected and offers:- A count of selected items displayed in a pill badge
- A list of all selected objects and classifications with their names
- Individual deselection controls for each item
- Bulk actions that can be applied to all selected annotations
Using the Multi-Select Panel
1
Select multiple annotations
Hold Shift and click on multiple objects or classifications in the canvas or labels pane to select them.
2
View selected items
The multi-select panel automatically appears in the left sidebar, showing the count of selected items and listing each annotation by name.
3
Deselect individual items
Click the X button next to any annotation name to remove it from the selection.
4
Apply bulk actions
Use the available bulk actions to perform operations on all selected annotations at once.
The multi-select panel is available for both objects (bounding boxes, polygons, etc.) and classifications, allowing you to work with mixed selections efficiently.
Multi-Select Panel Features
Selected item display: Each selected annotation appears as a row showing:- The annotation name and type
- Frame range information where the annotation appears
- A close button to deselect individual items
- Bulk deletion
- Class changes
- Attribute modifications
Label Branches
Label branches let you keep multiple versions of a Project’s labels side-by-side. Use them to preserve a labeled state before a re-labeling pass, run an experiment without disturbingmain, or hold a reviewer-only copy of labels.
Create Label Branches
Label branches are created in the Label Checkpoint Workflow stage, or using the SDK.View Label Branches

This feature is only available to Workspace and Project Admins, and Team Managers in the REVIEW and COMPLETE Workflow stages.
- Click the Branches button in the Label Editor header. The branch overlay panel opens.
- Select the checkboxes for the branches you want to overlay. Each branch displays with a unique color indicator.
- Click outside the panel to close it. The selected branch labels now appear as read-only overlays in the 3D scene.
Branch label comparison is available in Review and Complete editor views — no feature flag or admin configuration required. Overlay labels are read-only. You cannot edit annotations from other branches directly in the overlay view.
Audio and text-document modalities do not yet display branch names on overlay labels. The vertical fan-out uses fixed pixel offsets and is not collision-aware; in very dense scenes with many overlapping annotations, labels from multiple branches may still be difficult to read.
Multi-Tile Label Operations
In Projects with multiple data tiles, label operations (tracking, interpolation, and deletion) now target the specific tile where the label is located, ensuring accurate operations across different data sources.
- Tracking operations apply to objects within their specific tile
- Interpolation works within the correct tile’s frame range
- Label deletion removes labels from the appropriate tile
- Navigation automatically switches to the correct tile when needed
Download Bitmask Annotations as PNG
You can download bitmask annotations directly from the Label Editor as PNG image files without running a full project export. Each downloaded PNG renders the bitmask in its assigned annotation color. Download a single bitmask Right-click a bitmask annotation on the canvas and select Download bitmask as image. The editor downloads a PNG file for that bitmask. Download multiple selected bitmasks Select two or more bitmask annotations (hold Shift and click each one), then right-click any selected bitmask and choose Download bitmasks as image. The editor composites all selected bitmasks into a single PNG file. Download all bitmasks on the current frame Right-click anywhere on the canvas background (not on an annotation) and select Download all bitmasks as image. This option appears only when at least one bitmask annotation exists on the current frame. The editor composites all bitmasks on the frame into a single PNG file.The Download bitmask as image and Download bitmasks as image options appear only for bitmask-type annotations. Non-bitmask shapes do not show these options in their context menus.
<data_title>_frame_<frame_index>_<label>.png
- Special characters in the data title are replaced with underscores.
- For a single bitmask,
<label>uses the annotation name and object ID. - For multiple selected bitmasks,
<label>isbitmasks. - For the canvas-level download,
<label>isall_bitmasks.
If a download fails, the editor displays an error notification.
Controls Common To Both Modes
Editor Timeline
The Editor timeline visualizes when objects and instances appear throughout videos, scenes, and audio files. The cursor tracks playback in real time, always reflecting the current frame. The timeline is shown by default and can be resized or hidden by dragging it up or down.Editor Header

| Icon | Name | Description |
|---|---|---|
 | Help | Links to the: quick start guide, documentation, learning hub, and Encord support team. |
 | Notifications | Shows the current status and history of actions taken in the application. This includes uploading datasets, training models, and exporting labels. |
 | Share | Copies the URL of the asset currently being labeled or reviewed. |
 | Save labels | Manually saves labels on the Encord server. |
 | Label Editor settings | Settings controlling your labeling and reviewing experience. |
 | Open metadata | Display any metadata for the current asset. |
 | Overlay label branches | Choose which label branches to display for the current asset. |
Quick Toolbar

- Display settings: adjust brightness, contrast, and gamma, or select Show grid to overlay a grid on images, image groups, and videos. In Grid settings, set the grid size in pixels, color, and opacity. Your display settings persist across sessions.
- Rotate the asset
- Pin a new Issue
- Center the asset
- Zoom in and out, view the rounded zoom percentage, and click the percentage to reset the zoom to 100% or the nearest permitted zoom limit
Actions
The actions bar allows your to search for and access any actions and features within the Label Editor, for both the Annotate and Review modes.Issues and Comments
Issues can be added to annotation and review tasks to communicate with other users. All issues contain comment threads relating to the entire task or specific sections of the task. A small notification badge on the Issues icon displays the number of unresolved issues in a task. Types of Issues:- Label rejection: Created when a reviewer rejects labels. The reviewer is prompted to provide a reason for the rejection in the form of a comment. If all instances in a frame or image are rejected, a separate rejection issue is created for each label. Labels with rejection issues display a red Issues icon next to the instance name, which turns green once the issue is resolved.
- File: Apply to the entire file and can be created at any stage within the Label Editor.
- Pinned: Apply to a specific part of the file or frame and can be created at any stage within the Label Editor. Red Pin icons indicate unresolved issues and remain red until they are marked as resolved.
- Frame: Apply to a specific frame and can be created at any stage within the Label Editor. Frame issues can only be created when multiple frames are present; such as in a video, image sequence, or DICOM volume.
- Frame range: Apply to a range of frames and can be created at any stage within the Label Editor. Frame range issues can only be created when multiple frames are present; such as in a video, image sequence, or DICOM volume. Frame range issues can only be created during label validation.
- Task requirement: Are created for each object or classification marked Required in the Ontology. The issue is resolved when the required object or classification is applied. Task requirement issues are the only issues visible in a Consensus annotate stage.
Issues cannot be created in a Consensus annotate stage.
- Open the Issues pane by clicking the Issues icon.
- Click the New issue icon (or keyboard shortcut Ctrl+N).
- Click the Apply to dropdown to select the type of issue you want to create.
- Select any Issue Tags you want to apply to the issue.
- Add a comment to the issue.
- If you selected ‘Pin on canvas’ in Step 3, click the desired location on the canvas.
- Click Create issue.
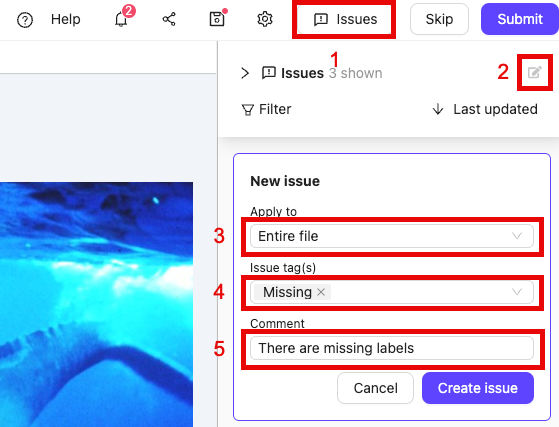
- Open the Issues pane by clicking the Issues icon.
- Click the tick to mark a thread as resolved.
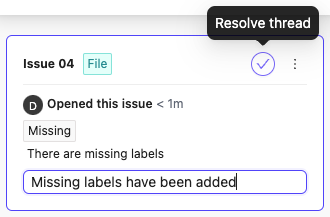
- Open the Issues pane by clicking the Issues icon.
- Click the Ellipsis icon to show more options.
- Click Delete thread.
Users can only delete issues that they created. Label rejections cannot be deleted, only resolved.
- Open the Issues pane by clicking the Issues icon.
- Click Reopen on an issue that was previously resolved.
- Ask questions: Annotators and reviewers can ask questions about the task. Admins can use this feedback to improve guidance.
- Explain task rejection: Reviewers can provide reasons for rejection, helping annotators avoid repeating mistakes.
- Track unresolved issues: Keep a record of open discussions that need follow-up before finalizing annotations.
Editor Lock
The ‘Editor lock’ is a safety feature we implemented to prevent several people making changes to the same file - annotators labeling, or reviewers reviewing the same data unit. A warning is triggered in two cases:- When you have the same task open in two different tabs or browser windows:

- When a different user is editing the same task:
